The PixyCam is a useful sensor that can detect various colors. As part of my involvement in an independent undergraduate research class at UCI, my goal was to get the PixyCam to communicate with Texas instruments MSP432 microcontroller. This project simply explains how to connect and display detect data in the serial monitor. There is a demo video at the bottom of this project that quickly illustrates the same information that is displayed below. Future projects may including getting the MSP432 to communicate with the PixyCam2, using the UART interface, and using the PixyCam with additional code in Code Composer Studio (CCS), such as programming the motors on Texas Instruments Robotics System Learning Kit (RSLK) and using the PixyCam to detect the color red which will stop the motors.
Project Issues:
First of all, I want to start by address some issues that I faced during this project. There was an issue trying to get the PixyCam to communicate with the MSP432 via UART. This is an ongoing issue that I have not figured out a solution for yet. In addition, I experienced some issues when using the PixyCam2 library with the MPS432 microcontroller. The library code produces errors when I attempt to verify or upload the code. This is an issue that I plan to analyze and hopefully solve in the future. Now let's get started with this project.
Connecting to the PixyCam:
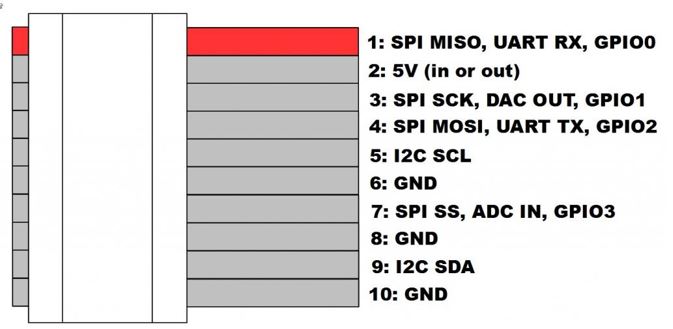
To connect the PixyCam to the MSP432, you should first choose which serial Interface you would like to use. For this project, I will be using I2C. Below is a diagram showing what each pin on the PixyCam is used for.
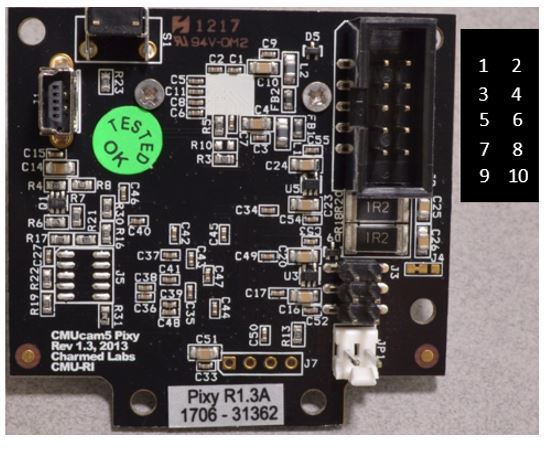
The picture above shows the PixyCam with a box next to it to illustrate the corresponding pin locations.
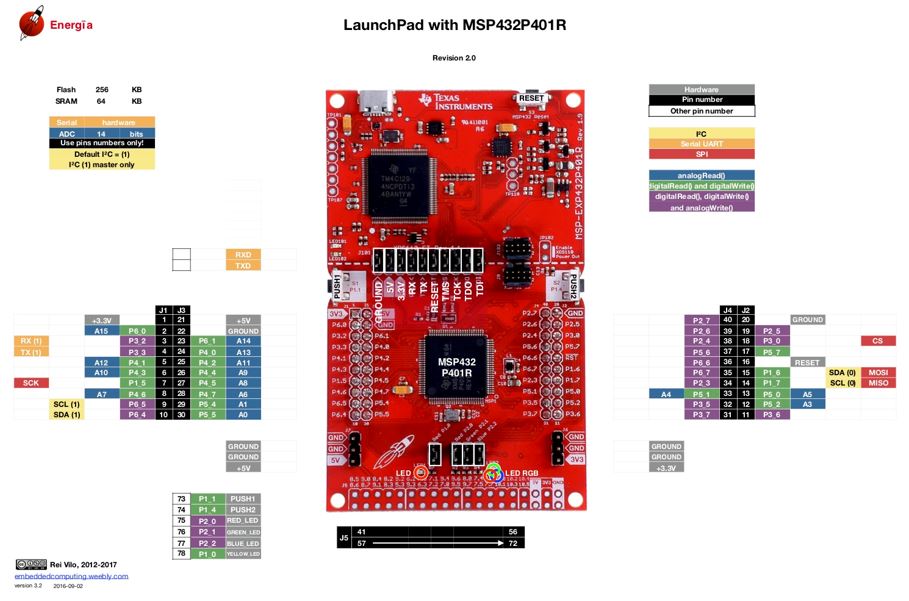
For I2C, we will be using Pin 5, Pin 9, and Pin 10. Below is a picture of the pin map for the MSP432. You will need to access the ground, SCL (1), and SDA (1) on the MSP432.
Make the following connections:
Pin 10 (GND) – Any GND on MSP432
Pin 9 (I2C SDA) - P6.4( SDA 1 )
Pin 5 (I2C SCL) – P6.5 ( SDA 1 )
You can connect to either the top of bottom of the MSP432. Here is an example of what these connections will look like.
You can find more information about connecting to the PixyCam here: http://www.cmucam.org/projects/cmucam5/wiki/Porting_Guide
Now that you have the PixyCam connected to the MSP432, you will need to download the required software.
Download Energia here:
Download the MSP432 Driver here:
https://energia.nu/pinmaps/msp-exp432p401r/
Instructions to install board managers in Energia here:
http://energia.nu/guide/boards/
Download PixyMon and the PixyCam library here:
https://pixycam.com/downloads-pixy1/
Import PixyCam library in Energia:
Click Sketch -> Include Library -> Add.Zip Library, then locate.zip folder location and click open.
Open the I2C example code in Energia:
Make sure the MSP432 board is selected:
Make sure the correct COM port is selected.
You can check the device manager to determine which com port should be selected.
Next, Open PixyMon program and then click configure.
Configuring the PixyCam:
Set the Data out port to I2C.
Set the I2C address to the address set in the Energia code.
Set the Baudrate to match whatever baudrate that you choose in the Serial.begin( ) statement in the setup function.
Now click Display raw video:
Set a signature in PixyMon under the action tab. You can make a box over the color that you want the PixyCam to detect.
Next, click home button to send data from PixyCam to Energia.
Now, upload the i2c code to the MSP432:
Click the button in the top right to open the Serial Monitor
Now, you should see some data displayed in the serial monitor. Here is an example of some data that you might see.


_wXEXmnY0RY.png?auto=compress%2Cformat&w=900&h=675&fit=min)


Comments
Please log in or sign up to comment.