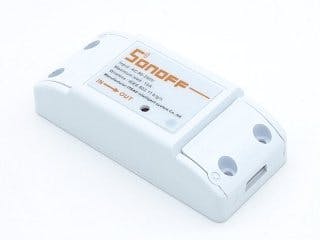
In this guide you will learn how to control any 110-240V appliance for $5, using Itead's SONOFF device. Compared to the $30 WiFi smart plugs out there, the SONOFF is a great alternative for making a smart home and even industrial IoT projects on a larger scale. Moreover, it is based on the popular ESP8266 Wi-Fi chip, making it compatible with the Arduino environment and other resources like our ESP libraries at Ubidots.
The SONOFF comes with its own firmware and mobile app, but we think that its main value actually lies in its form-factor and low price. This is why we decided to do some hacking and unleash its full power!
OverviewThe SONOFF contains a relay, an ESP8266 WiFi chip and the required circuitry to power it with the AC line of a power outlet. It also comes in a nice package that makes it look more professional than an average DIY project at home.
RequirementsSetup1. Disassemble the SONOFF device, this is to access the SONOFF TTL pinout, which we'll need to program the onboard ESP8266. You will need to solder four pins, these are shown in the picture below.
2. Connect the UARTbee pins to the SONOFF pins, following this pinout:
- UARTbee - SONOFF
- VCC - VCC
- TX - RX
- RX - TX
- GND - GND
3. In the Arduino IDE, click on Files -> Preferences and enter this URL into the Additional Boards Manager URLs field, to be able to access ESP8266's libraries for Arduino:
http://arduino.esp8266.com/stable/package_esp8266com_index.json
This field supports multiple URLs. Separate them with commas in case you already have other URLs typed.
4. Open the Boards Manager from Tools -> Board menu and install ESP8266 platform. After installation, go to the Tools > Board menu and select the board: Generic ESP8266 Module.
5. Download the UbidotsMicroESP8266 library here
.
6. Now, click on Sketch -> Include Library -> Add .ZIP Library.
7. Select the .ZIP file of UbidotsMicroESP8266 and then click on “Accept” or “Choose”.
8. Close the Arduino IDE and open it again.
Create a Ubidots Variable1. Login in your Ubidots account.
2. Go to Sources and click on the orange plus symbol.
3. Set the name to the Data source.
4. Create a new variable for relay.
5. Copy the variable ID.
Now, to control the SONOFF device you will need create a button widget in you Ubidots account. This widget will set your RELAY variable to either "1" or "0":
1. Go to Dashboard and click on the orange plus symbol.
2. Click on Control -> Switch and select the Data source and Variable to control created before.
Here is the code that turn on/off the SONOFF device, to use this code don't forget to change TOKEN and ID with your Ubidots' account token and the variable ID we just created. Change WIFISSID and PASSWORD with your network credentials.
To upload the code into the SONOFF you will need to:
1. Connect the UARTbee to your PC's USB.
2. Press SONOFF's button and unconnect the USB at the same time.
3. While still pushing the button, connect again the USB.
These steps are meant to bring the SONOFF into programming mode.
When you're ready, upload the code from the Arduino IDE:
#include "UbidotsMicroESP8266.h"
#define ID  "223e6b1176254235a7xxxxx"  // Put here your Ubidots variable ID
#define TOKEN  "bbN8FrVulRYGuPTkaaaiR9Myxxxxx"  // Put here your Ubidots TOKEN
#define WIFISSID "WiFi_SSID"
#define PASSWORD "WiFI_PASSWORD"
#define RELAY 12
#define LED 13
Ubidots client(TOKEN);
void setup(){
  Serial.begin(115200);
  delay(10);
  pinMode(RELAY, OUTPUT);
  pinMode(LED, OUTPUT);
  digitalWrite(LED, HIGH);
  client.wifiConnection(WIFISSID, PASSWORD);
}
void loop(){
  float value = client.getValue(ID);
  Serial.println(value);
  if (value == 1.00) {
      digitalWrite(RELAY, HIGH); //On relay
      digitalWrite(LED, LOW); //On led
  }
  if (value == 0.00) {
      digitalWrite(RELAY, LOW); //Off relay
      digitalWrite(LED, HIGH); //Off led
  }
}
Now it's time to make things "smart" by adding your SONOFF to them; control your lights, open or close your garage, etc.


Comments
Please log in or sign up to comment.