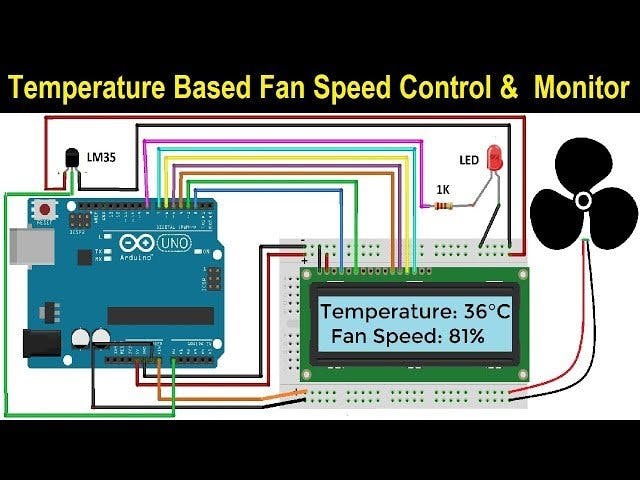
In this article, you are going to learn about Arduino temperature controlled fan using DHT22 sensor and relay. We will use the DHT22 sensor to get the temperature value and we will print this temperature value on the LCD. Then we will check if the temperature value is greater than 35 or not, if the temperature will be greater than 35, then the relay will be activated and the fan will start to rotate.
IntroductionTemperature controlling is required in many places such as server rooms, houses, industries, etc. So this project can be very useful in understanding the basics, how you can control the temperature at your home. You can take this as a DIY project which can be used anywhere. Here the Temperature controlled fan will act to the temperature changes.
This project Sponsor by NextPCB
NextPCB is one of the most experienced PCB manufacturers in Global, has specialized in the PCB and assembly industry for over 15 years. Not only could NextPCB provide the most innovative printed circuit boards and assembly technologies in the highest quality standards, the fastest delivery turnaround as fast as 24 hours.
Guys if you have a PCB project, please visit their website and get exciting discounts and coupons
Only 0$ for 5–10pcs PCB Prototypes :- Click Here
Register and get $100 from NextPCB :- Click Here
See more info about PCB Assembly Capabilities: Click Here
How does it Work?This project works in three parts -
In the first step, the sensor senses the temperature by temperature and humidity sensor namely DHT11.
In the second step, the sensor's output is taken and conversion of temperature value into a suitable number in Celsius scale is done. The fan speed is controlled by using PWM signals. And last part of the system shows humidity and temperature on LCD and Fan runs.
Then we have programmed our Arduino according to the requirements. Working on this is very simple. We have generated PWM from Arduino and put it at the base terminal of the transistor. Then transistor generates voltage with respect to the PWM input.
ConnectionsBelow are the components that we require to perform this project.Most of the components are easily available on our website.
Step 1 : Gather all these components
1.1 Components required
- Arduino UNO
- USB A to B
- Breadboard
- DHT11 sensor
- DC Fan
- 2n2222 transistor
- 16x2 LCD
- Connecting wires
Connections of thisare very easy to do, here an LCD is connected for displaying temperature and Fan speed Status.
Step 2 : LCD connection with Arduino
LCD is directly connected to Arduino :
Connect pins of LCD- RS, EN, D4, D5, D6, and D7 to Arduino's digital pin numbers 7, 6, 5, 4, 3, and 2.
Step 3 : DHT 11 temperature and humidity sensor connection
And a DHT11 sensor module is also connected to digital pin 12 of Arduino. Digital pin 9 is used for controlling fan speed through the transistor.
Step 4: Upload the code
The below section is for the code. Here the first table gives you an idea of what PWM value will be the speed of the fan. You can change values according to your need.
CodeBefore writing the code, please refer to the below table.
We included the libraries for the DHT22 sensor and for the LCD.
The libraries will help to make the code easier. Since we are using libraries, we must make sure that the libraries we are using are installed in our Arduino IDE. To install in the Arduino IDE, go to the Sketch tab, drop down to Include Library, and click Manage Library. In the Library Manager search for DHT and LiquidCrystal then install.
#include "DHT.h"
#include "LiquidCrystal.h"
PWM Values vs Speed
//NextPCB
#include "DHT.h"
#include<LiquidCrystal.h>
LiquidCrystal lcd(7, 6, 5, 4, 3, 2);
#define DHTPIN 12     // what pin we're connected to


#define DHTTYPE DHT11   // DHT 11

#define pwm 9

byte degree[8] =
              {
                0b00011,
                0b00011,
                0b00000,
                0b00000,
                0b00000,
                0b00000,
                0b00000,
                0b00000
              };
// Initialize DHT sensor for normal 16mhz Arduino
DHT dht(DHTPIN, DHTTYPE);

void setup() {
  lcd.begin(16, 2);
 lcd.createChar(1, degree);
 lcd.clear();
 lcd.print("   Fan Speed  ");
 lcd.setCursor(0,1);
 lcd.print("  Controlling ");
 delay(2000);
 analogWrite(pwm, 255);
 lcd.clear();
 lcd.print("Robu ");
 delay(2000);
  Serial.begin(9600);
  dht.begin();
}

void loop() {
  // Wait a few seconds between measurements.
  delay(2000);

  // Reading temperature or humidity takes about 250 milliseconds!
  // Sensor readings may also be up to 2 seconds 'old' (its a very slow sensor)
  float h = dht.readHumidity();
  // Read temperature as Celsius
  float t = dht.readTemperature();
  // Read temperature as Fahrenheit
  float f = dht.readTemperature(true);

  // Check if any reads failed and exit early (to try again).
  if (isnan(h) || isnan(t) || isnan(f)) {
    Serial.println("Failed to read from DHT sensor!");
    return;
  }

  // Compute heat index
  // Must send in t in Fahrenheit!
  float hi = dht.computeHeatIndex(f, h);

  Serial.print("Humidity: ");
  Serial.print(h);
  Serial.print(" %\t");
  Serial.print("temperature: ");
  Serial.print(t);
  Serial.print(" *C ");
  Serial.print(f);
  Serial.print(" *F\t");
  Serial.print("Heat index: ");
  Serial.print(hi);
  Serial.println(" *F");

    lcd.setCursor(0,0);
  lcd.print("temp: ");
  lcd.print(t);   // Printing terature on LCD
  lcd.print(" C");
  lcd.setCursor(0,1);
   if(t <20 )
    {
      analogWrite(9,0);
      lcd.print("Fan OFF            ");
      delay(100);
    }

    else if(t==26)
    {
      analogWrite(pwm, 51);
      lcd.print("Fan Speed: 20%   ");
      delay(100);
    }

     else if(t==20)
    {
      analogWrite(pwm, 102);
      lcd.print("Fan Speed: 40%   ");
      delay(100);
    }

     else if(t==28)
    {
      analogWrite(pwm, 153);
      lcd.print("Fan Speed: 60%   ");
      delay(100);
    }

    else if(t==29)
    {
      analogWrite(pwm, 204);

      lcd.print("Fan Speed: 80%    ");
      delay(100);
    }
     else if(t>29)
    {
      analogWrite(pwm, 255);
      lcd.print("Fan Speed: 100%   ");
      delay(100);
    }
  delay(3000);
}
Add the two libraries to your Arduino IDE through Library Manager.
Then we initialized the pins where we have connected the LCD and the DHT22 sensor. After that, we defined the type of DHT sensor that which DHT sensor we are using. There are many other types of DHT sensor are available like DHT11 so it is important to define the type here.
In this article, we learned about, how we can make a temperature-controlled fan circuit. Using an Arduino, DHT11, and few other components.


_ztBMuBhMHo.jpg?auto=compress%2Cformat&w=48&h=48&fit=fill&bg=ffffff)


Comments
Please log in or sign up to comment.