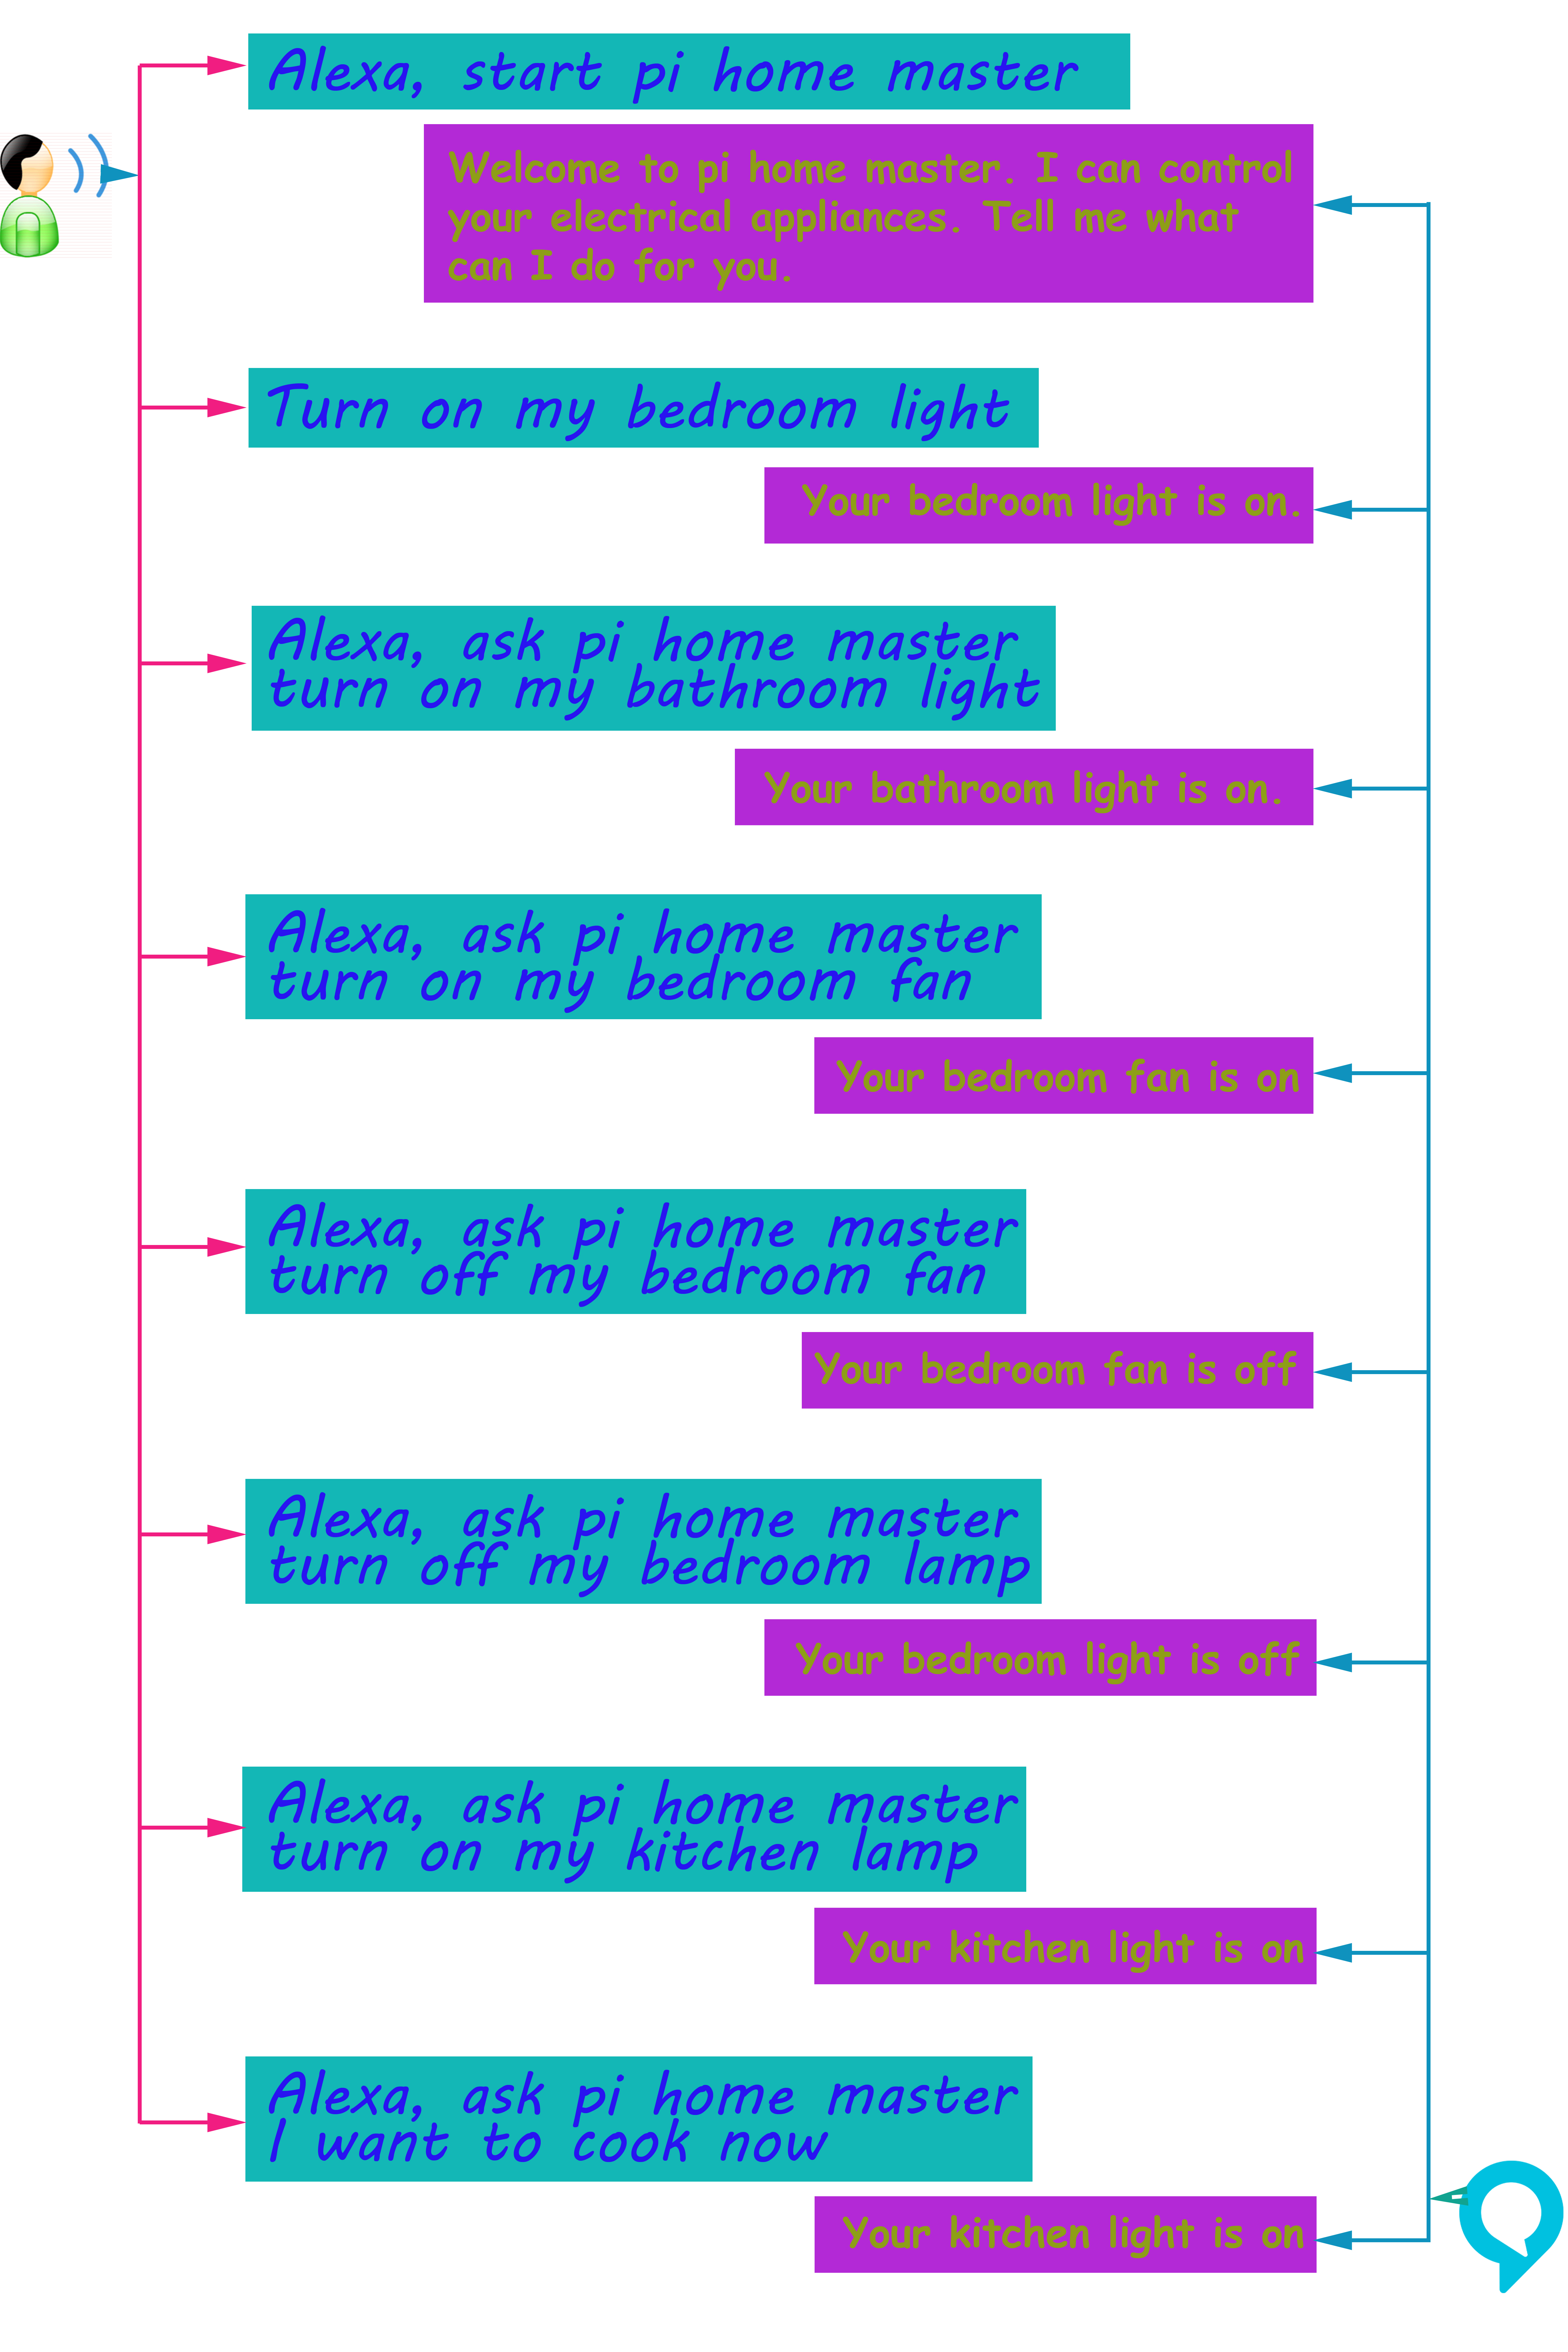
The Internet of Voice has come and now you can monitor and control all various devices in your home by using the sound of your voice, Amazing!!! Amazon Alexa and Raspberry Pi made the thing supper easy and now every hobbyist can enter in the era of hands-free home control using Alexa Voice Service.
Getting started with a voice controlled smart home is easier than you might think, and it won’t cost you much money either. You just need a Raspberry Pi with Alexa Voice Service.
In this project I will give you complete instruction to convert the dream to reality. I made the project to control 4 appliances and I used a Raspberry Pi to do this. Single Raspberry Pi is used for dual purpose. I is serving as a Alexa Voice Client and Paho MQTT client at the same time. You may use Amazon ECHO device for Alexa Voice Service. If you do so then you can escape first two steps (STEP 1 & STEP 2). For voice interface you require Alexa custom voice skill. Don't worried, making Alexa custom voice skill is very easy.
I developed a custom voice skill for my project and the skill was published and now live in the link below.
http://alexa.amazon.com/spa/index.html#skills/dp/B01KLHL8JS/?ref=skill_dsk_skb_ca_4
Skill ID: amzn1.ask.skill.2b38790d-905a-4005-ad73-908f63e1622f
Project DemoI hope you already watched demo video of my project. If you like it let's start making it.
For easy understanding I divided full project documentation into several steps. Follow step by step, I think you will enjoy it. If you have Amazon Echo device and want to use that ignore first two steps.
Amazon Developer Account SetupIf you are not already enrolled, setup an Amazon Developer Account which will allow the development of Alexa Voice Service and many more. Follow the link: https://developer.amazon.com/home.html
STEP 1.Setup Alexa Voice Service1. Log in to Amazon Developer Console and get started with Alexa Voice Service.
2. Click to Register a Product Type and select Device.
3. Give a Device Type ID and Display Name and then click to Next.
4. Select Create a new profile from the drop down.
5. Choose a name for the Security profile and give a description and then click to Next.
6. Your Security profile is ready. Click to Next.
7. Click Web Setting tab and configure it like the picture below.
Click to Add Another and add the IP address of your Raspberry Pi.
8. Put necessary information and click to Next.
9. Select No and Click to Submit.
10. You are now successfully registered to Alexa Voice Service.
Full instructions to make your Pi into an Alexa Client is available in AVS official Github page (https://github.com/amzn/alexa-avs-raspberry-pi) but I found it more easy to Sam Machin Github page (https://github.com/sammachin/AlexaPi).
1. Clone the repo to your Pi using the terminal. Type:
sudo git clone https://github.com/sammachin/AlexaPi.git
2. Go to AlexaPi directory and Run the setup script
./setup.sh
3. Wait for a while to ask your security profile information. Enter all information (product ID, Security profile ID, Client ID etc.) from the security profile of AVS when ask.
4. Open your browser and type your Pi IP address with port 5000 e.g. (http://192.168.1.104:5000). Just replace IP with your own.
You'll be taken to a Login with Amazon web page. Enter your Amazon credentials.
5. You'll be taken to a Dev Authorization page, confirming that you’d like your device to access the Security Profile created earlier.
Click Okay. You will see following response into browser
and like following to the terminal.
Congratulation!!! Your Raspberry Pi is now ready to work as Amazon ECO. You only need to connect a USB microphone to the USB port of Raspberry Pi and a button to GPIO 1 8 to talk to it.
STEP 3.Setup AWS IoTAll services in AWS are delivered via a rich set of REST APIs. You can use a service programmatically through the APIs by leveraging one of the many SDKs. You can use AWS cli. Alternatively, you can invoke services through the web-based AWS Management Console. To build my AWS environment, we will invoke AWS Management console. But keep in mind that every step we perform today can be done completely programmatically, which is one of the many reasons why the AWS cloud is so powerful. Follow the steps:1. Create an AWS account from the link: http://aws.amazon.com/2. Sign in to AWS Management console and from the Services select AWS IoT (Fig-1)
a. Click on Get Started (Fig-2)
b. Click on Create a thing
c. Type a thing name (e.g. raspberry) & click to Create
A thing named raspberry will be created (Fig-5)
d. Now, click to Create a certificate & then click 1-Click certificate create (Fig-6)
e. Download all the keys & certificates, it will be required for connection with AWS IoT (Fig-7)
f. To activate already created certificate, select particular certificate and then Activate it from the Actions menu (Fig-8).
g. Now, you need to attach the thing to the certificate. To do it select the certificate and then Attach a thing from the Actions menu (Fig-9).
Type the thing name and click attach (Fig-10).
h. You can see details of thing on the right side as in screenshot by clicking on the thing name.
AWS IoT is now ready for our project. Now, it is the time to connect Raspberry Pi to AWS IoT.
STEP 4.Create a Lambda Function1. Log in to AWS Management Console and from the Service select Lambda.
2. Click to Create a Lambda function.
3. From the bottom right corner click to Skip.
4. Click the rectangle box to choose trigger source and select Alexa Skills Kit.
5. Then click to next.
6. Give a name and select Node.js 4.3 as Run time. Description is optional. From Lambda function code section select Upload a .ZIP file for Code entry type dropdown.
7. Upload a dummy zip file to successfully crate the Lambda function. We will upload our final code later.
8. From Lambda function handler and role section choose lambda_basic_execution from Existing role.
9. Then click Next.
10. Finally click to Create function.
Note the ARN, it will be required later during the creation of Alexa Skill.
1. From Amazon Developer Console click to Get Started from Alexa Skills Kit.
2. From top-right corner click to Add a New Skill.
3. Select Custom Interaction Model and give a Name and Invocation Name and than click Next.
4. From the code section copy the JSON file from Intent Schema and pest it to Intent Schema section.
5. Do the same for the Sample Utterances and click to Next.
6. Select Lambda ARN as Endpoint and paste the ARN code you got at time of Lambda function creation to the textbox.
You can test your skill from Test tab but as we did not upload lambda code so we will be able to do this after next step.
After successfully testing your skill you may submit it for certification. To do that click to Publishing Information and follow the instructions.
Previously we just created a lambda function but we didn't upload or write any code for the lambda. In this step, I will show how to prepare your code and dependencies and upload it to lambda. For preparing code I used Raspberry Pi.
1. Install node.js to your Raspberry Pi (lots of tutorials are available to Internet).
2. Install npm to your raspberry pi (search net).
3. Make a directory to your Pi:
mkdir awssdk
Install aws-iot-device-sdk module to the directory using the following command
npm install --prefix ./awssdk aws-iot-device-sdk
4. After completing go to the directory and use ls
command to test either it successfully installed or not. You will see two directory named etc
& node_modules
.
If you found this then you successfully did the job. Transfer the directory to your PC using FTP client. This module has to be uploaded with lambda code. You may also upload it directly from raspberry pi using VNC.
Make your own lambda function or download index.js from the code section.
Make a zip folder and integrate all certificate files you got from AWS IoT thing creation, node modules you just prepared and the lambda function named index.js.
Now, go to lambda console of AWS Services and upload the zip file as Lambda function package.
Note: You can also download completed node_modules & Lambda function from my Github repository.
STEP 7Raspberry Pi as a MQTT ClientTo subscribe the topics publish in AWS IoT we need to install MQTT client to raspberry pi. I used open source MQTT client Paho developed by Eclipse. To install it to your raspberry pi go to terminal and write the following command.
sudo pip install paho-mqtt
After successfully installing paho client go to the code section and download the code named as Raspberry Pi. Save it as paho_client.py or use another name as you like and transfer it to your raspberry pi. To run the program go the the directory where you saved the program and write following command to terminal.
sudo python paho_client.py
To make the script auto-run at startup from the terminal window type:
sudo nano /etc/profile
Scroll to the bottom and add the following line :
sudo python /home/pi/paho_client.py
where “/home/pi/paho_client.py” is the path to your script.
Type “Ctrl+X” to exit, then “Y” to save followed by “Enter” twice.
If you are totally new in raspberry pi the Ultimate Raspberry Pi Configuration Guide may help you.
Making HardwareWe completed all the programming parts. Now, it is the right time to make the hardware and enjoy it.
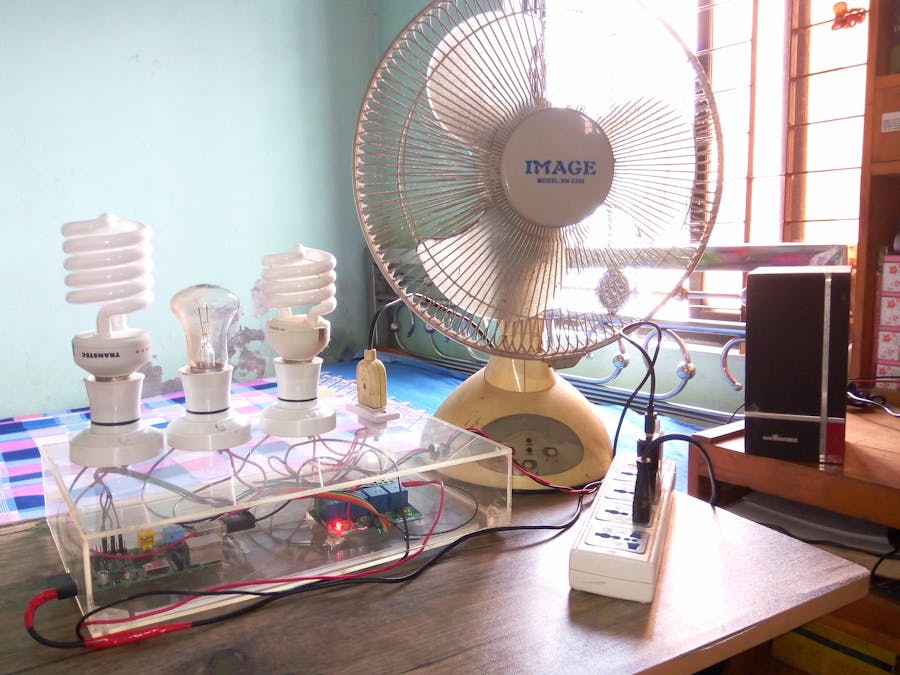
As I made it for four appliances (3 lights and one fan) I made a box using three lamp holders and one socket. Socket is for the fan.
As the loads are AC equipment you must need to use relay to interface with raspberry pi. I used a 4 channel 5V relay module for the purpose.
Be careful, you must power the relay coils from separate 5V power source. Don't power any relay coil from raspberry pi 5V header, you may burn it.
Connect relay module to the raspberry pi using jumper wires. For the details connection please see the schematic diagram attached in the schematic section.
An image of complete setup of my project is attached below.
I tried my best to keep the tutorial simple. I hope you enjoyed it. Thanks for reading.


Comments
Please log in or sign up to comment.