Full disclosure: I work as Creative Director for Losant. I am also neither a developer nor engineer.
OverviewAt Losant, we were all recently tasked with building a "dogfood" project that utilizes the Losant platform. As I'm neither a developer nor an engineer, I was initially stumped. How would I be able to contribute to this exercise in any meaningful way? So like all good creatives needing a jolt of inspiration, I retreated to the bar.
After observing a few rounds of drinks being poured and conversing with the bartender, it struck me. There’s no easy way for bars to measure pours from specific taps, what types of pours are most popular and when those taps are most active. So much of the traditional watering hole is incredibly old-fashioned (and in some cases, that's the way we like it). But having an interest in opening a bar myself in the near future, it occurred to me that finding a way to track tap pours could come in handy down the line.
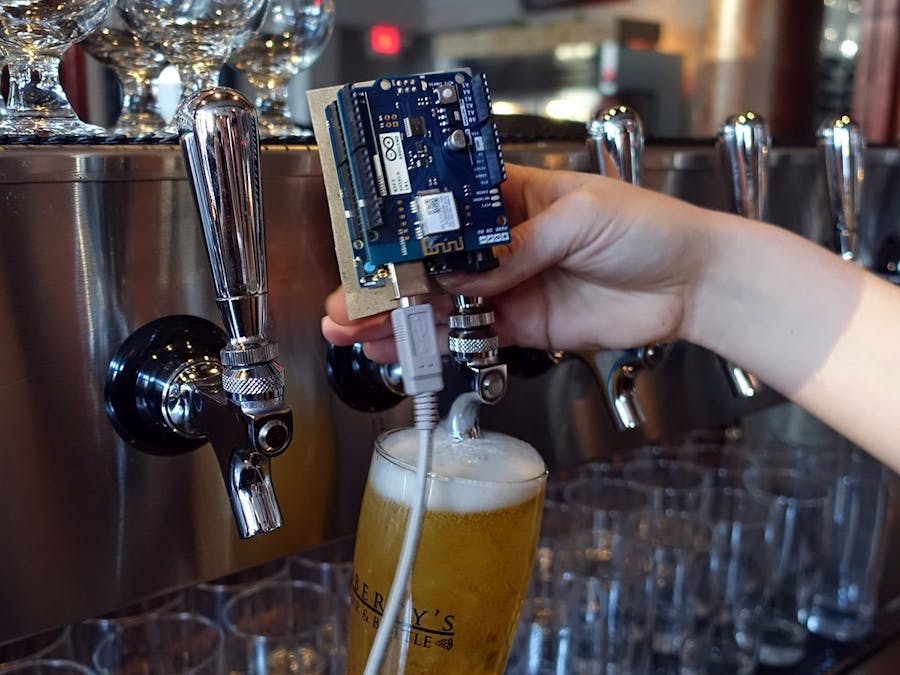
The ApproachWith the help of my more technical teammates (shout out to Losant Co-Founder/Drinking Buddy Brandon Cannaday), I went to work assembling the nuts and bolts of the TapTracker. From a hardware standpoint we settled on an Arduino 101 with the 101 Wi-Fi Shield to be the “Thing” due to the device's approachability and because it features an accelerometer. We used the accelerometer in the 101 to measure the pitch of the tap handle when engaged and then closed. That data was then sent to Losant via local Wi-Fi.
Setting Up the ArduinoArduino dev boards are some of the most well-documented maker hardware available. I used the Losant's very straightforward Getting Started with the Arduino Wi-Fi 101 Shield.
Losant WorkflowLosant is an easy-to-use cloud platform to IoT projects. As I mentioned earlier, I used a Losant Workflow to periodically pull accelerometer data from pours, then analyze it and present to a dashboard for visualization. The first thing you'll have to do is register for a free Losant account. Once you have an account, create an application and a new workflow. You can name both anything you want.
Within my workflow, we measured the amount of time the tap was open to determine which type of pour we were tracking (a sample or taster, a pint, or a growler). When the handle is activated, a Losant workflow is activated along with it that tracks the pours.
I then set up my Losant Dashboard to track daily and monthly pour counts for all 3 categories, pour types and daily pour frequency.
The simplicity of my setup and ease of getting the Losant workflow and dashboard configured allowed me to focus on the data and all the crazy ways I could track and organize it. With a goal of opening a bar with a brain in the future, Losant really did make it easy to get those first thoughts started.
Pros- Customizable/flexible (track as much or as little data as you can dream up or deem necessary).
- Scalable/integrated/comprehensive (multiple tap handles can be tied together into one workflow and dashboard).
- Non-invasive (not required to be built into the tap system).
- TapTracker doesn’t track actual liquid volume (not as precise).
My TapTracker project is just the beginning of what I plan to track with a basic Wi-Fi enabled dev board and simple workflows and dashboards in Losant. The proof of concept worked well enough for me to expand on the project including:
- Track beer styles/breweries/specific beers etc.
- Create an array of TapTrackers for an entire tap line.
- Include TapTracker toggle/input line in the bar’s POS system.
- Reduce device size (Mouser has a few good options like this)
- Design an ergonomic tap handle with a built-in TapTracker
- Account for different beer styles and flow rates (nitro, cask, etc)
I hope you can see how easy it is for even non-technical folks like me to now build smart connected solutions to solve everyday, real-world problems thanks to affordable microcontrollers, and IoT platforms like Losant. Please share any feedback or ask questions on my TapTracker project in the comments below.
Cheers, and Happy Tracking!


_baVEVgguW1.jpg?auto=compress%2Cformat&w=48&h=48&fit=fill&bg=ffffff)


Comments
Please log in or sign up to comment.