
Paper Man brings an interesting way to communicate with your Android device through NFC technology: you can send a message to the Paper Man by touching its head with an NFC-enabled Android device and the Paper Man will immediately spit the message out.
Watch the following video to better understand the Paper Man.
Step 1: Preparation
-
A Seeeduino or other Arduino-compatible board
-
NFC Shield V2
-
Embedded Thermal Printer
-
Thermal Paper Roll - 57x50mm
-
Papercraft
-
NFC enabled Android device, like Galaxy Nexus
-
Polymer Lithium Ion Battery
Step 2: Make a Papercraft Shell
We chose an Iron Man model papercraft which can be downloaded from http://www.cubeecraft.com/cubee/iron-man-mk-42.
We recommend using A2-sized paper, which makes the shell size perfect for placing Seeeduino and NFC Shield.
Step 3: Connecting Components
-
Plug in the NFC Shield onto the Seeeduino
-
Connect the embedded thermal printer to the NFC shield
- The green wire connects to digital pin 3
- Yellow goes to digital pin 4
- Black to any of the GND pins
You can change the digital pins later, but to match the demo code, stick to this for now.
Step 4: Download Libraries and Demo Code
We need the PN532 library available at https://github.com/Seeed-Studio/PN532
To Download, click the “ZIP” button near the top left of the library page, unzip PN532-master.zip and place the 4 folders (PN532, PN532_SPI, PN532_I2C and PN532_HSU) inside your Arduino libraries folder.
Don’s NDEF library (https://github.com/don/NDEF) is also needed. Download it and place the NDEF folder inside your Arduino libraries folder too.
Lastly we need an Arduino sketch to run. Get the demo sketch from https://github.com/xiongyihui/NFCDemo/blob/master/arduino/nfc_printer.ino
Open the sketch with Arduino IDE. Select the board “Arduino Duemilanove w/ ATmega328” for Seeeduino and the serial port of Seeeduino to upload the sketch.
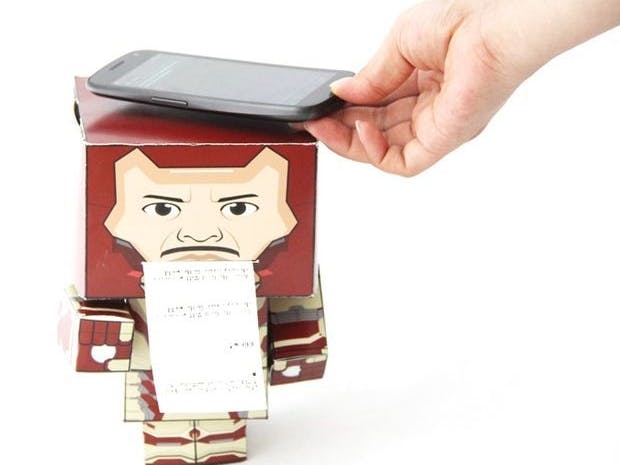
Step 5: Test
After setting up the hardware and software, use an NFC-enabled Android device to touch the antenna of the NFC Shield:
- Make sure the screen of the Android device is on and unlocked and that the app is opened
- If everything is correctly set up, Android will play a sound and show a message “Touch to beam”
- Touch the screen to send a message to the Paper Man
- The Paper Man will print the message out.
Step 6: Assemble
A few notes on the assembly:
- The thermal printer output port must be directed at the mouth of Iron Man. Otherwise, paper tape can’t be spited out from the Iron Man’s mouth.
- Make sure Seeeduino is placed in the center of Iron Man. Or the gravity will make the posture of Iron Man weird.
- Make sure that the atenna of NFC shield is easy to get for the mobile.
After the work finishes, your Paper man is ready!
What's Next?
The current version Paper Man only prints text messages, while the printer supports to print images and bar code. Perhaps you can have a try to print a richer message!
xiaobo__
Comments