Turn a simple $20 Christmas tree into a festive light display using the Internet of Things. This project is meant to be simple and cheap, perfect for college students who want to enjoy the holidays.
Our Project:Christmas time is coming near and we wanted a fun and festive way to brighten up the room. All we had was our sad $20 Christmas tree from last year, but with the addition of 2 Particle Photons we had potential to turn our sad little tree into something more. So we used our electrical skills to set up a motion activated Christmas light and tree for our living room. We pinned up Christmas lights around the room and decorated our tree. Next came the electrical part. We constructed a PIR sensor and placed it in the tree. The other Photon was placed on the window edge behind the tree and was connected to a relay. The relay was set up so that when there was motion, the relay would switch on, turning on the lights around the room and in the tree.
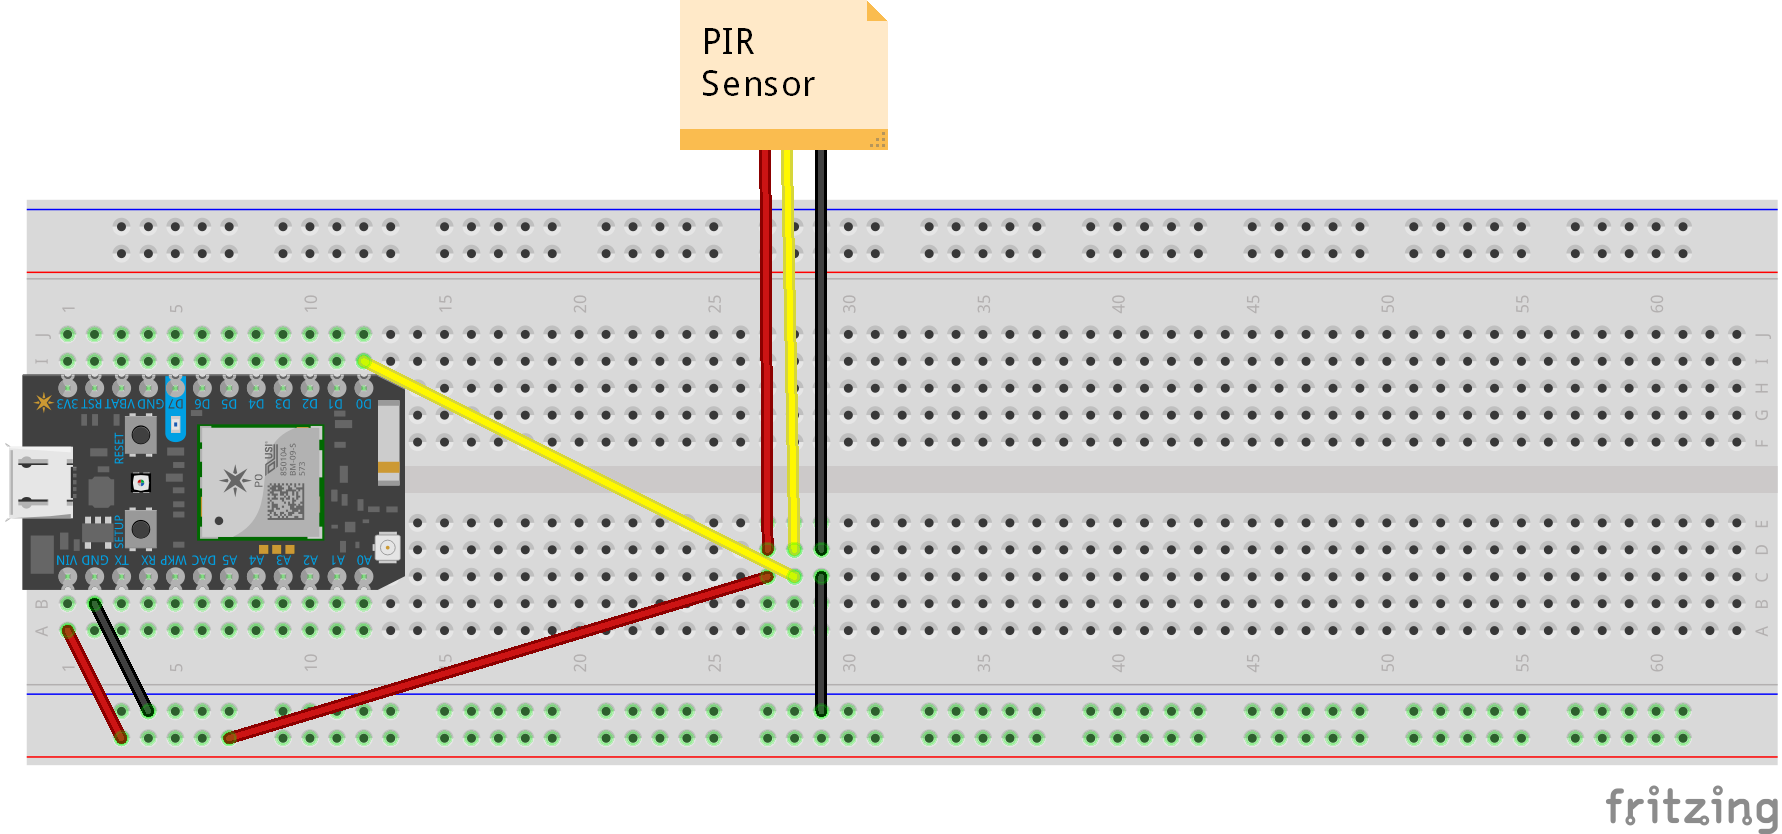
The motion is detected by a PIR sensor that is connected to and powered by a Particle Photon. The Photon was also programed so that when motion was detected, the internal D7 LED would lite up. Having this little light can be very helpful because it can indicate if there is an issue. When the internal LED is on, the lights in the room should also be on. We hung the breadboard as a Christmas ornament and placed the PIR sensor in a pair of sunglasses. The tree was decorated as if it had a face: it had a tie, hat, and sunglasses.
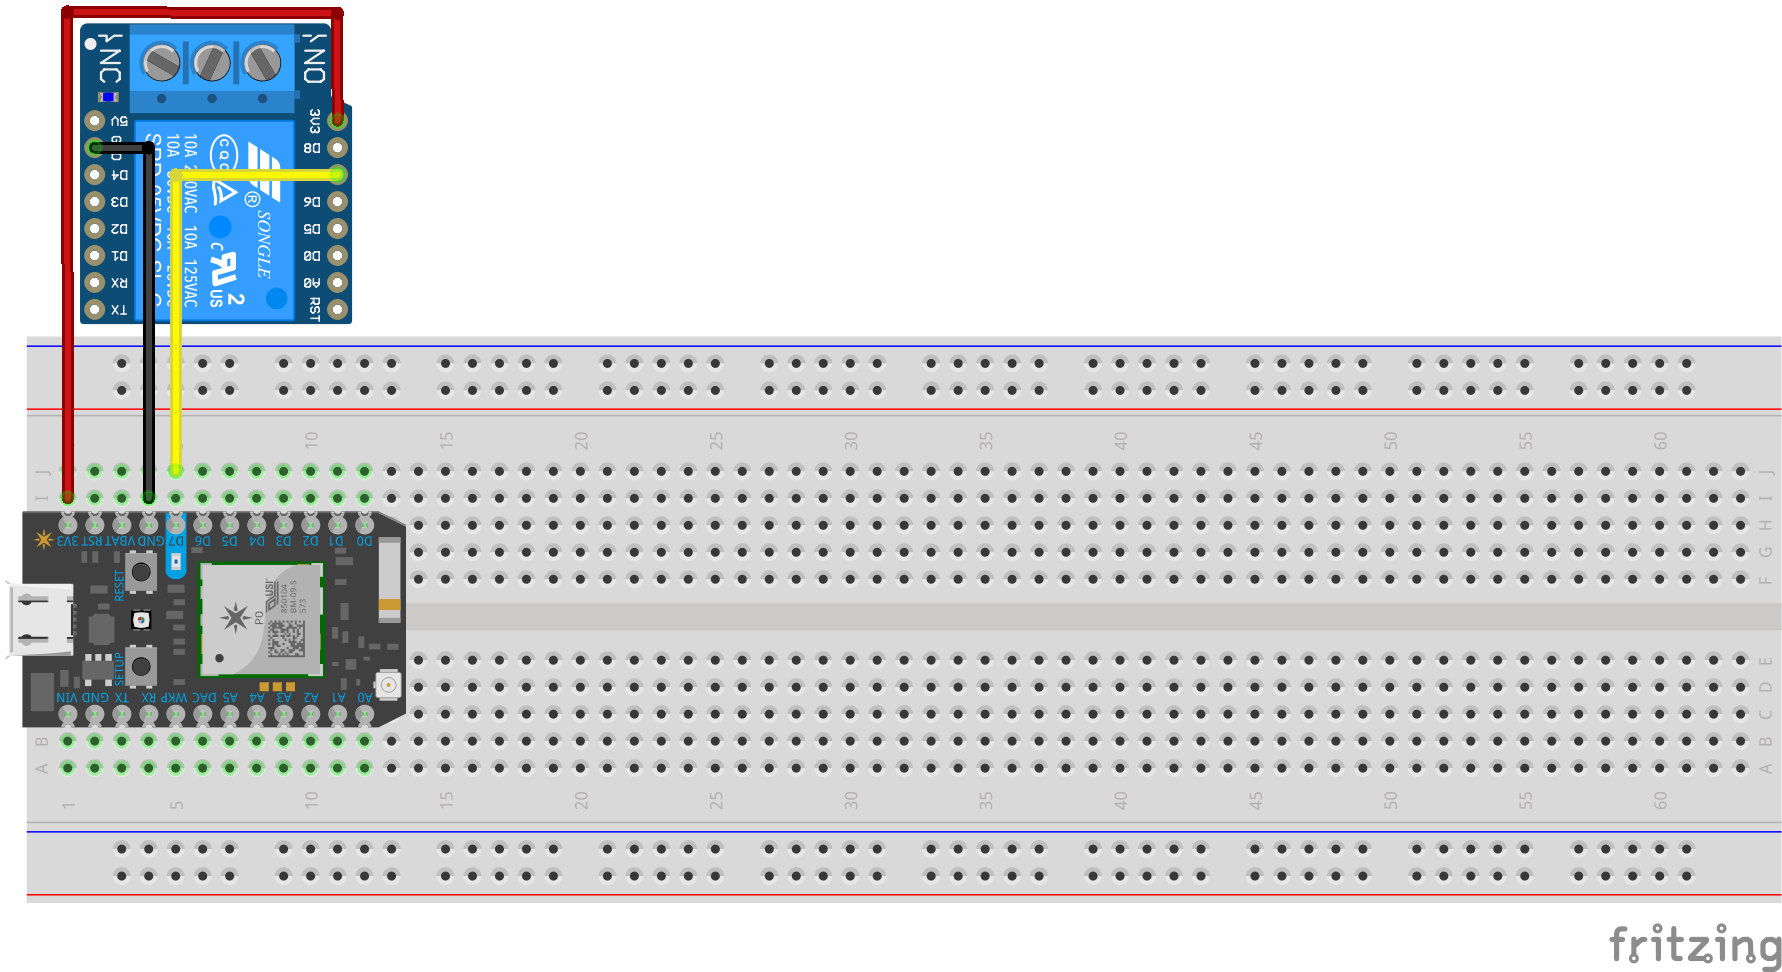
When motion is detected, the device published the event and signals to the second Photon. The second Photon is connected to a relay that switches on and connects the circuit of a string of Christmas lights and a Christmas tree. The relay was spliced into an extension cord, this means that the coating was stripped and one of the wires was connected to two ports in the relay.
The code for this project is listed at the bottom. There was a code used for the motion sensing Photon and a slightly different code for the relay Photon. The two Photons communicated DigitalWrite signals through the Particle.publish and Particle.subscribe function. When motion was detected, the event was published by the first Photon, and the second Photon was subscribed to this event. After the event was published, the second Photon would connect the relay. This allows the motion sensor to be located anywhere you wish, and does not restrict it to be with the relay. We also included a delay in the code so that when motion was detected, the lights would stay on for 10 minutes. The time that the lights are on can be adjusted by changing the value of the delay.
Our Results:Whenever there is motion in the line of sight of the sunglasses, the first Photon's internal LED lights up and sends a signal to the other Photon. The second Photon receives the signal and the internal LED and the relay switch on. The cords attached to the relay light up. The pictures below show the lights working in the room and the video below shows the Photons in action.
The Photons communicate using a publish event in the code. The first Photon publishes the event and the second Photon is subscribed to the event. This means that the second Photon will not turn on the relay unless the first Photon detects motion and publishes that information. The publish event is also connected to If This Then That, which is a website that does many things when an event is published. For our project, we used If This Then That to send a notification to a phone through the IFTTT app. We also used If This Then That to record when event was published so that we could calculate the amount of energy our project consumes.
We let the Photons run continuously for one day and the data was recorded in Google Sheets by using IFTTT. Each time the lights turned on, the time was recorded in Google Sheets. Since each time interval would last ten minutes, we graphed when the lights were on (value of 1) and when they were off (value of 0), this can be seen in the On/Off Diagram.
Next, we wanted to calculate how much energy our system was using. We used an Uni-T multimeter to measure the voltage coming out of the wall outlets, the current through the Photons, and the current through the extension cord when it was on. The 2 Photons were constantly on and were each consuming approximately 0.016 kW for 24 hours. We used $0.11 per kWhr to calculate the cost of having the 2 Photons constantly running (this means that the 2 Photons were never put in a low power setting or sleep mode). With this calculation, we found that both Photons would cost about $0.0845 per day. Then we used the same method to calculate the energy consumed by the extension cord. We found that the extension cord used 0.0822 kW when it was on, and we used the On/Off Diagram to calculate how much energy would be used for an average day. After that, we calculated the cost of this by assuming the cost of electricity is $0.11 per kWhr. The average cost per day for the motion activated lights was $0.041. Then, we combined the data of the 2 Photons and the extension cord to calculate the total energy and cost for an average day. We found that with 2 Photons constantly on and a motion activated Christmas lights, that the cost was about $0.125 per day.
Finally, we wanted to see how the cost of our Christmas lights compared to if we left the lights on for 24 hours. For this example, the current from the extension cord and the voltage from the outlet were used to calculate the amount of power consumed, 0.0822 kW. Then we assumed the cost of electricity was about $0.11 per kWhr. The graph below shows the cost of continuous lighting for 24 hours, using only the extension cord. This cost can be up to $0.22 per day if left plugged in for 24 hours.
Our project was a simple project with instructions that should help even novice IOT enthusiast. It was meant to be cheap so that college students can set this up without breaking their budget. Hope you enjoyed our project and have a Merry Christmas!


Comments
Please log in or sign up to comment.