WTF is a intelligent cup which has the capability of measuring the inside water temperature also inform the user by voice and this cup is hard to incline. It is useful for everyone, especially for blinds and visually impaired users.
WTF是一個智慧水杯,擁有偵測杯中溫度並用語音通知用戶的功能。這個杯子適合所有的人,尤其是視障人士。
2. IntroductionThere are 217 million people suffering from visually impaired in the world, in which 36 million people are totally blind. Drinking water is essential. However, people with visually impairments might encounter some dangers and inconveniences. Therefore, we plan to design a cup to help these people to avoid those dangers. The cup will have the function that makes it to be able to notify its user clearly.
在現今社會中,全世界有約2.17億人有中度至重度的視力受損,更有約3600萬人完全失明。生活中飲水是必須的,但是因為視覺上的不方便,這些人在飲水方面也會有一些危險和困擾。我們擬設計一個能夠避免這些危險的水杯,讓水杯能夠清楚告知使用者,達到提醒警示的作用。
3. Hardware Intro3.1 Arduino Nano 3.0The left one is Arduino Uno, it is very common. Uno has complete functions but a little too big for our project. We are making a cup, we can not put a normal size calculator into it.
圖片左邊的是Arduino Uno,是Arduino系列中最常見的版本,有完整的功能但對我們這個要放進杯子的專案來說有點太大了。
The other one is our protagonist, Arduino Nano. Smaller, lighter and cheaper. The one I bought costs NT$100 (about $3.3 USD). The size of it is 43.18 mm * 17.78 mm.
再來的才是我們的主角Arduino Nano。比起UNO板更小更輕更便宜,只花了100塊台幣在傑森創工的網站上買的,大小大概是43.18 mm * 17.78 mm。
3.2 LM35LM35 is a temperature sensor which is available for measuring water temperature between -50℃ to 150℃. It is an interval that suits for drinking water.
LM35是溫度感測器,可測範圍大約是 -50℃ 到 150℃,是滿符合水溫狀態的區間。
However there is another temperature sensor DS18B20 that is waterproof. Which is great of measure liquid temperature. The reason we that choice LM35 is that we plan to place the sensor out of the glass cup and don't damage the body of the cup. Nevertheless, I still recommend you to try DS18B20, maybe it is more accurate.
不過有另一款DS18B20是防水的溫度感測器,但是因為我們本來就不打算破壞杯子本體所以沒有選擇這一個,但是我還是非常推薦你可以試試看,因為相較起來它的準確度會更好喔。
3.3 DFPlayer MiniObviously, it's just a mini mp3 player. It needs a sd card to store mp3 documents and a normal speaker. If you are looking for a sound player, I think there is not much choices except this one.
就像字面上的意思,這是一個mp3播放器的驅動模組。除了這個外還需要一張sd卡跟喇吧或揚聲器來完成撥放。而且除了這個之外我覺得你也很難在市面上找到其他太多的選擇了。
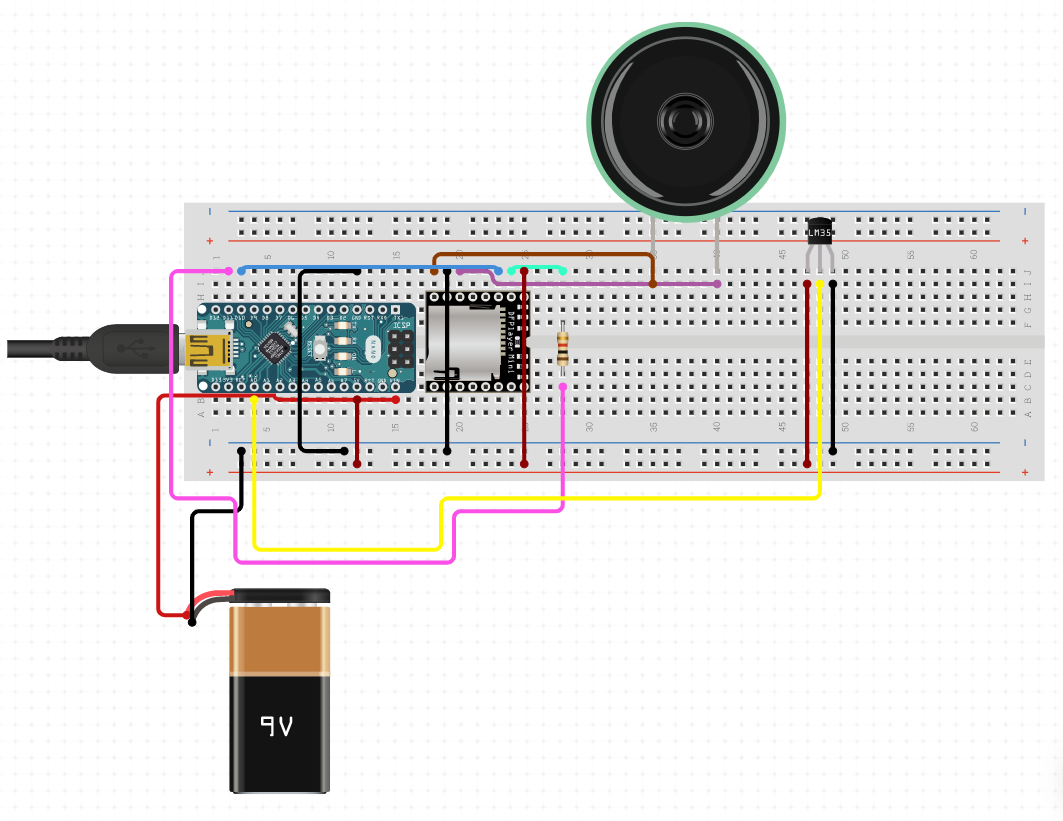
4. Circuit DiagramThe method of connection is as above image.
連接的方式就像上面這張圖
And the result that I made is as follow.
我做的樣子則是像下面這個
But I don't think it is easy to understand so please go to the one I made on circuito.io~
但我不覺得有辦法從這麼亂的實體中看出甚麼端倪,所以建議還是看我在circuito.io 做的連接圖吧~
5. Connection Part by Part5.1 LM35This is a very easy step (if you just want to measure temperature). After you enter the code and run, it's done.
這步驟很簡單(如果單純只是想測溫度)。在你輸入完成是而且跑動後這就完成了。
/*Code designed by Sujay Alaspure in SA Lab */
const int sensor=A5; // Assigning analog pin A5 to variable 'sensor'
float tempc; //variable to store temperature in degree Celsius
float tempf; //variable to store temperature in Fahreinheit
float vout; //temporary variable to hold sensor reading
void setup() {
pinMode(sensor,INPUT); // Configuring sensor pin as input
Serial.begin(9600);
}
void loop() {
vout=analogRead(sensor); //Reading the value from sensor
vout=(vout*500)/1023;
tempc=vout; // Storing value in Degree Celsius
tempf=(vout*1.8)+32; // Converting to Fahrenheit
Serial.print("in DegreeC=");
Serial.print("\t");
Serial.print(tempc);
Serial.print(" ");
Serial.print("in Fahrenheit=");
Serial.print("\t");
Serial.print(tempf);
Serial.println();
delay(500); //Delay of 1 second for ease of viewing }
Nevertheless, we are not going to measure the air, what we want to measure is water which across the glass. So considering the reasons that accuracy will decrease and the reflection time will be longer, we need to make the measuring interval wider and revise the output. The follow photo is the note we take for making a exchange formula, the left side is real condition, the right side is the input what we got from LM35.
不過別忘了我們要做的不是溫度感測器,而是要隔著玻璃杯的水溫感測器。在考慮他的準確度下降以及反應時間增加的情況下,我們需要調整他的輸出及區間。下面這張圖是當時我們為轉換公式做的紀錄,左邊是實際該有的結果,右邊是LM35傳出來的數值。
The following code is after the new formula exchanging.
經過這樣的改變後我們的程式碼變成下面的樣子。
//sensor
const int sensor=A5; // Assigning analog pin A5 to variable 'sensor'
float tempc; //variable to store temperature in degree Celsius
float tempf; //variable to store temperature in Fahreinheit
float vout; //temporary variable to hold sensor reading
char rT='24';

void loop(){
vout=analogRead(sensor); //Reading the value from sensor
vout=(vout*500)/1023;
if (vout<19.5){
Serial.print("lower than 10");
}
else if (vout>=19.5 and vout<21){
Serial.print("about 15");
}
else if (vout>=21 and vout<22){
Serial.print("about 20");
}
else if (vout>=22 and vout<24){
Serial.print("about 25");
}
else if (vout>=24 and vout<24.5){
Serial.print("about 30");
}
else if (vout>=24.5 and vout<26.5){
Serial.print("about 35");
}
else if (vout>=26.5 and vout<28.5){
Serial.print("about 40");
}
else if (vout>=28.5 and vout<29.5){
Serial.print("about 45");
}
else if (vout>=29.5 and vout<31.5){
Serial.print("about 50");
}
else if (vout>=31.5 and vout<32.5){
Serial.print("about 55");
}
else{
Serial.print("higher than 60, warnning, its hot.");
}
Serial.print("in DegreeC=");
Serial.print("\t");
Serial.print(tempc);
Serial.print(" ");
Serial.print("in WTF=");
Serial.print("\t");
Serial.print(rT);
Serial.println();
}
Reference: https://www.instructables.com/id/Arduino-Temperature-Sensor-Using-LM35/
5.2 DFPlayer MiniThere is plenty of code in the tutorial blog, I only take the part we need:
他範例給了很多行程式碼,我只取我這邊會用到的:
#include "Arduino.h"
#include "SoftwareSerial.h"                    // 採用SoftwareSerial程式庫
#include "DFRobotDFPlayerMini.h"        // 採用DFRobotDFPlayerMini程式庫

SoftwareSerial mySoftwareSerial(2, 3);  // mySoftwareSerial(RX, TX), 宣告軟體序列傳輸埠
                                        // 用來與DFPlayerMini通訊用
DFRobotDFPlayerMini myDFPlayer;         //宣告MP3 Player

void setup()
{
    Serial.begin(115200);                 // 定義Serial傳輸速率115200bps
    mySoftwareSerial.begin(9600);  // 定義mySoftwareSerial傳輸速率9600bps, DFPlayerMini           的通訊速率為9600bps.

myDFPlayer.setTimeOut(500); // 設定通訊逾時為500ms

//----Set volume----
    myDFPlayer.volume(10);     // 設定音量, 範圍0~30.
//----Set device we use SD as default---- // 設定SD卡
    myDFPlayer.outputDevice(DFPLAYER_DEVICE_SD);
//----Mp3 control---- // 設定MP3參數
    myDFPlayer.enableDAC();     //Enable On-chip DAC
//----Mp3 play----  // 設定MP3播放參數
    myDFPlayer.play(1);  // 播放第1首音樂
}
Don't forget to import the library it request.
記得要載入他需求的程式庫
https://github.com/DFRobot/DFRobotDFPlayerMini
see the detail in Reference/從下面的連結看更詳細的教學
Reference: https://thirtysec.pixnet.net/blog/post/223799714
In here I record 11 mp3 files by Sound Of Text and saved into my micro SD card then plug into the DFPlayer Mini.
The record files is kind of like "about 15°C" or "higher than 60°C, warning, it's hot. ".
在這裡我用 Sound Of Text 錄了11個mp3檔到我的micro SD 卡裡,然後插入DFPlayer Mini裡。
這些音檔的內容大該是"大約十五度"或像"高於60度,小心高溫。"
5.3 Power SupplyThis part has no code! Cheers! The only thing need to do is connecting the battery like above image (not the LED part, only battery)
這邊沒有程式要寫!恭喜!只要照上圖接好電池就好(不要管LED,)
Reference: http://geocaching.hyliston.net/2015/08/25/powering-your-arduino-cache/
6. Completed code#include "Arduino.h"
#include "SoftwareSerial.h" // 採用SoftwareSerial程式庫
#include <DFRobotDFPlayerMini.h> // 採用DFRobotDFPlayerMini程式庫
//mp3
/*Code designed by Sujay Alaspure in SA Lab */
SoftwareSerial mySoftwareSerial(2, 3);
DFRobotDFPlayerMini myDFPlayer; //宣告MP3 Player
void printDetail(uint8_t type, int value); //印出詳情
//sensor
const int sensor=A5; // Assigning analog pin A5 to variable 'sensor'
float tempc; //variable to store temperature in degree Celsius
float tempf; //variable to store temperature in Fahreinheit
float vout; //temporary variable to hold sensor reading
char rT='24';
//toggle
boolean state = false;
void setup() {
//toggle
pinMode(13, OUTPUT);
digitalWrite(13, LOW);
pinMode(7, INPUT);
digitalWrite(7, HIGH);
//MP3 Player
Serial.begin(115200); // 定義Serial傳輸速率115200bps
mySoftwareSerial.begin(9600); // 定義mySoftwareSerial傳輸速率9600bps, DFPlayerMini的通訊速率為9600bps.
myDFPlayer.setTimeOut(500); // 設定通訊逾時為500ms
//----Set volume----
myDFPlayer.volume(30); // 設定音量, 範圍0~30.
//----Set different EQ---- // 設定EQ(等化器 Equalizer)
myDFPlayer.EQ(DFPLAYER_EQ_NORMAL);
//----Set device we use SD as default---- // 設定SD卡
myDFPlayer.outputDevice(DFPLAYER_DEVICE_SD);
//----Mp3 control---- // 設定MP3參數
myDFPlayer.enableDAC(); //Enable On-chip DAC
pinMode(sensor,INPUT); // Configuring sensor pin as input
Serial.begin(9600);
}
void loop() {
//MP3 player
if (myDFPlayer.available()) // 監視MP3有沒有回應
{ // 有的話印出詳情
printDetail(myDFPlayer.readType(), myDFPlayer.read()); //Print the detail message from DFPlayer to handle different errors and states.
}
//toggle
if(digitalRead(7) != HIGH){
state = !state;
digitalWrite(13, state);
temp();
delay(2000);}
} //Delay of 1 second for ease of viewing
void temp(){
vout=analogRead(sensor); //Reading the value from sensor
vout=(vout*500)/1023;
if (vout<19.5){
Serial.print("lower than 10");
myDFPlayer.play(4);
}
else if (vout>=19.5 and vout<21){
Serial.print("about 15");
myDFPlayer.play(2);
}
else if (vout>=21 and vout<22){
Serial.print("about 20");
myDFPlayer.play(3);
}
else if (vout>=22 and vout<24){
Serial.print("about 25");
myDFPlayer.play(5);
}
else if (vout>=24 and vout<24.5){
Serial.print("about 30");
myDFPlayer.play(7);
}
else if (vout>=24.5 and vout<26.5){
Serial.print("about 35");
myDFPlayer.play(6);
}
else if (vout>=26.5 and vout<28.5){
Serial.print("about 40");
myDFPlayer.play(10);
}
else if (vout>=28.5 and vout<29.5){
Serial.print("about 45");
myDFPlayer.play(9);
}
else if (vout>=29.5 and vout<31.5){
Serial.print("about 50");
myDFPlayer.play(8);
}
else if (vout>=31.5 and vout<32.5){
Serial.print("about 55");
myDFPlayer.play(11);
}
else{
Serial.print("higher than 60, warnning, its hot.");
myDFPlayer.play(1);
}
Serial.print("in DegreeC=");
Serial.print("\t");
Serial.print(tempc);
Serial.print(" ");
Serial.print("in WTF=");
Serial.print("\t");
Serial.print(rT);
Serial.println();
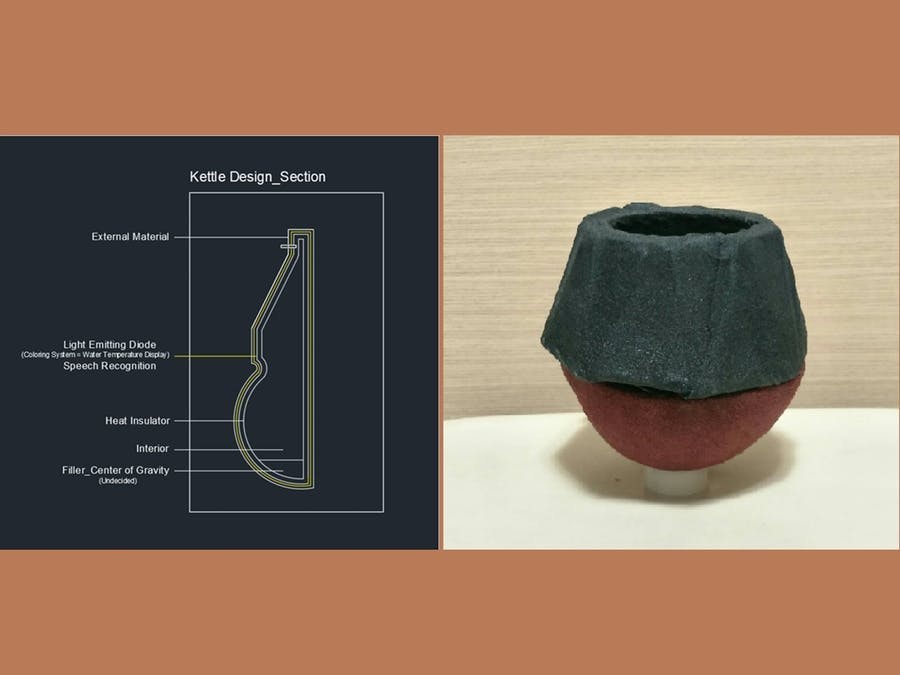
}The external design uses a semi-circular pot shape with a weight increase at the bottom, and this design was divided into two parts, the main materials are as follows:
外部設計選擇使用底部增重的半圓式壺形,而最主要分為上下兩部分進行製做,而最主要的使用材料為以下:
First, the upper part is made with a wooden board into a ring that matches the size of the glass and 18 pieces of triangular wood pieces, arranged according to the size of the sides, and joined to the ring to form the skeleton of the upper part of the cup, then cover the black cloth on the surface.
首先上半部使用木板磨成符合玻璃杯大小的圓環跟18片三角形小木片,依照邊長大小進行排列,並接合在圓環上,形成杯子上半部的骨架,接著覆蓋黑色布料在表面。
Use a gourd in the lower half and smooth the irregular surface, also cover it with red cloth. Use two colors to distinguish the upper and lower parts.
下半部則使用葫蘆,將不規則的面磨平並蓋上紅色布料,用兩個顏色區分上下兩部分。
First, we take a look of the interior operation:
首先先來看一下內部的運作吧:
Substance and exterior
實體物和外觀
Disadvantage: Time and budget constraints are tight, some better components can not be chosen. And maybe add some functions like tell user that temperature is measuring.
缺點: 經費有限,使用的感溫器LM35效果稍慢,須等個一分鐘才能有相符的溫度結果。其實時間允許的話可以更精準,如告知溫度是否還在測量。
Hope this tutorial will help you~
希望這個教程能幫到你~


Comments