The Brainstorming
When we first signed up for the challenge, we asked ourselves what kind of project would best demonstrate the ability of Amazon's virtual assistant AI Alexa together with creative and technical capabilities of the LEGO Mindstorms EV3 robotics kit. It had to be a project where if either Alexa or EV3 is removed from the equation it would render the project meaningless. After a few sessions of brainstorming we came up with Alexander - a speech to sign language humanoid arm.
Alexander
The idea behind Alexander is basically a humanoid robot upper torso with articulated arms and hands with a static head which serves the purpose of a translator/communicator between a normal person and the deaf or hearing impaired. It performs this task by taking voice inputs from a normal person through Alexa and translates them into sign language with the humanoid arm and hand actually mimicking the actual sign language and shown to the deaf or the hearing impaired. This robot is named after the famous inventor Alexander Graham Bell, who invented the telephone and for his work with the deaf.
Sign Language
Before we started working on the design of the arm we needed to understand how sign language is done and what sort dexterity is involved in performing the signs and we found tutorial videos like the one below which shows how alphabet signs are done.
https://www.youtube.com/watch?v=lYhAAMDQl-Q&t=214s
Understanding the Human Arm
Before we started designing the humanoid arm for Alexander we did some research on actual human arms and found out just our hand alone contains 27 degrees of freedom (DOF)! The elbow has another DOF and the shoulder another 3, which gives a total of 31 DOF for one arm. To construct Alexander with both arms we would need at least 62 DOF, meaning 62 motors for independent joint control and 16 EV3 controllers for this project, which is more than what we can afford to acquire.
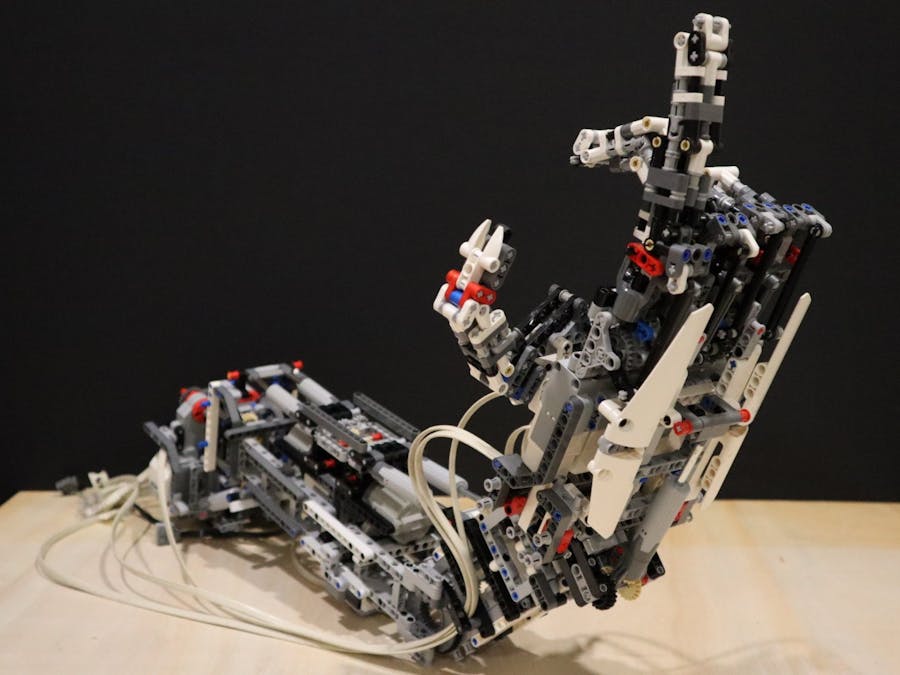
Looking at the LEGO bricks and EV3 components we have, we decided to limit Alexander to just a complete right arm and with articulated fingers and wrist. The final form of Alexander has 10 degrees of freedom controlled by 3 EV3 controllers. Below is the demo video showing Alexander in its final form.
Mechanical Design- Hand
Since the most important element in performing the signs is the articulated hand, we did some research online and found a LEGO humanoid design from Barman which has enough dexterity to perform very intricate movements.
Unfortunately, the original designer Barman did not provide any building instructions. He did provide enough pictures on his flicker account and we were able to recreate the humanoid hand from various angles of the humanoid hand and voila!
The humanoid hand has 6 degrees and freedom and are actuated by 6 EV3 medium motors - 1 for each finger and 1 for
All fingers and thumbs are driven by worm gears to ensure the position of the fingers is maintained when no power is applied to the motors.
- Wrist
The wrist of the robot arm has 2 degrees of freedom - 1 for rotating the wrist with a range of motion of 180 degrees, 1 for angling the hand forward and backward.
- Lower Arm
The lower arm of the robot houses 2 EV3 medium motors that transmit power to rotate the wrist and angle the wrist forward and backward. 2 turntables are used as the elbow joint of the arm.
- Upper Arm
The upper arm structure provides the rigid structure for connecting the shoulder joint which is driven by 2 large EV3 motors. It also houses an EV3 medium motor in the middle for actuating the EV3 IR remote to control the 2 Power Functions XL motors in the "bicep" assembly.
- Bicep
The "bicep" which houses 2 Power Functions XL motors and 4 linear actuators to provide the lifting power to raise and lower the lower arm and hand assembly.
- Complete arm assembly
Once all the subassemblies are put together the humanoid arm is finally complete, in all its glory.
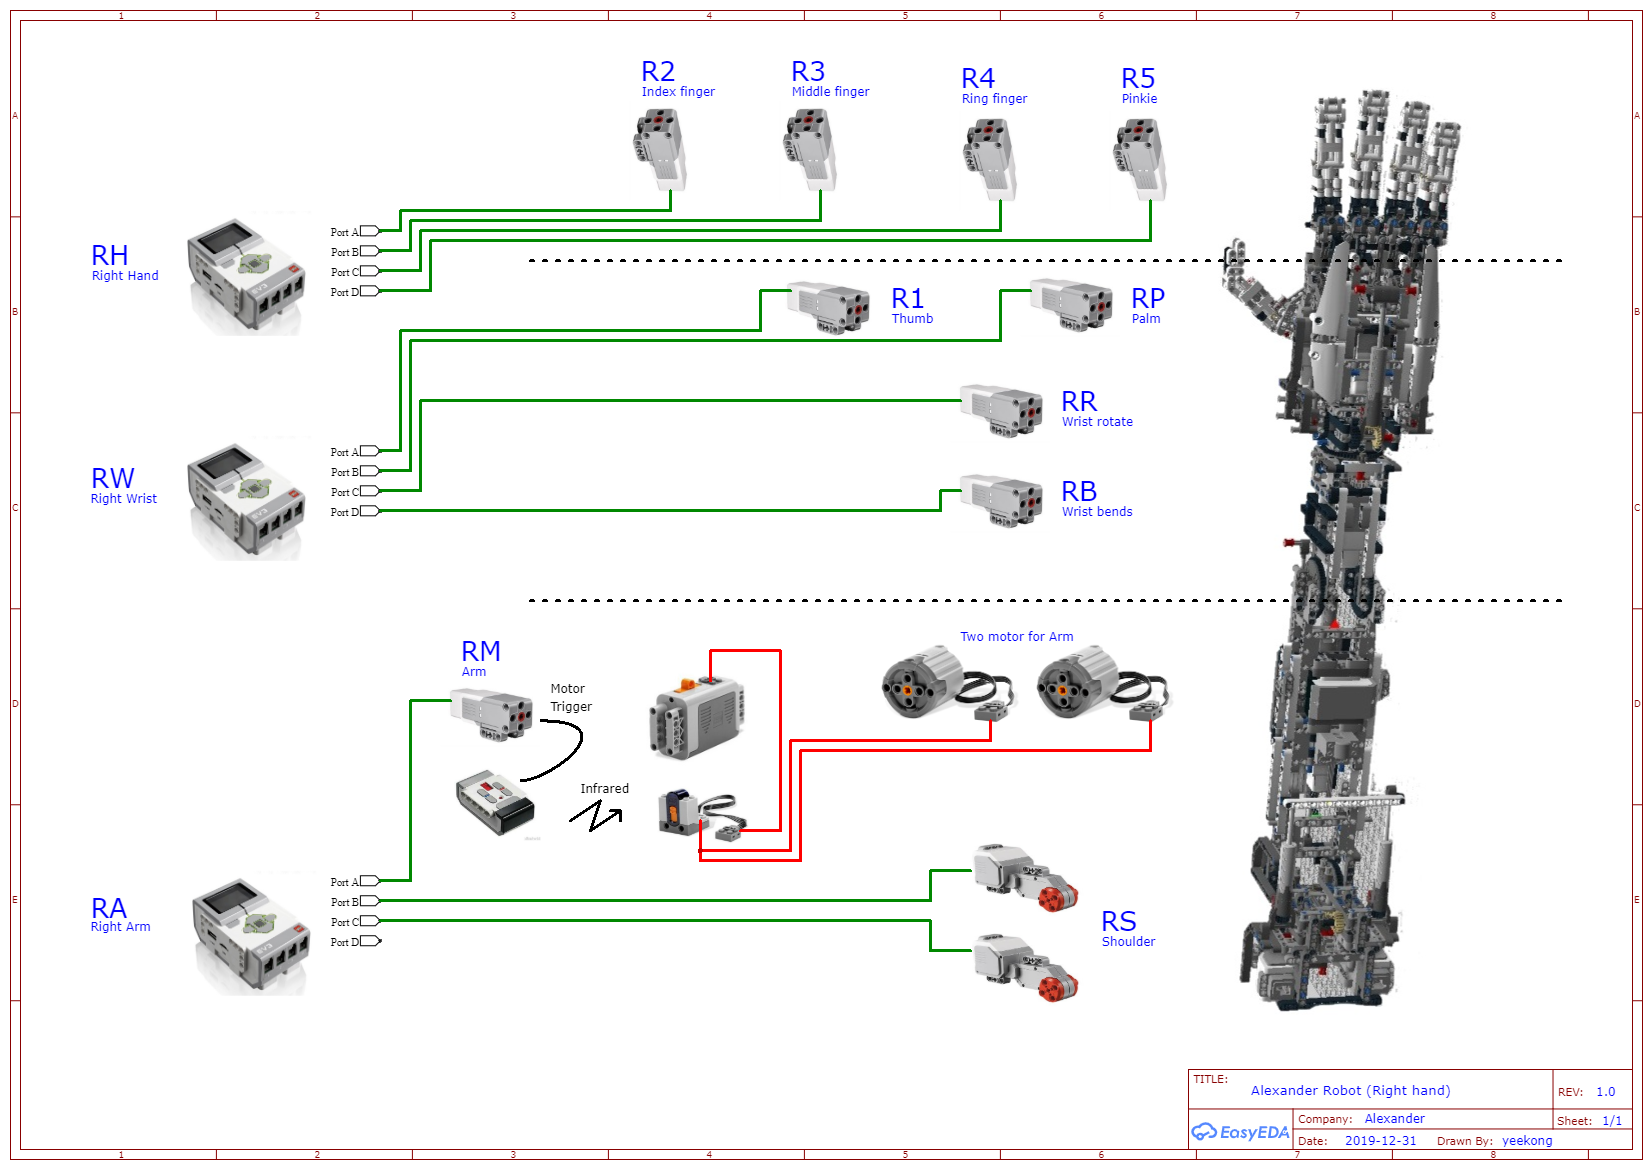
The schematic below shows all the wiring connections located at the different parts of the robot arm.
Ev3 brick that named "RH" is controlling 4 fingers on the hand. This brick handle index finger, middle finger, ring finger, and pinkie that represented by "R2" to "R5".
"RW" handling all the movements from the palm to the wrist, which including the thumb.
"RA" handling movements for the upper arm and the bicep.
This robot arm requires multiple EV3 bricks working together and by using Wifi through MQTT protocols to interact between bricks. To achieve that, a broker that always available on the network is required. We are using a Raspberry Pi to act as a bridge.
By simplifying the program, a master and slave topology is using in here. A brick that named "RH" is acting as a gateway between brick and Amazon echo dot device.
The picture below shows as step-by-step on how a voice command sends out form the Echo Dot through Bluetooth over to "RH" and how the brick reacts.
- Init
Three of the Ev3 brick execute the same program code like the picture above, but each of them has is own unique brick name. Brick "RH" which acts as the master, "RW" and "RA" act as slaves that will listen and execute movement from the master. The unique brick name is located at file init.txt, and by changing the name will define its characteristics.
- ID and Secret key
The Amazon ID and Alexa Gadget Secret that received when created the gadget in the Amazon Developer Console is located at file alexander_main.ini. It authenticates EV3 Brick and allows it to connect to the Echo device and Alexa.
After setting up the "init.txt" and "alexander_main.ini" files, now come to the fun part. In order to kick-starting Alexander, below command have to execute on three of the brick.
sudo python3 alexander_main.py- Main Program
The alexander_main.py code executes in two modes, master or slave. Firstly this code will read init.txt fille get the "name" and define its characteristics.
#------------------------ Read init File ----------------------------------
with open('init.txt', 'r', encoding="utf-8") as initFile:
    eve3Init = json.load(initFile)
    initFile.close()
    print(eve3Init.get('name','name not fround'))
Next initial MQTT publish and subscribe topic.
publishTitle = "in/motor/" +  eve3Init["name"]
subscribeTitle = "out/motor/" +  eve3Init["name"]
On master mode, MindstormsGadget() is called and the blick will turn on Bluetooth to connect Echo Dot. Slave only executes client.loop_forever() which listen to command form MQTT.
if eve3Init["name"] != "RH":
    print("Start MQTT client Loop")
    client.loop_forever()
else:
    threading.Thread(target=client.loop_forever, daemon=True).start()
    print("Start Gadget main")
    gadget = MindstormsGadget()
gadget.main()- Action Task
Now ... do some sign language. On the picture below-left side, all the finger in an open position, our target is to perform as the picture below-right side.
First of all, need to understand the difference between an action and a task. An action is a movement on a single motor and a task can be multiple combinations of action.
Go-to file actionTasks.json, and search for "5". This is a JSON format, "5" is a task, inside "machine", it has 2 "name", RW and RH.
The sequence will start from brick RW, and the first action is to move the motor number 1 to -2000 position and wait for 2 seconds. "abs" stand for an absolute position. After that continue on "motor":2 which is the second action. Next, the action for brick RW is done, and it will continue to execute the action at brick RH.
"5": {
    "machine": [
        {
            "name": "RW",
            "action": [
                {
                    "function": "abs",
                    "motor": 1,
                    "speed": 800,
                    "pos": -2000,
                    "delay": 2
                },
                {
                   "function": "abs",
                   "motor": 2,
                   "speed": 200,
                   "pos": -2,
                   "delay": 1
                }
            ]
        },
        {
            "name": "RH",
            "action": [
                {
                   "function": "abs",
                   "motor": 1,
                   "speed": 800,
                   "pos": -10,
                   "delay": 1
                },
                {
                   "function": "abs",
                   "motor": 2,
                   "speed": 800,
                   "pos": -10,
                   "delay": 0
                },
                {
                   "function": "abs",
                   "motor": 3,
                   "speed": 800,
                   "pos": -10,
                   "delay": 0
                },
                {
                   "function": "abs",
                   "motor": 4,
                   "speed": 800,
                   "pos": -10,
                   "delay": 2
                }
            ]
        }
    ]
}
Take Note: It is no limited number of task, machine, and action that can be executed, as longe as the protocol is correct.
Voice ControlStart command: open Alexander
To start translate number to sign language say for example: show me number 5.
Or for example: give me number 9.
Why Node-red?
When all the brick is connected to MQTT, by using node-red which is a GUI and easy-to-use platform, we can do program debug, hardware testing, mechanical testing and fine-tuning in a more rapid way.
Node-red attachment as below.


Comments
Please log in or sign up to comment.