


Hardware components | ||||||
| × | 1 | ||||
| × | 1 | ||||
Software apps and online services | ||||||
 |
| |||||
Do you want to make project based on Microchip PIC32MX microcontroller, but at the same time use great help of Arduino open-source community? There is one solution from Mikroelektronika and chipKIT.
This article provide step by step instructions how to setup Arduino IDE for clicker 2 for PIC32MX board programming.
I found great tutorial at Electronza blog website, and if you want more details about PIC32MX direct programming Arduino IDE just visit this link.
Adding clicker2 for PIC32MX to Arudino IDE board listThis is the easiest and best method for end users. Follow these steps:
- From within the Arduino IDE, go to File->Preferences dialog box. Look at the text entry field called "Additional Boards Manager URLs:". If that text entry field is blank, then you can just copy/paste the following URL into that text field https://github.com/chipKIT32/chipKIT-core/raw/master/package_chipkit_index.json Then click OK to close the Preferences dialog box.
- If that field is not blank, then click the little box icon to the right of the text field, and copy/paste the URL https://github.com/chipKIT32/chipKIT-core/raw/master/package_chipkit_index.json onto the next line of the text entry field. Arduino lets you have as many different cores as you want loaded into the IDE as long as each URL is on a separate line. Click OK to close the Additional Boards Manager URLs dialog box and then click OK again to close the Preferences dialog box.
- Now select the Tools->Board->Board Manager menu from the Arduino IDE, and it will open up the Boards Manager window. From there, scroll down until you see the chipKIT board. Click once on any of the text in the chipKIT section, and you will see a button appear that says "Install". It will take some time to download all of the chipKIT components and install them, but when it's done, you can click the Close button to close the Board Manager window.
- Now choose a Mikroelektronika clicker 2 board from the Tools->Board menu.
As for programming in Arduino IDE, all you need is to connect the Clicker2 board using the USB port. No driver is required, skip choosing COM port as step needed for Arduino boards. When uploading the sketch, when the *** Enter programming mode now. *** message appears on the screen you have to press the reset button on the Clicker2 board. This brings up the bootloader and the sketch can be uploaded. This is the only difference as compared with Arduino Uno boards.
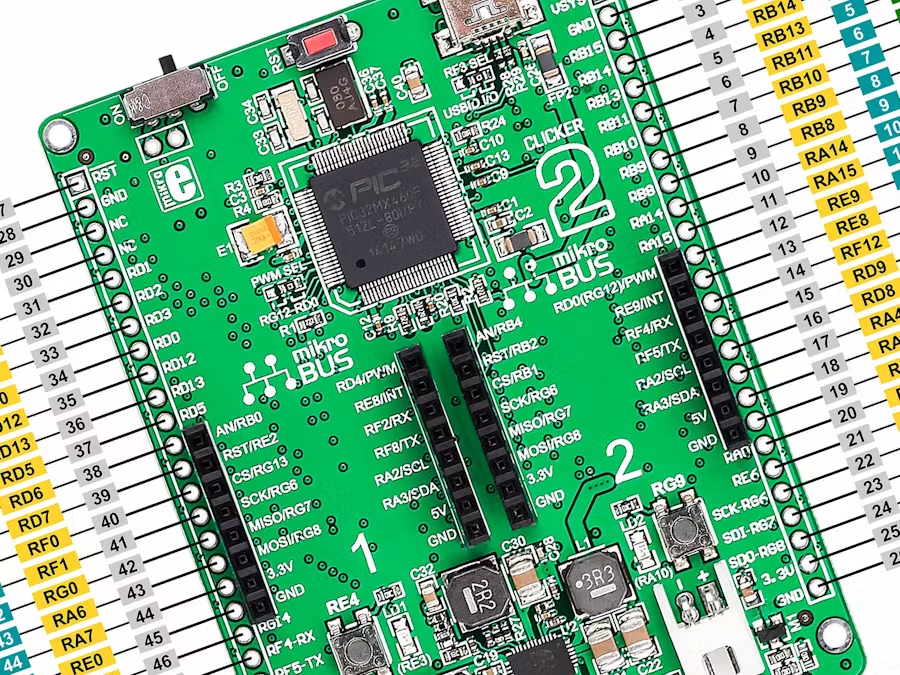
PinoutClicker 2 is not compatible with Arduino shield standard. But, with two mikroBUS™ sockets on clicker 2, you can take advantage of the huge potential of click™ boards, the constantly expanding range of over 200 add-on boards. Blend different functionalities together and come up with new and original inventions. That’s just two clicks and your project is half-way done. Go ahead and play with a few ideas right away. In schematics section of this tutorial you will found image with pinout specification.


Comments
Please log in or sign up to comment.