This is just a demo, a prototype, a short sketch or quick recipe, how to control an e-paper display connected to a Particle Photon using IFTT.
If you look for more comprehensive information about
- the Particle Photon,
- the Particle Device Cloud,
- the Thinger.io platform or
- how use a Waveshare 1.54 inch e-Paper Module
you are encouraged to read the associated documentation for this platforms/products.
Prerequisites- Hardware components (see BOM)
- Particle Photon device connected and setup (see here)
- Particle Build and or Particle Desktop IDE (Dev) setup (see here)
- IFTTT account and Particle service connection (see here)
IFTTT
IFTTT = If This Then That is a free web-based service to create chains of simple conditional statements, called applets. The Particle platform is integrated as a service.
Waveshare 1.54 inch e-Paper ModuleThe Waveshare 1.54 inch e-Paper Module "is an E-paper device adopting the image display technology of Microencapsulated Electrophoretic Display, MED."
The e-paper screen display patterns by reflecting ambient light and does not require a background light requirement. Once the display pattern is set/updated the module has an extreme low power consumption in standby mode (5 uA = 0.000005 A)
To connect the display module to the Photon, you can basically follow the instructions for “Working with Arduino” from the vendors documentation and consider the differences regarding the pin layout and the build environment / platform.
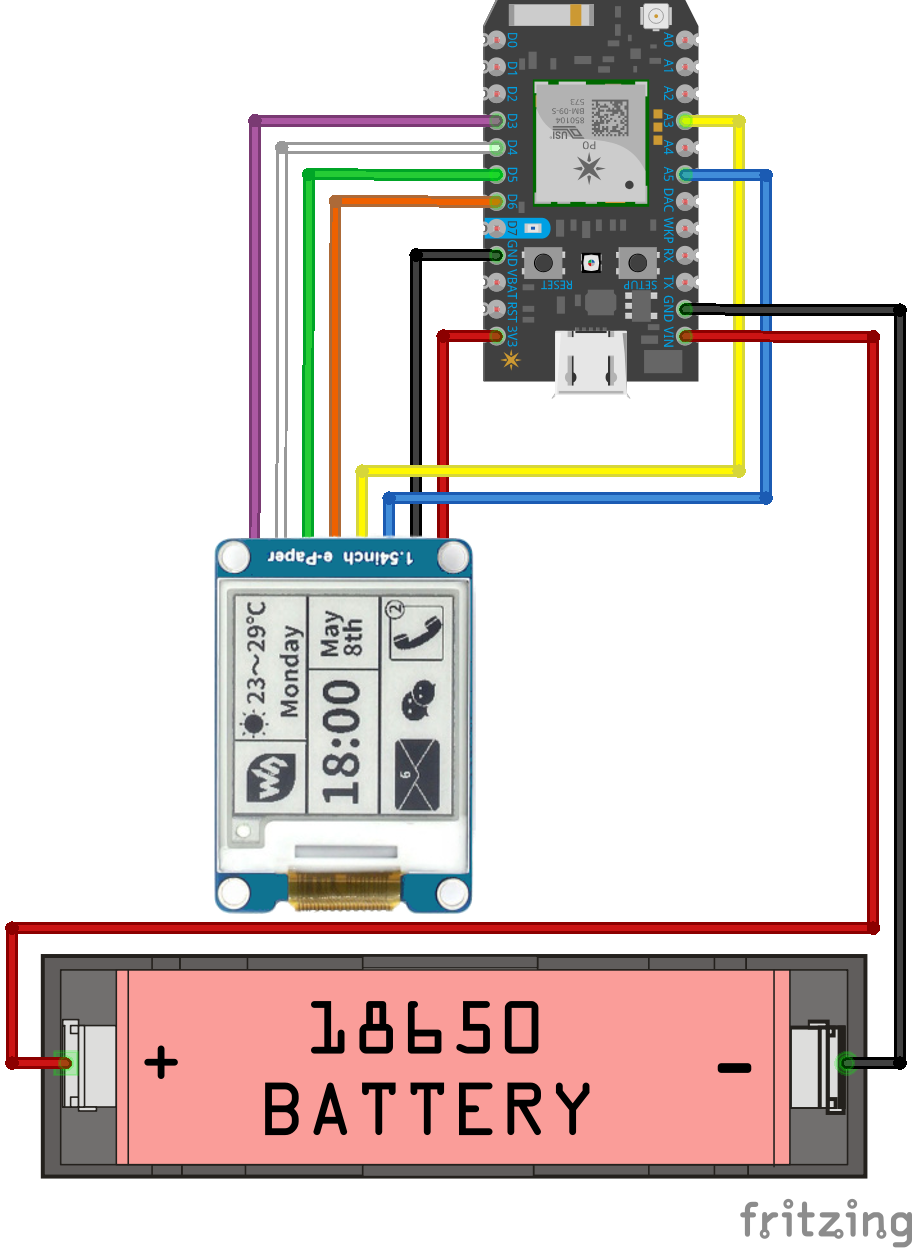
The default SPI pins on the Photon are A5 (MOSI) and A3 (SCK). Following the instructions from the Waveshare Wiki Page the two SPI signals SCK and MOSI must be remapped to A3 and A5 for the Photon. The remaining signals like CS, DC, RST and BUSY can be freely mapped to the other digital signals of the Photon.
This is the mapping table for wiring the module with the Photon:
To integrate the vendor provided library into your own Particle project some minor changes to the provided library code are necessary:
- Download code and library from https://www.waveshare.com/wiki/File:1.54inch_e-Paper_Module_code.7z and extract the package.
- Copy the files from thedirectory arduino/libraries of the demo package to /lib/ep1in54/src in your project directory.
- In the files /lib/ep1in54/epdif.h and /lib/ep1in54/epdif.h make the following changes:
In file epdif.h replace
#include <arduino.h>
by
#include "application.h"
#include "Particle.h"
In file epdif.cpp replace
#include <spi.h>
by
#include "Particle.h"
#include "Arduino.h"
and
#define RST_PIN         8
#define DC_PIN          9
#define CS_PIN          10
#define BUSY_PIN        7
by
#define RST_PIN         4
#define DC_PIN          5
#define CS_PIN          6
#define BUSY_PIN        3
The door sign itself application is basically a simple combination of two example sketches: The Web-Connected LED example provided int Particle Build web platform and the ep1in54-demo sketch provided by Waveshare.
For this demo we basically:
- create two small (200 x 200 px) monochrome bitmaps and convert these images to C byte arrays - see the "How to display an image" section in the Waveshare wiki.
- create two file pairs imagedata_open.h / imagedata_open.cpp & imagedata_closed.h / imagedata_closed.cpp and put these into the source directory (/src) of your Particle project (or add them as a separate library - e.g. in /lib/imagedata/src)
- include these bitmap arrays in a sketch:
/* "imagedata_open.h" */
extern const unsigned char IMAGE_DATA_OPEN[];
/* "imagedata_open.cpp" */
#include "imagedata_open.h"
#include <avr/pgmspace.h>
const unsigned char IMAGE_DATA_OPEN[] PROGMEM = {
/* 0X00,0X01,0XC8,0X00,0XC8,0X00, */
0xff,0xff,0xff,0xff,0xff,0xff,0xff,0xff,0xff,0xff,0xff, ...
// Image data for "We are open" and  "Sorry, we are closed" ...
#include "imagedata_open.h"
#include "imagedata_closed.h"
- define/register a Particle function and handler to control the choice which of the images above should be displayed
- display the chosen image as shown in the ep1in54-demo example.
The complete code is here.
After being compiled and flashed a new function sign should be available on your device and being shown at the Particle console:
Calling this function with parameter "open" will choose the "We are OPEN" image to be shown - sending the string "closed" will choose the "Sorry, we are CLOSED" image to be displayed.
The debug function can be used to toggle the DEBUG events on/off.
Scheduling opening times with IFTTTTo automatically schedule the change of the door sign according to opening times, you now just have to setup some applets in IFTTT using Date & Time as trigger and let them call your door signs sign function by the Particle service.
For example, if your shop's opening times are Monday to Friday 8:00 am till 5:00 pm:
Just as an example...
- Take a small photo frame - e.g. IKEA's RIBBA frames provide enough room for the whole electronic stuff at the back;
- Take a small postcard or canvas, fitting into the photo frame (e.g. 10x15 cm) and cut out a square hole just the size of the e-paper display screen;
- "Decorate" the remaining canvas / postcard pane and place your artwork in to the photo frame;
- Place the e-ink display on the backside of the canvas, just matching the display's screen with hole you cut out and glue it in place;
- Connect the Photon and a 18650-type battery holder;
- Place and/or clue Photon board and battery holder into the backside of the canvas frame;
- Insert a 18650-type Li-Ion battery;
- Enjoy!.


Comments
Please log in or sign up to comment.