


Hardware components | ||||||
 |
| × | 1 | |||
_ztBMuBhMHo.jpg?auto=compress%2Cformat&w=48&h=48&fit=fill&bg=ffffff) |
| × | 1 | |||
 |
| × | 1 | |||
Software apps and online services | ||||||
| ||||||
What it does: Indicates where the telescope is pointed in useful "Horizon" coordinates (e.g., 45 deg up and 60 deg (from zero - North). Easy to build, code and use.
Enables quickly locating the celestial object (galaxy, nebula, cluster...everything!).
Companion Android App: See the 'Apps & Online Services Tab' for link to my App that quickly provides Altitude and Azimuth coord' for many cataloged Celestial objects as well as inputting your favorites .
3D printed parts: See the 'Custom Parts/Enclosures' tab for link to the parts at ThingVerse.
Don't have a 3D-Printer? Search for a "3D Printhub" in your area - there are many... Find one with good reviews and use the print tips from my presentation.
The code: See the Code tab for link to code (posted at github) - it is ready for your addition's - Well documented on what I removed for your challenge, along with tips on completing it.
The code is based on a proven design I created in 2006. I converted it to C/C++/Arduino syntax and removed just enough to make it a small challenge but, left enough (with comments) to enable you to get up and running quickly.
The video contains the info to enable making a DSC for your telescope. It assumes you’re able to program (in at least a minimal way) such that you can use the Arduino IDE and it’s Encoder Library.
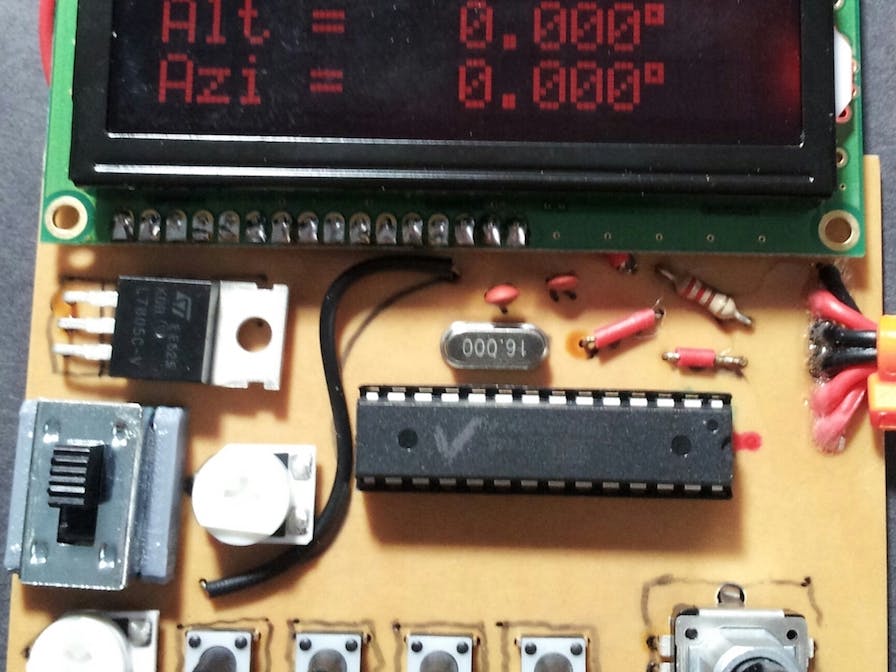
The Circuit & Parts list: See 'Schematics' tab for link to circuit/parts at the Fritzing link.
For a simple build, use an UNO or NANO and breadboard. NANO with Bluetooth display output (no LCD) video and Photo posted below.
For a Geek build, make a PCB and use a chip. Either way, read through the info on selecting the 3D parts and encoders.
Powering the gizmo: I prefer Kamashi 10000 Powerbank's (about $10 US at Amazon). Different ways to bring the power into gizmo - review the schematic. No need for the 7805 regulator if using the 5v out of supply.
Arduino syntax (Setup and Loop) are great but they contain hidden code/libraries that increase the file size and slows the code (especially if using the Serial Monitor feature). That said, the Arduino syntax and Encoder library work well enough for DSC. However, once you’re satisfied with your code, consider replacing ‘Setup and Loop’ with standard ‘C’ programming using ‘Main and While’. Be sure to comment out the Serial Monitor. This will significantly increase the speed.
FYI - the two schematics at Fritzing / in presentation are basically the same - the differences are how the encoders connect (pads for leads to JST connectors versus an RJ11 (6 pin). You can make the circuit on a Breadboard and use a chip or an UNO/other... Of course, you can hard-wire the encoders...
UPDATE 12/30/17: Added photo of Nano on BreadBoard (see link to Fritzing...). Added photo of Pinouts (for clearer understanding).
Code: Hex files of the full code for UNO and Nano are now posted (see link to Github). These codes require an LCD (there No serial or bluetooth display output).
UPDATE 12/2/17: Added some code for Bluetooth to display output on Smartphone / Tablet
Here's a Bluetooth display example
Here's a Serial display example


Comments
Please log in or sign up to comment.