Hackster is hosting Hackster Holidays, Finale: Livestream & Giveaway Drawing. Watch previous episodes or stream live on Tuesday!Stream Hackster Holidays, Finale on Tuesday!
Sandeep DwivediSachin Dwivedi
Published © TAPR-OHL

Healthy Arduino

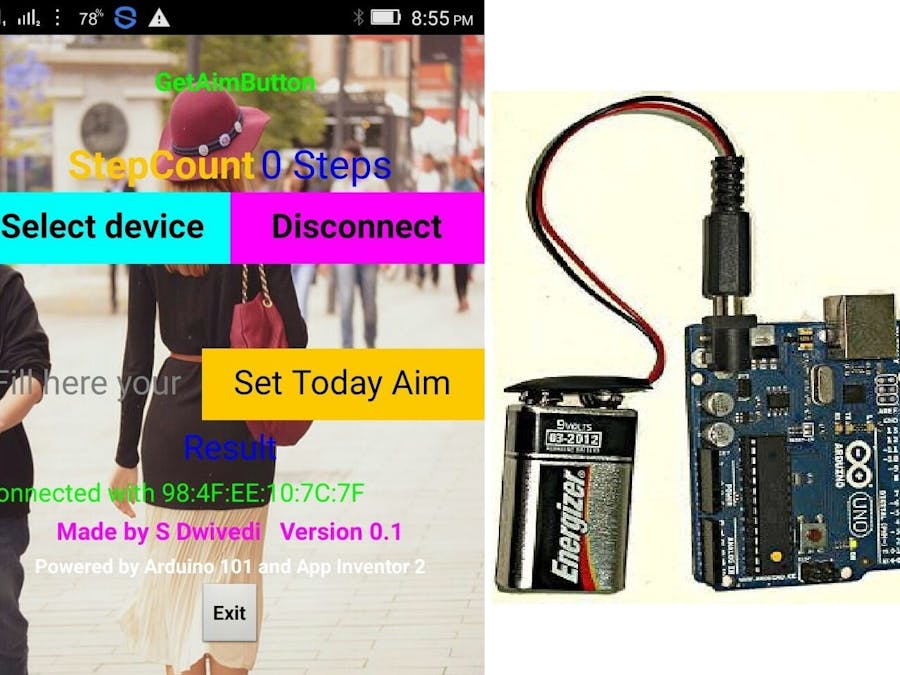
DIY real-time footsteps counter using an Arduino to show the number of steps taken per day on your smartphone.

BeginnerFull instructions provided1 hour4,995
Healthy Arduino

Things used in this project

Hardware components

Arduino 101
Arduino 101
×1
Android device
Android device
×1
9V battery (generic)
×1

Software apps and online services

Arduino IDE
Arduino IDE
MIT App Inventor
MIT App Inventor

Story

Read more

Schematics

Circuit

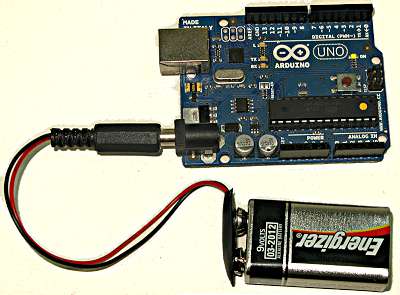
In this project no extra wiring needed only connect power source to arduino power jack according to pic.

Code

HealthyArduino.apk

Java
apk file to install app on your smartphone
No preview (download only).

HealthyArduino.aia

Java
In case you want to modify android app , simply import this file to app inventor 2 and edit
No preview (download only).

StepCount1.ino

C/C++
Arduino skectch file. dirctly upload to your arduino 101
/*
   Copyright (c) 2015 Intel Corporation.  All rights reserved.

   This library is free software; you can redistribute it and/or
   modify it under the terms of the GNU Lesser General Public
   License as published by the Free Software Foundation; either
   version 2.1 of the License, or (at your option) any later version.

   This library is distributed in the hope that it will be useful,
   but WITHOUT ANY WARRANTY; without even the implied warranty of
   MERCHANTABILITY or FITNESS FOR A PARTICULAR PURPOSE.  See the GNU
   Lesser General Public License for more details.

   You should have received a copy of the GNU Lesser General Public
   License along with this library; if not, write to the Free Software
   Foundation, Inc., 51 Franklin Street, Fifth Floor, Boston, MA  02110-1301  USA

*/

/*
   This sketch example demonstrates how the BMI160 accelerometer on the
   Intel(R) Curie(TM) module can be used as a Step Counter (pedometer)
*/

#include "CurieIMU.h"

/* To get an interrupt notification for every step detected,
    set stepEventsEnabeled to true. Otherwise, the main loop will
    poll for the current step count.

   By design, the step counter does not immediately update on every step detected.
   Please refer to Section 2.7 of the BMI160 IMU SensorData Sheet
   for more information on this feature.
*/
/////////////////////
#include <CurieBLE.h>
BLEPeripheral blePeripheral;//BLE Peripheral Device (Arduino Device)
BLEService demo111("19b10010-e8f2-537e-4f6c-d104768a1214"); // BLE demo111 Service

// BLE demo111 buttons Characteristic - custom 128-bit UUID, read and writable by central
BLEUnsignedCharCharacteristic buttons("19b10011-e8f2-537e-4f6c-d104768a1214", BLERead | BLEWrite);
// BLE sensor rate Characteristic"
BLEUnsignedIntCharacteristic sensors("19b10012-e8f2-537e-4f6c-d104768a1214", BLERead | BLENotify);
//DHT 22 library and things
//#include "DHT.h"
//#define DHTPIN 7
//#define DHTTYPE DHT22
//DHT dht(DHTPIN, DHTTYPE);

long previousMillis = 0;  // last time the sensor was checked, in ms
const int green = 13; // pin to use for the green light
const int red = 11;// pin to use for the red light
boolean a = LOW, b = LOW; //Control variables

/////////////////////
const int ledPin = 13;

boolean stepEventsEnabeled = true;   // whether you're polling or using events
long lastStepCount = 0;              // step count on previous polling check
boolean blinkState = false;          // state of the LED

void setup() {
  Serial.begin(9600);
  //dht.begin();//sensor begin
  pinMode(green, OUTPUT);
  pinMode(red, OUTPUT);
  // set advertised local name and service UUID:
  blePeripheral.setLocalName("Demo111");
  blePeripheral.setAdvertisedServiceUuid(demo111.uuid());
  // add service and characteristic:
  blePeripheral.addAttribute(demo111);//service 
  blePeripheral.addAttribute(buttons);// add the buttons characteristic
  blePeripheral.addAttribute(sensors); // add the sensor characteristic
  // set the initial value for the characeristic:
  buttons.setValue(1);
  // begin advertising BLE Light service:
  blePeripheral.begin();
  Serial.println("Demo111 service begin!");
  // pinMode(13, OUTPUT);
  // intialize the sensor:
  CurieIMU.begin();
  // turn on step detection mode:
  CurieIMU.setStepDetectionMode(CURIE_IMU_STEP_MODE_NORMAL);
  // enable step counting:
  CurieIMU.setStepCountEnabled(true);

  if (stepEventsEnabeled) {
    // attach the eventCallback function as the
    // step event handler:
    CurieIMU.attachInterrupt(eventCallback);
    CurieIMU.interrupts(CURIE_IMU_STEP);  // turn on step detection

    Serial.println("IMU initialisation complete, waiting for events...");
  }
}

void loop() {
  /* Instead of using step detection event notifications,
     we can check the step count periodically */
  if (!stepEventsEnabeled) {
    updateStepCount();
  }
  digitalWrite(13, blinkState);
  blinkState = !blinkState;
  delay(1000);
  /////////////////
  // listen for BLE peripherals to connect:
  BLECentral central = blePeripheral.central();
  digitalWrite(green, LOW);
  digitalWrite(red, LOW);
  // if a central is connected to peripheral:
  if (central) {
    Serial.print("Connected to central: ");
    // print the central's MAC address:
    Serial.println(central.address());

    // while the central is still connected to peripheral:
    while (central.connected()) {
      // if the remote device wrote to the characteristic,
      // use the value to control the leds:
      if (buttons.written()) {
        if (buttons.value() == '1' && a == LOW) { // 1 in ASCII

          digitalWrite(green, HIGH);         // will turn the LED on
          a = HIGH;
        } else if (buttons.value() == '1' && a == HIGH)  {  //when 1 was read again (second time)          

          digitalWrite(green, LOW);          // will turn the LED off
          a = LOW;
        }

        if (buttons.value() == '2' && b == LOW) { // 2 in ASCII

          digitalWrite(red, HIGH);         // will turn the LED on
          b = HIGH;
        } else if (buttons.value() == '2' && b == HIGH)  { //when 2 was read again (second time)  

          digitalWrite(red, LOW);          // will turn the LED off
          b = LOW;
        }
      }

      long currentMillis = millis();
      // if 10s have passed, check the sensor:
      if (currentMillis - previousMillis >= 10000) {
        previousMillis = currentMillis;
        updateSensor();
      }
      //finish
    }
    // when the central disconnects, print it out:
    Serial.print(F("Disconnected from central: "));
    Serial.println(central.address());
  }
  else
  {
    digitalWrite(green, LOW);
    digitalWrite(red, LOW);

  }
  ////////////////
}

static void updateStepCount() {
  // get the step count:
  int stepCount = CurieIMU.getStepCount();

  // if the step count has changed, print it:
  if (stepCount != lastStepCount) {
    Serial.print("Step count: ");
    Serial.println(stepCount);
    // save the current count for comparison next check:
    lastStepCount = stepCount;
  }
}

static void eventCallback(void) {
  if (CurieIMU.stepsDetected())
    updateStepCount();
}

void updateSensor() {
  //int temp=dht.readTemperature();//read temperature 
  sensors.setValue(CurieIMU.getStepCount());//send temperature value
  Serial.println(CurieIMU.getStepCount());//if you want check temperature i serial monitor
}

Credits

Sandeep Dwivedi
10 projects • 26 followers
just a learner curious about things
Sachin Dwivedi
4 projects • 6 followers
Student of Final Year of B.Tech. in Computer Science

Comments