


Hardware components | ||||||
| × | 2 | ||||
| × | 1 | ||||
 |
| × | 1 | |||
| × | 1 | ||||
| × | 1 | ||||
| × | 1 | ||||
 |
| × | 1 | |||
| × | 2 | ||||
| × | 3 | ||||
| × | 1 | ||||
| × | 1 | ||||
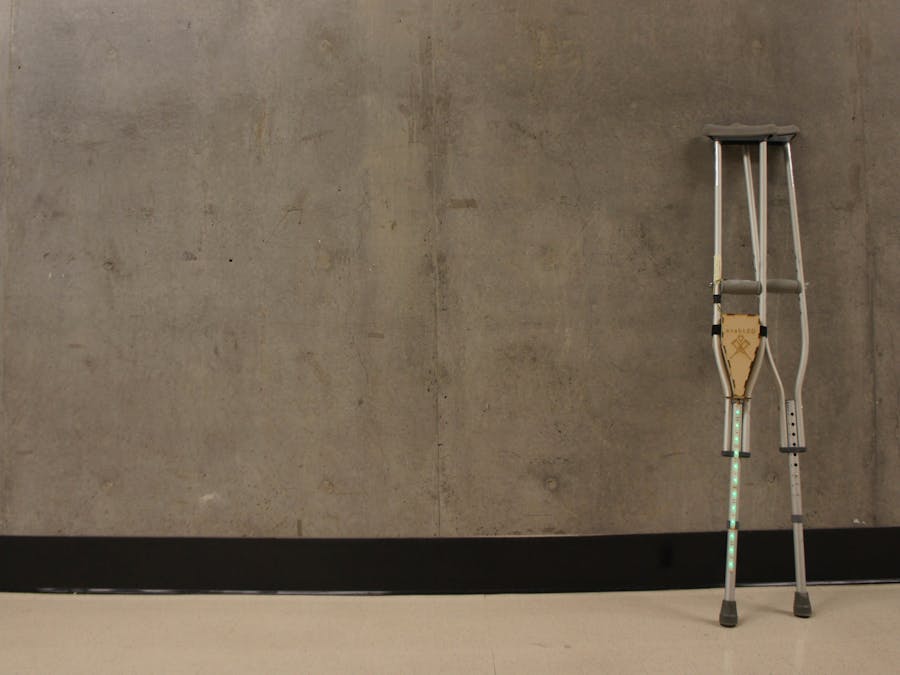
enabLED
After exploring the aspects of human-powered transportation, both its wonders as well as its faults, our team has created enabLED. enabLED is our response to the difficulty and burden of using crutches. We've devised the solution of making the road to recovery, often arduous and frustrating, more fun and empowering. With enabLED, we hope to better the future of not only crutches, but of all mobility aids to lessen the agony of injury and making recovering a much more enjoyable experience.
(I couldn't get hackster to cooperate with uploading our presentation, so here's it in pdf form)
Step-by-Step
1. Obtain Crutches
2. Get an accelerometer, force sensor, GPS tracker, wireless module, and LED strip.
3. Use the accelerometer and force sensor data to dynamically control LEDs during crutch usage.
4. Use the wireless module to push force, acceleration, and GPS data to the web.
5. Install technology in housing
6. Map the acceleration and force data to different locations to generate a map showing what areas are easy and what areas are hard to use crutches in.
Step-by-Step for Implementing GPS
1) Download Arduino code enabLEDgps.ino.
2) Download TinyGPS library.
3) Wire GPS module.
4) Run Arduino code and let it calibrate.
5) Once it’s found a position, write output to .txt or .csv file.
7) Use .txt or .csv file for GeoJSON object marker coordinates.
Visualization
Link: http://briancly.github.io/enabLED/GitHub Repo: github.com/briancly/briancly.github.io
In its current iteration, the visualization serves as a representation of the intensities of different coordinates taken by enabLED users, indicated by the size of the markers to represent the level of intensity. The end goal is to use crowdsourcing to develop a community of enabLED users who can tell each other what are the easiest paths for crutch users.
LED strip and pushing data to the web
Parts: 0.5 inch diameter force sensitive resistor, LSM303 triple axis accelerometer, Adafruit HUZZAH CC3000 wifi shield with onboard antenna, RGB LED weatherproof flexi-strip, 2 9V batteries, 3 N-Channel MOSFETs (such as FQP30N06L from sparkfun).
Approach:
1. Mount the force sensor on top of the handle of the crutch so that it can detect when someone is pushing down while using the crutch.
2. Mount the accelerometer so that the x-axis is along the direction of crutch movement and attach it firmly in place so that it does not wobble when the crutch is in use.
3. Solder wires to the pads of the LED strip and attach it to the bottom pole of the crutches. Adafruit has a great tutorial on how to use it: https://learn.adafruit.com/rgb-led-strips. The LED strip can be powered with a 9V battery and controlled with an Arduino by using a MOSFET to control whether current can flow through (and light can come out of) each of the red, green, and blue LEDS. PWM can be used to control brightness.
4. Mount the CC3000 wifi shield on top of an Arduino Uno. Set up a free data.sparkfun.com data stream to store data from the crutches. Connect the CC3000 to the internet using the SFE_CC3000 Arduino library and Phant Arduino library, both from sparkfun (https://learn.sparkfun.com/tutorials/pushing-data-to-datasparkfuncom/arduino--cc3000-shield). Shown in code below.
5. Set the force sensor readings to control the brightness of red (pushing harder increases brightness). Be sure to take readings from the force sensor in use to find out what the values vary between and map this range to 0-255 to control the color via PWM. Shown in code below.
6. Set the absolute value of the accelerometer readings to control the brightness of green (moving faster increases brightness). Be sure to take readings from the accelerometer in use to find out what the values vary between and map this range to 0-255 to control the color via PWM. Shown in code below.
7. Turn the LED strip to pure blue when posting data because it will not be possible to dynamically update red and and green while posting. Shown in code below.
8. A 9V battery can be used to power the Arduino when the crutches are in use and portability is required.


_3u05Tpwasz.png?auto=compress%2Cformat&w=40&h=40&fit=fillmax&bg=fff&dpr=2)

Comments
Please log in or sign up to comment.