


Hardware components | ||||||
 |
| × | 1 | |||
| × | 1 | ||||
| × | 1 | ||||
| × | 1 | ||||
| × | 1 | ||||
| × | 1 | ||||
| × | 1 | ||||
| × | 1 | ||||
| × | 1 | ||||
| × | 1 | ||||
| × | 1 | ||||
| × | 1 | ||||
| × | 2 | ||||
| × | 3 | ||||
| × | 1 | ||||
| × | 1 | ||||
| × | 2 | ||||
| × | 1 | ||||
| × | 2 | ||||
| × | 2 | ||||
| × | 1 | ||||
| × | 1 | ||||
How long does it take to go around the world? Some say 80 days. We think 8 minutes - ChairVoyager
What is ChairVoyager in one sentence?
ChairVoyager is a unique chair and floor mat pair that mentally transports the user through space and time.
Okay sounds cool, what else can it do?
The Chair Voyager gives users a break from their day in the office, letting them roam around the World Mat to hear current events from regions around the world. We designed the Chair Voyager to be simple and natural - there are no buttons to press, no devices to take out, and no searching or scrolling on a tiny screen. It encourages users to literally distance themselves from their desk and electronic devices. Rolling around the World Mat (a map of by color-coded continents) adds a playful element as well, and the constantly changing livestream of news stories maintains a sense of adventure. The ChairVoyager automatically pushes all articles heard by the user to the user's electronic device via Wifi, so that the user can refer to the articles later.
The Concept
We believe that transportation is more than a physical movement from one spot to another. Transportation can be mental. Transportation can occur within time and space.
Our group wanted to examine the idea of feeling transported to far away places without actually being there. We brainstormed a large variety of ideas, and eventually settled on an a special office chair the plays back curated news podcasts from the country on the World Mat they land on. These news stories are also shared via Wifi with the users electronic devices for future reference.
Target Audience
According to the Bureau of Labor Statistics, in the United States, the majority of office workers spend over 8 hours a day at work (http://www.bls.gov). As much as they might want to travel, they often find themselves stuck at a desk in an office instead. Based on user research, although workers are able to access national as well as international current events from an internet page on an electronic device, the abundance of online information coupled with the stressors of work creates for a place not optimal to keep up with the latest occurrences in the world.
We originally designed ChairVoyager for office workers. We want to make it easy to catch up on current global even, and allow their mind to explore and connect to the larger world. And we saw their breaks, as they kick back with a relaxed gaze and listen to their ChairVoyager travels, as the perfect opportunity to do this.
The Design Road
1st Iteration
Our initial design choice for our transportation was a one called "no place like home" shoes. It was intended to empower kids to be able to contact parents without the need to yell moms' names or use a cellphone. The idea was that a child would wear specially designed shoes with BLE capability. These shoes, once tapped against each other a certain number of times, would send a message to a parent's cell phone to come and get the kid. We thought it would be a great way to provide safety and an element of playful enchantment as the show would respond by saying "There is no place like home" to the child - as Dorothy would say in the movie The Wizard of Oz.
However, initial user interviews revealed parents' fears of safety and issues with giving kids the autonomy to decide when to reveal their location. The majority of parents were against a design as the one envisions and said they would not allow their children to wear such shoes. Even though we rejected the shoes idea due to various safety concerns, we started to think about transportation as more than just physical, embodying aspects such as auditory or sensual signals that are tied with transportation.
The New Design
We thought of transportation beyond the physical. We considered mental transportation and transportation through time.
The concept of a traveling chair fit in with what we wanted to accomplish and we began formulating ways to "feel" as though the user could travel to different countries by moving over set locations on the floor. User interviews of people working in office settings approved the need for a fun way to engage the user during their breaks. People sit in their office chairs and want to kick back for a break. Instead of having to pull out a phone and scroll through a smart device, we thought that there should be a better way to "explore" the world, naturally of course.
Hence we created ChairVoyager. As the user kicks back for a break, the smart light color sensor detects what country on the World Mat and plays back curated news headlines from that country.
How much information do we reveal to the user?
A key design choice our group made was deciding how much information to reveal to the user. At one point, we were considering "invisible" sensors such as distance sensors to determine location, so that the user would suddenly find themselves in the Congo or in Siberia with no visual cue. However, we decided that a physical interface would give the user more control in their choice of travel. A color-coded map outlining the continents gives users a visual cue about their location, but leaves an opportunity for the users to be greeted with unexpected and diverse news stories from a variety of countries in that continent. The bold colors make it clear where one area ends and another begins; the white background could also be programmed to play naval-related news or whale songs. Also the low resolution (big contents) made it easy for the user to land on their desired continent.
How do we communicate with the user?
Another important design choice was the use of audio. Originally we thought of having a loudspeaker attached to the backrest of the chair and it would play the tracks in a high volume, enough for everyone in a room to hear it. After user research, we realized that noise is not a welcome solution in an office setting. We began thinking about different solutions and honed in on a surround sound quiet headrest with very localized sound where only the user sitting in the chair would hear the audio piece. The sound is not only localized, but also focused and amplified leading to a clean listening experience. Also, office neighbors can work uninterrupted, barely making out a muffled sound, not knowing that the their friend is actually traveling in the Middle East at that moment.
BUILD LOG 1
HARDWARE
The hardware is comprised of 5 main aspects.
- The Color Sensor
- The Electronic Components Housing
- The Surround Sound Headrest
- The World Mat
The Chair
In order to create the experience, the office chair was equipped with the following electronics.
- Sparkfun Audio Sound Breakout Board
- Adafruit Wifi Module Breakout Board
- Adafruit RGB Color Sensor
- 6v Power Supply
These electronic components where first independently assembled and coded on separate Sparkfun Redboards for calibration purposes. Once working, we integrated all the parts together into one Redboard and combined the codes, making the necessary implementation changes to the master code such as when the color sensor reads blue, play track 2 from the audio module, also push the track information via the WiFi module through the internet to pull up the related article via a webpage.
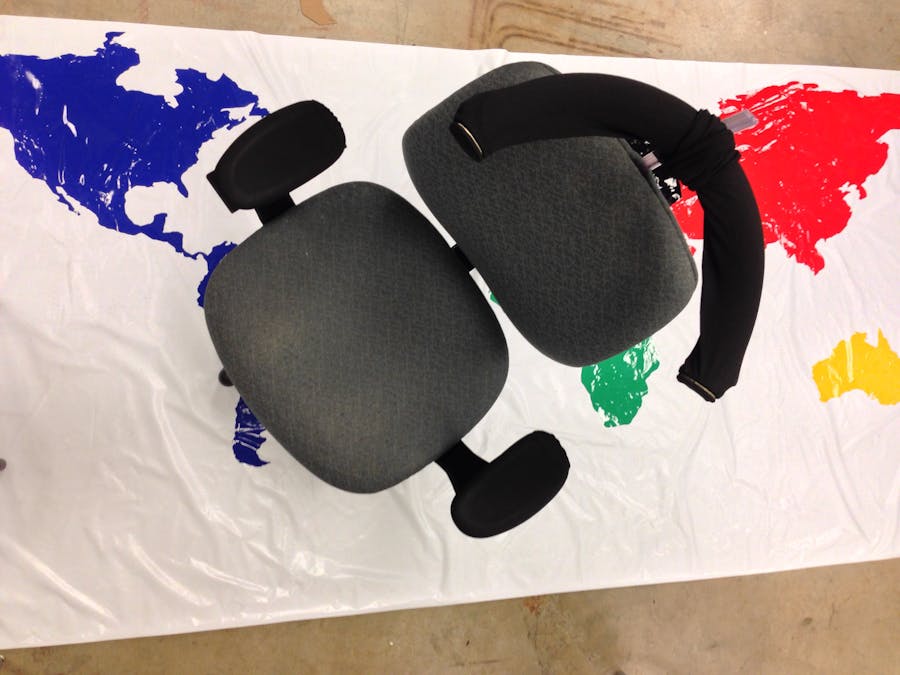
After soldering long wires and covering them with Heat-shrink tube, The color sensor was place at the bottom-most center part of the chair, about an inch away from the floor. The cable was hot glued to the chair hiding it as much as possible from the users view.
We taped the chair's gas spring when expanded (the mechanical part that allows the user to lift the chair up) so that as to restrain rotation. Since rotation would cause the cable going to the color sensor to the main box to be pulled out of place. We used the remaining of the hose tubing to conceal the cable coming from the sensor by cutting it and placing it around the spring.
We placed the power supply, which has a switch serving as the turn on/off switch, under the right armrest- closes to the hand of the user.
Finally we covered both armrests with a pair of women's stockings to give the chair a high end look (as well as to hide the power supply).
The Electronic Components Housing
We chose to buy our box (it is cheap) instead of 3D printing it or laser cutting it out of wood because we wanted to give the final product a polished professional look, geared towards a professional setting as is the office. The box we bought comes with a thin aluminum cover and 4 screws to close it shut.
To make sure the box is ready to house components required for Chair Voyager:
- Using a power Drill...
- Make two small holes at the bottom of the box, running along the center of the box, about 3" apart from each other.
- Make one semi large hole on the sidewall of the box that would be positioned closest to the center of the chair. (for color sensor and speaker cable use)
- Make one small hole on the sidewall of the box that would be position closest to the right armrest. (for power supply cable use)
- Place the box in the front area of the bottom of the chair, keeping in mind the holes positioning.
- Drill through the 2 holes made on the bottom of the box, onto the wood of the chair, making a deep enough hole. CAREFUL not to go through the seat cushion itself.
- Use two long screws to screw and tighten box to chair.
- Using Adobe illustrator, Create your logo or write your name. In our case it we infused our project with some school pride "Cal"
- Print it in vinyl via a vinyl cutter printer
- Paste vinyl onto aluminum cover of box
- Seal component by using screws when cables have been passed through holes and individual components have been tested
The Surround Sound Headrest
The original design called for audio implementation. Our "Surround sound quiet speaker is design to wrap close to the ears of the user and meant for only such user to be able to hear the sounds emanating from the speaker.
To build the speaker housing (the headrest):
- Measure and cut a piece of 4' long BLACK hook up wire
- Repeat wire cut but this time with RED wire
- Thread them together and use Heatshrink plastic wrap to make speaker cable
- Measure the middle part of the tube and make a small incision with a box cutter or paper cutter pen
- make another 4 small incisions on the opposing end of the central incision and separated by 3-4 inches from each other.
- Pass speaker cable through tube's incision
- Solder one end of cable to the speaker (black - , red +)
- Use Heat Gun to glue soldered portion together.
- Insert speaker inside the hose and pull cable until it will not budge. At this point speaker should be in the center of the hose
- Use a drill to make a two small holes in the thread portion of the hose clamp.
- Pass through two small bolts though the holes in hose clamp and place it around the midsection of the hose
- Tighten the screw of the hose clamp to keep the hose perpendicular to the ruler
- Make small holes of similar distance from each other as the holes in the hose clamp on a wooden or plastic ruler
- Unite ruler with hose clamp by tightening nuts to the bolts
- Tighten the screw of the hose clamp to keep the hose perpendicular to the rule
- Bend the Hose forming a semicircle away from the ruler
Use hot glue to glue speaker cable to ruler and cover both with black tapeOpen the back rest portion of the chair and insert the ruler to desired height feeding cable though the backside of chair and to the side.
- Our chairs backrest was composed of two pieces nailed together. Open the backrest portion of the chair by pulling the back section and insert the ruler to desired height feeding cable though the backside of chair and to the side.
- Once the ruler and cable are in, use hot glue and clamps to close the opening made earlier.
- Hide cable by hot gluing it to the bottom side portion of the chair and continue through until getting to the Electronics component box
- Feed cable through one hole on the side of box.
- Attach audio wires to corresponding locations in Redboard.
- Finally, place one women's knee high stocking over the right side of the Hose tubing and extending the sock until reaching the middle portion.
- While stretching the stocking, place a rubber band at the endmost part of the hose.
- Stretch the portion of the stocking near the middle part of the hose and place a rubber band to hold stocking in place-coveing rubber band by folding the remaining portion of stocking.
- Repeat for the right side.
The World Mat
Once we settled on creating a physical mat and using a color sensor, we had to consider three key aspects in designing the World Mat: appearance, amount of detail, and scale. We sketched several iterations of the mat’s appearance, from four blocks of color representing four quadrants of the world, to variously sized dots placed in the general position of the continents. We decided to use vinyl cutouts of the actual continent shapes, to give the map the most realistic appearance. As noted above, we elected to make every continent a single color to make the user experience easier and expose them to an unexpected variety of news stories. And since the user will be rolling across the World Mat, it must be big enough to simulate office size; this determined the general scale of the mat.
To create the mat:
- Measure out the desired width of the mat
- Using Adobe Illustrator and a stock vector image, create a map of the world
- Constraining proportions, scale the world map to match your desired width; use the corresponding length to determine the length of the mat
- Obtain white vinyl with these dimensions
- Separate your Illustrator file into several files, with each containing one continent
- Using the Roland GX-24 CAMM-1 vinyl cutter, create colored cutouts of the continents
- Clean the white vinyl using a damp cloth and lay it on a flat surface
- Carefully peel off each continent and apply to the white vinyl; cut into smaller shapes if necessary to make the application more manageable
- Remove bubbles using a cardboard tube as a roller, and also by puncturing the bubbles with tweezers
- Clean the entire surface again with a damp cloth.
All Illustrator files for the mat can be found in this .zip file (as well as the Cal logo we placed on the box):
BUILD LOG 2
ELECTRONICS AND SOFTWARE
The Color Sensor
We used the TCS34725 color sensor. The sensor was not very easy to work with. The biggest problem with it was that the colors it claimed to detect (various shades of white and grey) were very different from the colors placed before it (bright reds, dark blues, etc). On the bright side, it was able to distinguish between colors fairly distinctly. First we presented the sensor with a specific color (say, red). We then wrote a script that would ask the color sensor which rgb color it was seeing 100 times and averaged those results. This gave us the base line for each color. These base lines were drastically different from the color they were intended to be, but thankfully were also fairly different from each other.
We then wrote a distance algorithm. It would take the rgb value the sensor detected and calculate the three-dimensional distance of that value to the "base line" values stored in the system. The hope was that if the sensor saw red, the rgb values it announced would be closest to the base line values stored for red.
The distance formula was correct in determining which color the sensor was "seeing" about 80% of the time. To get 100% accuracy, we ran the distance calculation 5 times in a row (with 5 different rgb inputs from the color sensor). If the result was "RED" a majority of the time, we would assume we were seeing red. This system worked really well.
Wireless Connectivity
In order to send the URLs of the articles that the user hears during their journey on the ChairVoyager, we implemented wireless connectivity. Using the CC3000 WiFi Breakout board from Adafruit, we pushed color sensor data to Sparkfun’s server at http://data.sparkfun.com/streams/Jx3n8mWoYEsNwYYDwWM0. When the color sensor detects a new color, it triggers audio playback an article from a country corresponding to that color. Ideally, we would have streamed these articles in real time from the web and sent the audio over Bluetooth to be played back on the Arduino. Because of time constraints, we used a pre-curated list of articles for our prototype. The audio was stored locally on a microSD card, and the index of the article from our curated list was sent to the Sparkfun server. We wrote a Python script to be run on the user’s computer, which pulls the data from Sparkfun’s servers, and opens the corresponding article on the user’s webbrowser.
Check out our github for our code.
User Testing and Other Uses
Although we originally designed with an office setting in mind, we saw potential for many distinct uses after engaging with the finished ChairVoyager. We could see this unique chair and floor mat pair as an installation in a museum, a science center like San Francisco's Exploratorium, or in a classroom to help children learn about world cultures and news. Though not our original intention, our product can clearly serve a useful, educational and interactive purpose for people beyond our initial target.
Future Work
Working on this project helped us realize its incredible potential to not just broadcast current events, but serve as a teaching tool for many different groups. The technology can be applied to customizable mats—we can envision rolling over colored silhouettes of the planets instead of continents, making the Chair Voyager truly a space voyager. This also means we can curate the type of news Chair Voyager plays, perhaps discussing only international environmental issues for some users or economic policies for others.
Taking inspiration from our class discussions, a final, more speculative idea we played with was that Chair Voyager can transport you through time as well as space. Instead of rotating to simply "tune in" to contemporary broadcasts, spinning in the chair would turn back the clock and allow users to hear what was newsworthy in the past.
Code


_3u05Tpwasz.png?auto=compress%2Cformat&w=40&h=40&fit=fillmax&bg=fff&dpr=2)
Comments
Please log in or sign up to comment.