


Hardware components | ||||||
 |
| × | 1 | |||
 |
| × | 1 | |||
 |
| × | 1 | |||
| × | 1 | ||||
Software apps and online services | ||||||
 |
| |||||
 |
| |||||
This project does the same work as the project https://www.hackster.io/phpoc_man/amazon-echo-control-diy-iot-devices-with-phpoc-037b11. But there is only one difference, the one project uses MQTT and the other uses HTTP.
DemonstrationThe big picture of this article
I. System Architecture
- 1. System diagram
- 2. Functionalities of each part and interaction among the system parts.
- 3. Which parts in system are changeable. If possible, which are the alternative
II. Amazon Echo Dot – PHPoC
- Step 1: Setting up an Amazon Echo or Echo Dot
- Step 2: Creating and configuring Alexa Skill (on Alexa Service)
- Step 3: Writing source code to handle requests Sent by Alexa (on AWS Lambda)
- Step 4: Writing source code on PHPoC to handle commands and control the devices
Now, let’s go into detail.
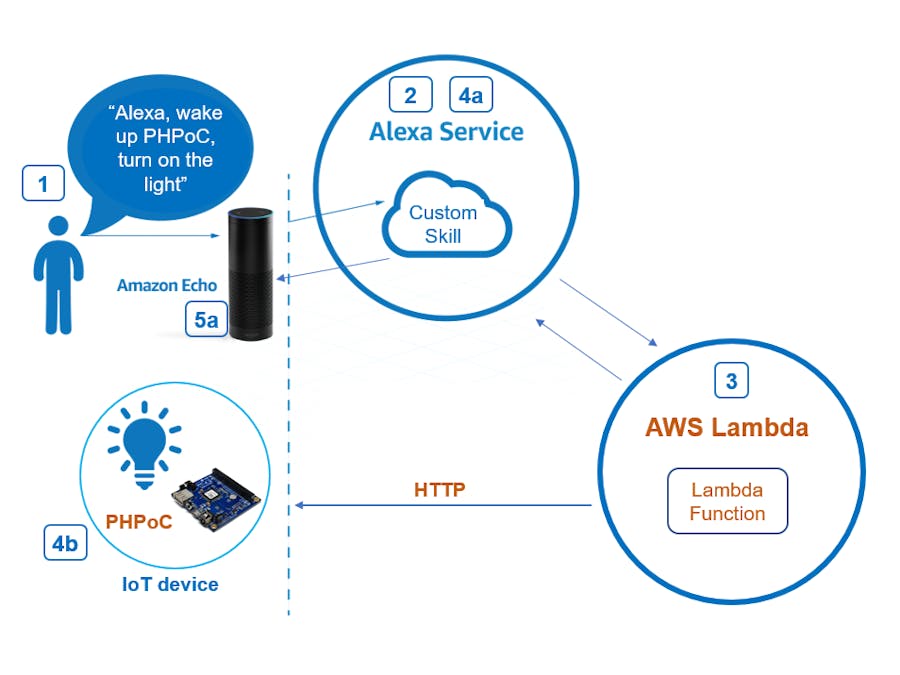
I. System Architecture1. System diagram
In the article https://www.hackster.io/phpoc_man/amazon-echo-control-diy-iot-devices-with-phpoc-037b11 , I explained how I designed the system architecture using “Custom Skill” of Alexa Service. In that article, I used MQTT protocol. In this article, I am going to use HTTP protocol instead of MQTT. By using HTTP protocol, system architecture is simpler since it does not require any Device Cloud. However, it will be less simple to manage if we want to control a lot of IoT devices.
2. Functionalities of each part and interaction among the system parts
- Amazon Echo: (1) getting your voice command, stream it to Alexa service. (5a) receiving response from Alexa Service.
- Alexa service: this is where you create the Alexa Skill. (2) It converts you voice to text, process it, create “intent” data and send it to your service. You need to provide the endpoint of your service (URL or Amazon Resource Names (ARNs)) when you create the skill. (4a) receiving response from your service and send it to Amazon Echo
- Your service: (3) this is where you write your code to handle command from Alexa. Your code will perform two main tasks: send necessary command to IoT Device via HTTP and send the response to Alexa service.
- IoT device: get command and take action (e.g. turn on/off light bulb) according to the command.
3. Which parts in system can be changed. If possible, which are the alternative
- Amazon Echo: you can use Amazon Echo, Amazon Tap, Echo Dot or Echo Look.
- Your service: Amazon provides two ways to build your custom skill:
- You can build a web service for your skill and host it with any cloud provider. (This is a hard work)
- You can host your service in AWS Lambda (This is a simpler work)
- IoT device: Any kind of IoT hardware platform which has a web server such as PHPoC
II. Amazon Echo Dot – PHPoCI am going to show a very simple example of voice-controlling on/off a light bulb. Another example which is quite complicated will be present in the next article.
As mentioned, Amazon echo, the service, device cloud and IoT device are changeable parts. In this project, I use:
- Amazon Echo: Amazon Echo Dot.
- The service: AWS Lambda.
- IoT device: PHPoC and a light bulb. I use PHPoC for this project because PHPoC is an IoT hardware platform which has a web server and a variant of PHP interpreter. From PHP script, we can interact with any kind of sensors or actuators.
As I described before, the system includes four parts. The following is five steps to do on four parts, respectively.
Pre-require
You need to register Amazon accounts:
- Amazon developer account at https://developer.amazon.com/
- AWS Account at https://aws.amazon.com/
Step 1: Setting up an Amazon Echo Dot
Refer to https://www.amazon.com/gp/help/customer/display.html?nodeId=201994280
Step 2: Creating and configuring Alexa Skill (on Alexa Service)
- Visit https://developer.amazon.com/home.html and sign in
- Navigate to “Alexa” tab, Click “Alexa Skills Kit”
- Click “Add a New Skill” button, fill some information as below, click “save” and then “next” button.
- In “Skill Information”:
Note that: invocation name should be written with space “P H P o C” for correct the recognition. And you will interact with Amazon Echo Dot with structure:
- Alexa, tell P H P o C turn on/off the light
- Alexa, tell P H P o C turn the light on/off
You can change vocation name to “robot” and can say: Alexa, tell robot turn on/off the light.
- In “Interaction Model”:
- Intent Schema
{
 "intents": [
   {
     "slots": [
       {
         "name": "LightState",
         "type": "LIGHT_STATE"
       }
     ],
     "intent": "ControlLightBulb"
   }
 ]
}
- Custom Slot Types
+ Enter Type: LIGHT_STATE
+ Enter Value: on and off
ð Click “Add Slot Type” button
For "LightState" and "ControlLightBulb", you can search them on index.js to see their meaning.
- Sample Utterances
ControlLightBulb Turn {LightState} the light
ControlLightBulb Turn the light {LightState}
ControlLightBulb {LightState} the light
ControlLightBulb the light {LightState}
- Click “Next”
- Do step 3 to get AWS Lambda ARN and then come back here, put ARN as below image
- Click “Next” button.
If you finished step 3, you can test this skill by using service simulator
Step 3: Writing source code to handle data from Alexa Skill (on AWS Lambda)
We need to create a lambda function and write source code for it. This function is fired when there is an incoming request from Alexa. The function will:
- Process the request
- Make a HTTP request to PHPoC and get response
- Send the response back to Alexa
Create a Lambda function:
- Go to https://aws.amazon.com/ , Click “Sign in to The Console” button at the top-left.
- Search “Lambda” on the search bar and click on “Lambda” result
- Click “Create a Lambda function” button
- Select runtime Node.js 6.10
- You will see a template function “alexa-skills-kit-color-expert”, click download icon to get the sample code. We will modify and compare this code later. Then, close download window and click “Blank Function”. (Amazon may change the template code overtime).
- Choose “Allexa Skill Kit” and click “next”
- Configure function:
- Name: any name, for example: myLightBulb
- Runtime: Node.js 6.10
- Handler: index.handler (by default)
- Role: Firstly, select “Create a custom role”, it will redirect to create a custom role. (refer to Appendix 1 to create a role). Secondly select “choose an existing role”.
- Existing role: choose the custom role you have just created.
- Click “next” button
- Click “Create Function” it will redirect to function management page. You will upload code at this page. Please pay attention to the upper right corner of the ARN string, this is the endpoint of this Lambda function which we will put it in Alexa Skill configuration in step 2.
You can code in Node.js (JavaScript), Java, Python, or C#. In this project, I code in Node.js
- Write main code ( see index.js in the code section)
we downloaded ““alexa-skills-kit-color-expert”” sample code. Unzip this code and see the index.js file. I modified it to control the light bulb (see index.js in source code section). You can compare my index.js code and index.js code from template to see the difference (I recommend to use the WinMerge tool for compare two file http://winmerge.org/ ). When you compare two file, it’s easier to understand the source code and how it works.
Note that: you need to change IP address or domain name of your PHPoC board in this source code. In case you use the private IP address, you need to set port forwarding on your router or access point.
- Since this source code does not use any the external library, we can paste this code directly to online editor.
Step 4: Writing source code on PHPoC to handle commands and control the devices( see index.php in the code section).
In this code, we just need to write a PHP script to handle HTTP request. When receiving a HTTP request, this code turn on or off the light bulb according to value in HTTP request and send response to AWS Lambda.
Appendix 1: creating a role


Comments
Please log in or sign up to comment.