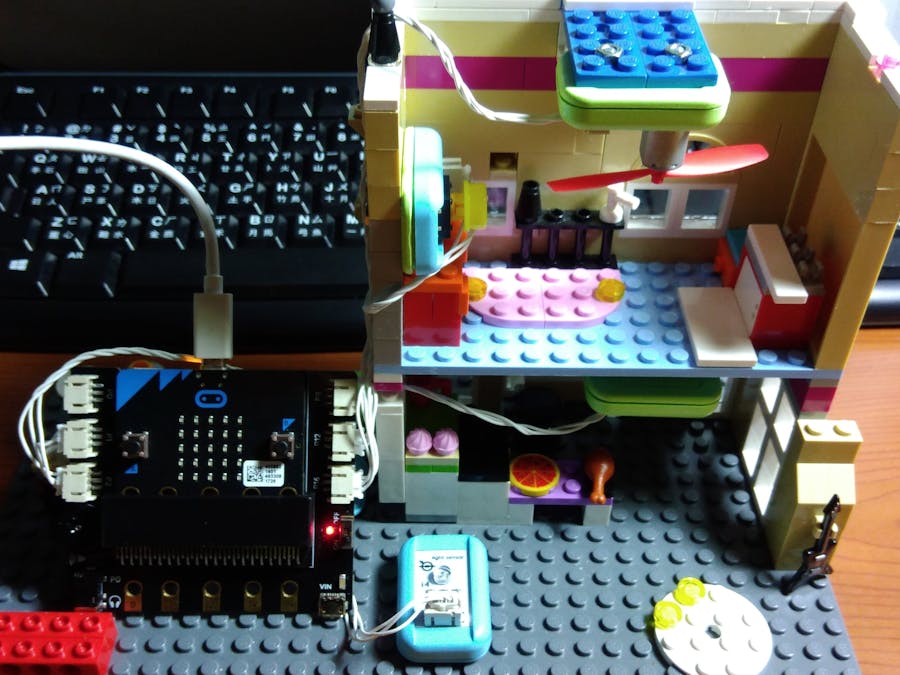
In this post, we would introduce how to use micro:bit and DFRobot BOSON starter kit for micro:bit to build a Lego smart house.
There are three small projects in this topic, the first one is a LED light which will automatically adjust the lightness according to ambient light; the second one is a button-controlled ceiling fan; and the third one is an earthquake-detecting alarm.
PreparationMicrobit and BOSON starter Kit
In this article, we use the BBC Micro:bit as the controller of the smart house.
And to handle the electronic components in our smart house, i.e. sensors and actuators, we use the DFRobot BOSON starter kit and insert micro:bit into the extension board bit so that we can easily connect all the BOSON modules of this projects.
Note: if you don't have this starter kit, you can use compatible components and connect them to micro:bit pins with the help with breadboard and wires.
For more information about BOSON starter Kit, you may refer to this link.
And here is the list of all BOSON bricks we need:
1.Light Sensor Module
2.LED Module
3.Button Module
4.Fan Module
5.Tilt Sensor Module
6.Buzzer Module
Next, to write the micro python code of micro:bit, please download the Mu Editor from here. This is its main interface.
Also, we recommend you to have a basic understanding of the Micro Python API for micro:bit, there are many tutorials and samples of the Microbit Python Module.
The following pictures show how we build our house by Lego bricks.
Besides the horizontally placed BOSON bricks, some hanged bricks require addition fasten method rather than simply attach them to the Lego pieces.
We could use a screw to secure a BOSON base plat with Lego pieces, and the bricks can adhere to the base magnetically.
Now let’s launch the Mu Editor and write the Micro Python program!
1. Night LightIn the first sample, we want to make a LED light to adjust the lightness by itself, even more, we want it can change properly with respect to the ambient lightness.
So we attach a light sensor to P1 port of the micro:bit extension board to enable microbit read the value of lightness, and the LED is connected to P2 of the extension board.
First, we need to use the following scripts to measure the max and min light sensor value.
To make the value more precisely, we record light sensor values in a short time, and then compute the final average value.
night-light-measure.py
from microbit import *
light_sensor = pin1.read_analog()
counter = 0
timer = running_time()
while (running_time() - timer) <= 3 * 1000:
  light_sensor += pin1.read_analog()
  counter += 1
light_sensor /= counter
print("mean light sensor value: ", light_sensor)
Then open a REPL in Mu Editor, and run this program with and without the ambient light.
You will obtain the mean value under these two instances, for example the 966.4033 and 14.81614 in the picture below,
Now we can put these two dark and light value in the following code, and micro:bit will adjust the analog output proportionally due to these two upper and lower bounds.
night-light.py
from microbit import *
light_sensor = pin1.read_analog()
counter = 0
timer = running_time()
light = 966.4033
dark = 14.81614
while True:
  light_sensor = pin1.read_analog()
  LED = int((light - light_sensor)/(light - dark)*1023)
  if LED > 1023:
     LED = 1023
  elif LED < 0:
     LED = 0
  print("LED lightness: ", LED)
  pin2.set_analog_period(1)
  pin2.write_analog(LED)
  sleep(0.5)
Video:
2. Ceiling FanIn the second demo, we will build a simple ceiling fan which can be switched on and off by a button.
Please connect a BOSON button module to P12 of the extension board and connect to a BOSON DC fan module to P16.
We use a boolean variable, switch, to store the status of the switch, and it would change to the opposite status when user pressed and released the button.
Note that it might be better to wait for a certain time duration ( i.e. sleep(0.5)) during user switching the fan so that we can ensure the button is pressed only once and fully released.
ceiling-fan.py
from microbit import *
switch = False
while True:
  if pin12.read_digital() is 1:
     while pin12.read_digital() is 1:
        sleep(0.5)
     switch = not switch
     if switch:
        pin16.write_digital(1)
        print("Turn ON")
     else:
        pin16.write_digital(0)
        print("Turn OFF")
Video:
3. Earthquake AlarmThe third demo is quite interesting, we are going to make a earthquake alarm of the house.
To tell if the house is shaking, we use a tilt sensor and monitor the variance of the sensor in a very high frequency.
If the house is not shaking, the variance will be identically zero, so we compute the average and check whether it is zero to determine the occurrence of earthquake. And if an earthquake is detected, the program will play a music to notify people.
Please connect a BOSON tilt module to P0 and buzzer's +/- pins to micro:bit's P0 and GND pin. If you use the extension board, just plug a earphone or small speaker to its audio jack (connected to P0 already).
Note this demo uses the built-in music library of microbit, and it defines audio output on P0.
You may design a custom notes and play it such like the example in this document.
alarm.py
from microbit import *
import music
status = pin8.read_digital()
def detect_shake():
  old_tilt_status = pin8.read_digital()
  sleep(0.1)
  new_tilt_status = pin8.read_digital()
  return abs(new_tilt_status - old_tilt_status)
while True:
  counter = 0
  timer = running_time()
  shake = detect_shake()
  while (running_time() - timer) <= 500:
     shake += detect_shake()
     counter += 1
  status = shake/counter
  print(status)
  if status is not 0.0:
     print("Alarm!!!")
     music.play(music.DADADADUM)
Video:


Comments
Please log in or sign up to comment.