All the necessary files for making the VenetianMover device can be downloaded from this repository. All the files are also attached individually below.
Making the CaseThe case for the device can be 3D printed using the STL files below if you have access to a 3D printer, or they can be purchased from an online 3D printing service, such as Shapeways. If creating the parts with a fused filament fabrication process, print the rod-gear with a high-density infill (90%) so the hook can be screwed into it later.
Once you have the pieces of the case, the hook attachment can be made by bending the wire into a hook shape and screwing it into the rod-gear. It may also be necessary to secure the hook with super glue.
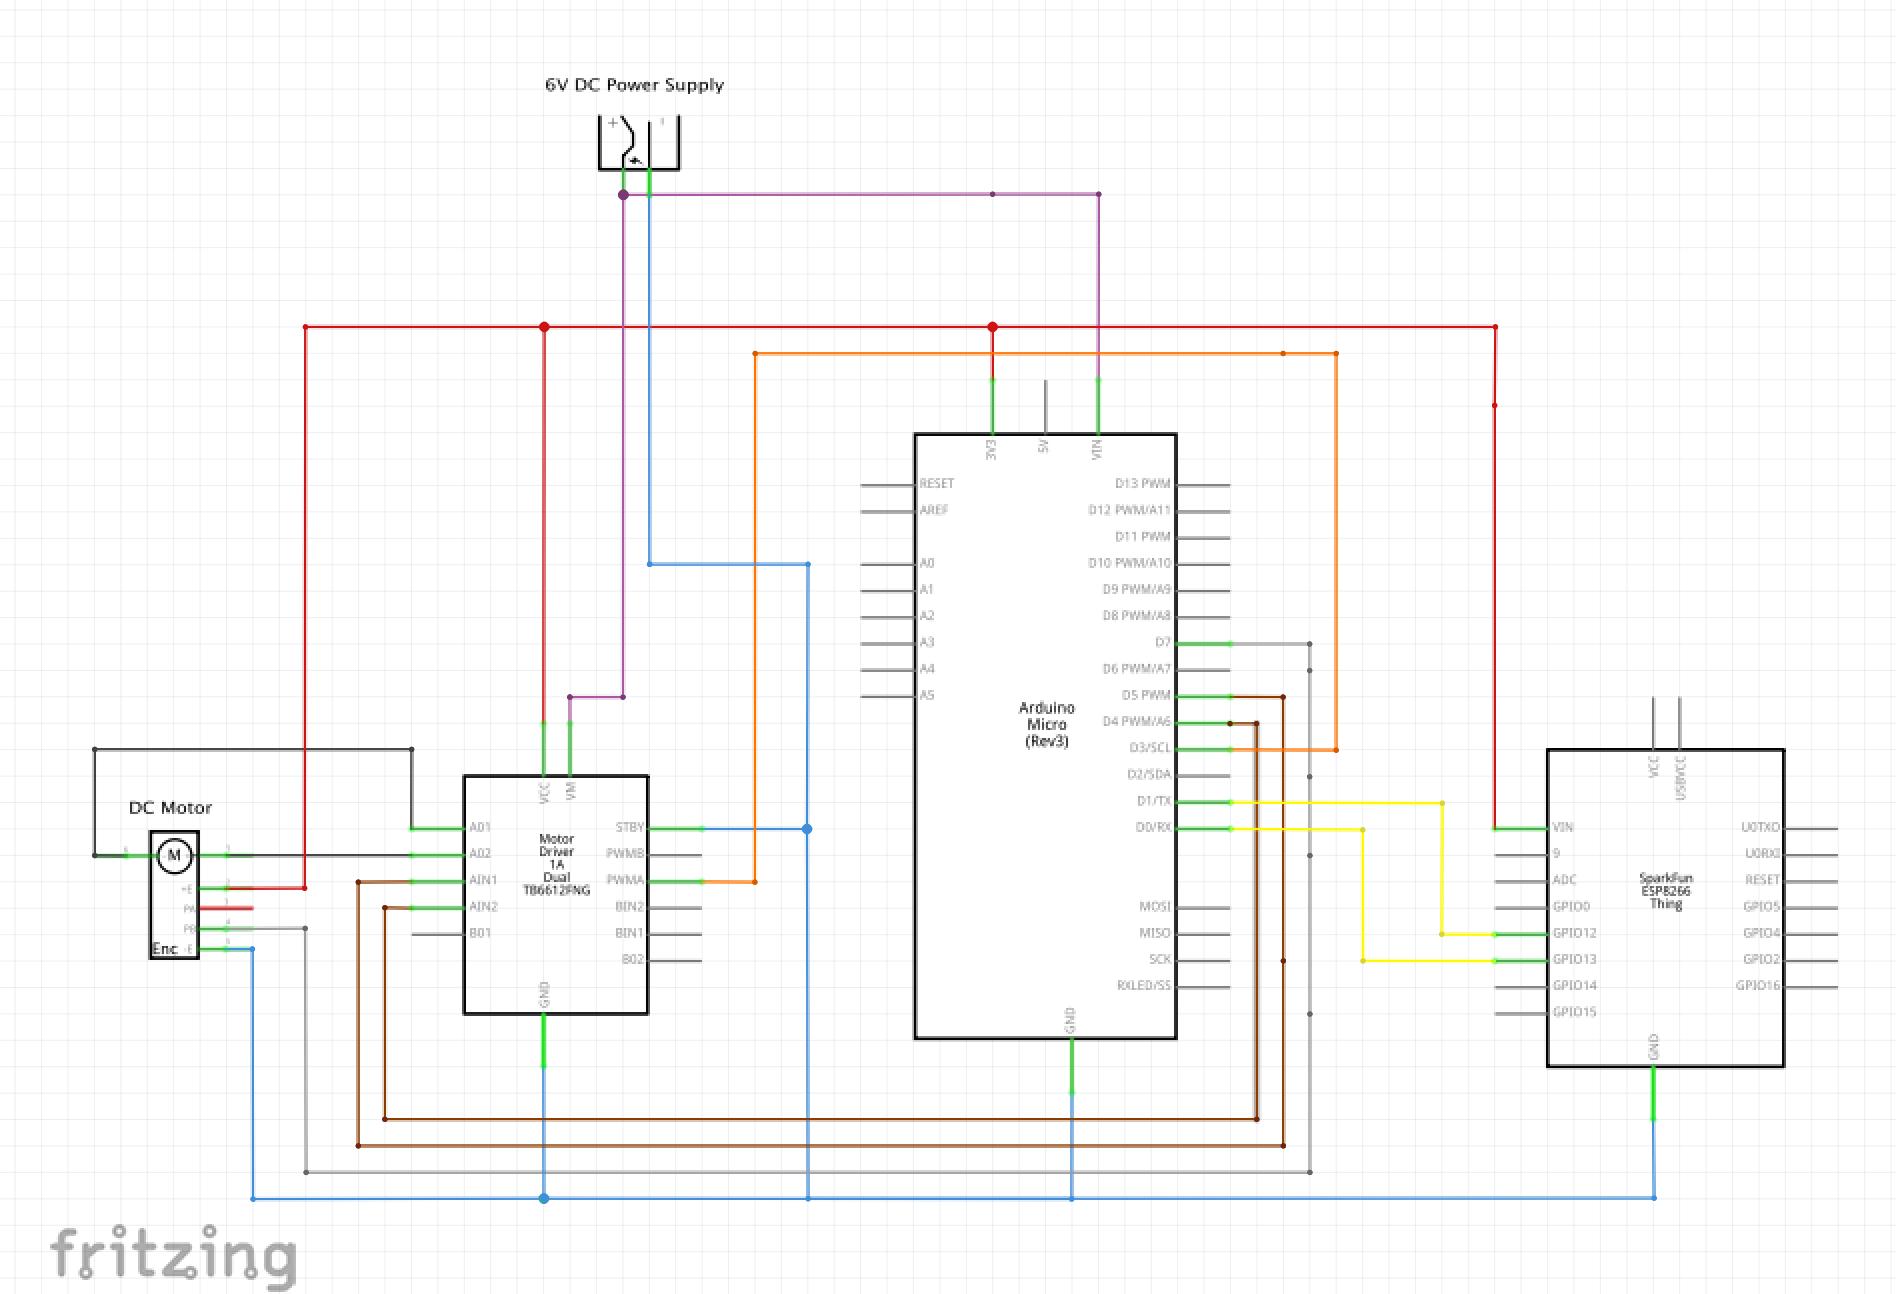
In general wiring is as simple as following the schematic wiring diagram using a breadboard and jumper wires. In addition, the following components will require soldering:
- Motor driver breakout board
- Motor encoder
Solder the 0.1" headers that are packaged with the motor driver onto the motor driver breakout board by first inserting the headers into the breakout board so that the board can rest flat, and then soldering each pin.
Once the above step is complete, solder the motor power supply wires by first inserting the wires and bending them so that they stay secure, and then applying the soldering iron and solder. Once soldered, any excess wire can be removed with wire cutters.
The motor encoder also requires soldering. We've chosen to solder wires onto all encoder connections even though our project does not use all of them. First insert the wires into the circular holes and bend the wire to secure it. Then solder the individual wires and trim any excess.
Once complete, the encoder can be installed on the motor and the motor tabs soldered to the tab connections on the encoder. The motor tabs are shown in the image below:
The power for the device is supplied by the 6V power supply. To attach this to the circuit, cut off the end of the female connector that comes with the power supply and push the wires into the breadboard.
Registering the DeviceGo to VenetianMover and login with your Amazon account. Click "Add Device" and fill in the device name:
Click save and then click the download link that appears:
Replace the file named connection_info.h with the new file (in directory VenetianMover/arduino/aws_iot_esp8266).
Open up connection_info.h and add your WiFi connection details (network name/SSID and password) in the appropriate locations:
You will need to determine how many turns of the rod are necessary for your blinds to go from completely closed to completely open. Once determined, adjust the MAX_ROTATIONS variable in the file named motor_control_arduino.ino.
Using the Arduino IDE, load the code named motor_control_arduino.ino onto the Arduino Micro. To do this, start by selecting the correct board under Tools > Board > Arduino Micro, connect the board via USB, select the appropriate COM port under Tools > Port and press the upload button.
To set up the ESP8266, it is necessary to first configure the Arduino IDE to work with the new board. Follow the instructions below:
- Open Preferences (File > Preferences)
- Enter
http://arduino.esp8266.com/stable/package_esp8266com_index.jsoninto the Additional Board Manager URLs field.
- Go to Tools > Board > Boards Manager and search for "esp8266".
- Select the latest version and click the install button.
- Select the ESP8266 board from the Tools > Board menu.
- Set Tools -> Upload Speed -> 921600
Open the aws_iot_esp8266.ino sketch, ensuring that cdecode_p.h, cdecode_p.c, and connection_info.h are also opened in the Arduino IDE.
Install the necessary PubSub library into the Arduino IDE by using menu Sketch > Include Library > Manage Libraries..., searching for "pubsubclient", and clicking install.
For this project, the MQTT (messaging protocol) buffer size of the PubSubClient Library must be increased. To do this, find the location the PubSubClient Library was installed to (typically Arduino/libraries/PubSubClient/src) and open the file PubSubClient.h. Change the MQTT_MAX_PACKET_SIZE to 256:
Physically connect the ESP8266 (via USB), select the appropriate COM port, and upload the sketch. Note that if the COM port doesn't show up, you may need to install the USB to UART drivers from here.
Now, test that everything is working correctly. Open the Serial Monitor (Tools > Serial Monitor) and ensure the output contains "PubSubClient connecting to AWS endpoint. connected". This means that everything is set up correctly. If nothing is displayed in the Serial Monitor, you may have missed the output. Reset or power-cycle the ESP8266 and watch the Serial Monitor again.
Begin this step by pressing the motor gear onto the motor shaft. Ensure that the wider part of the gear faces the motor.
Next, place the rod-gear (rod with the attached gear) and motor into the left half of the case. Check that the gears mesh nicely. Adjust their positioning if needed. Also make sure that the wires attached to the motor exit the top of the case neatly (and are not crimped or squished).
Put the magnet into the round receptacle in the right case half.
Finally slide the left half of the case onto the right half and push them together.
Important: The code assumes that the blinds start at the 50% position between open and closed. Before attaching the device to your blinds, ensure your blinds are fully open (slats horizontal). This should also be done any time the Arduino is reset or power-cycled.
Open the blinds so the slats are horizontal, hook the wire through the rotating hook on your blinds and secure the device to the top of the blinds with the magnet.
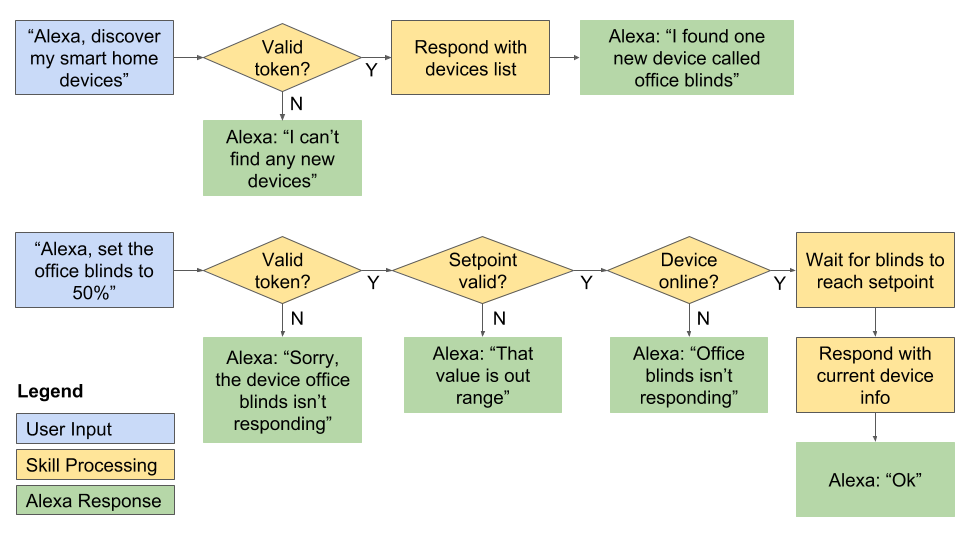
To set up the device with Alexa, you will need the Alexa app which can be found on the Play Store for Android, or the iTunes Store for iOS. Sign into the app, go to Skills, and search for "VenetianMover". Tap Enable and follow the prompts to link your Amazon account. A confirmation, such as the one below, should be shown.
When prompted to, discover your devices.
Using the DeviceAsk Alexa to open your blinds:
Alexa, set my blinds to ten-percent.
Congratulations, now Alexa can control your blinds!


Comments