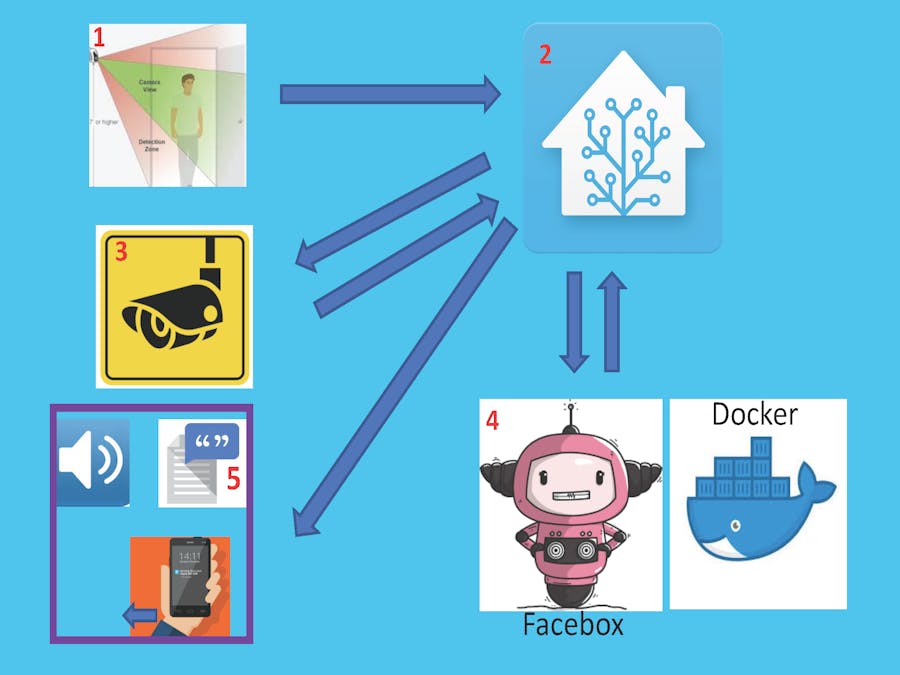
In this project, I show how I have implemented a system for facial recognition with text-to-speech (TTS) announcements of who is approaching a camera on my front door. A camera image is captured when motion is registered by the camera, and image processing is then performed on the captured image. If a recognised face is identified in the captured image, the name of the person recognised is announced over a speaker at home. Additionally, the system can be configured to trigger automations which are personalised to the person recognised, which is typically myself or my wife, but it could be the postman or even Father Christmas! The view presented in my home automation platform showing the camera image and the name of the recognised person is shown below:
On planning this project I identified several requirements that the project solution must satisfy:
1. All image data from my camera must be stored and processed locally, so that I have complete control over my sensitive personal data. This rules out cloud based solutions such as Google Vision or Amazon Rekognition.
2. My solution must integrate with my home automation platform Home-Assistant, which runs locally in keeping with requirement 1.
3. The solution must be fast enough to make a TTS announcement within 2 seconds of an image being captured by the front door camera.
4. The solution must not adversely affect the performance of Home-Assistant, either by slowing it down or risking outages due to crashes etc.
5. It must be straightforward to customise the solution to recognise a reasonable number of specific people, such as myself and my family.
6. Maintenance overheads must be minimal, and those that are necessary must be automated by Home-Assistant.
These are quite a challenging set of requirements, so lets get started!
Hardware & ComputingCamera on front door: Hikvision doorbell, which allows local image/video storage (unlike Ring or Doorbird).
PIR sensor: I use a standard PIR sensor to detect motion.
Speaker for TTS: The announcement speaker is integrated into Home Assistant via Chromecast. The speaker itself is a JBL Flip, but any speaker with a 3.5mm audio jack will do.
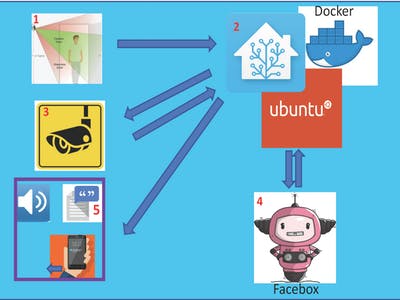
Computing - Home-Assistant: My entire home automation platform is running on an Intel Nuc, with an Intel® Celeron® Processor J1900 and 8GB of RAM. I am running Home-Assistant on Ubuntu server 18.04 LTS in a Docker container. However the solution in this project is equally suitable for other Home-Assistant supported computers such as Raspberry Pi.
Computing - Facebox: I am also running Facebox on the Nuc in a Docker container. Alternatively, a spare laptop with at least 2 GB or RAM that can run Docker could also be used. (Robin is running Facebox on a Synology DS216++ NAS that has had its RAM upgraded to 8 GB). Note that it is not possible to run Facebox on a raspberry pi.
Facial Recognition Options in Home-AssistantIn order to satisfy my requirement that my solution integrates with Home-Assistant, I naturally investigated the facial recognition options presented in the image processing section of the Home-Assistant docs. As of June 2018 there are 4 integrations for facial recognition in Home-Assistant. I immediately ruled out the Microsoft integration since this uses a cloud service. Both the dlib and openCV integrations looked promising, but both require that I install extra packages and perform processing run on the same machine as Home-Assistant, risking an impact on performance. Therefore I decided to try out the new Facebox integration, introduced in Home-Assistant release 0.70.
Introduction to FaceboxFacebox is a service for performing facial detection/recognition on images, where detection is the number of faces, and recognition is the name of found faces. Facebox is run in a Docker container and accessed via a local rest API. This approach means that there is no need to install and maintain any additional software packages in the Home-Assistant environment. Furthermore, since Facebox is accessed via a local rest API, processing can be performed on any suitable computer available on the local network (although Facebox could easily be hosted on a cloud service if you wanted, e.g. using AWS).
Free tier limitation: Facebox is a paid product but offers a free tier for non-commercial use. The main restriction of the free tier is that you are limited to 20 taught faces, and these must be retaught every time you restart Facebox (see the Maintaining Facebox section for instructions on automating this process).
Teaching FacesBy default Facebox will detect and recognise faces in an image and return a bounding box which locates each identified face and the name of those faces where recognised. Face detection alone (number of faces) is useful in limited situations, but Facebox becomes really powerful when you teach it to recognisespecific faces (see the docs). In my case I have taught Facebox the faces of both myself and my wife. There are several ways to teach Facebox a face:
1. Using the Home-Assistant teach service
2. Uploading images via the web interface exposed by Facebox
3. By using a script such as this official script in GO, or this python script (teach.py) on Github.
Note that training is only possible when Facebox is in recognition mode (see the Disabling facial recognition section).
Integrating Facebox with Home-AssistantFirst run the Facebox Docker container with:
sudo docker run -p 8080:8080 -e MB_KEY=yourkey machinebox/facebox
Head to the Home-Assistant docsfor complete instructions on configuring Home-Assistant to use Facebox, but in summary the Facebox integration must be associated with a camera feed. In my case the configuration in Home-Assistant is:
image_processing:
  - platform: facebox
    ip_address: localhost
    port: 8080
    source:
      - entity_id: camera.local_file
Here the entity camera.local_file is a local_file camera which displays the most recent image captured by my camera, and is configured with:
camera:
  - platform: local_file
    name: Saved Image
    file_path: /config/www/facebox/tmp/image.jpg
Note that any configured camera entity can be used. Image processing by Facebox is performed on the camera image when the camera.scan service is called. See the section Optimising system resources for guidance on optimising the times and rates at which processing is performed. The Facebox entity displayed in Home-Assistant is shown below:
For text-to-speech (TTS) I use the Google Text-to-Speech Home-Assistant component. To implement this add to your Home-Assistant configuration:
tts:
- platform: google
You also require a media_player to play the audio, in my case I used the Chromecast component which is configured with:
media_player:
  - platform: cast
    host: 192.168.1.XX
I use a template_sensor to extract the name of recognised faces from the Facebox entity. To extract the name of the first recognised face (index 0) I use the following sensor:
- platform: template
  sensors:
    facebox_detection:
      friendly_name: 'Facebox Detection'
       value_template: '{{ states.image_processing.facebox_saved_images.attributes.faces[0]["name"].title}}'
The following automation captures an image on the camera using the camera.snapshot service when motion is detected by the PIR sensor. The automation then performs image processing by calling the camera.scan service and announces any identified faces via TTS:
- id: facebox_announcement
  alias: 'Facebox Announcement'
  initial_state: on
  trigger:
    - platform: state
      entity_id: binary_sensor.entrance_motion
      to: 'on'
  action:
    - delay: 00:00:02
    - service: camera.snapshot
      data:
        entity_id: camera.hass_tablet  # your doorbell camera
        filename: '/config/www/facebox/tmp/image.jpg'
    - delay: 00:00:01
    - service: image_processing.scan
      entity_id: image_processing.facebox_saved_images
    - delay: 00:00:02
    - service_template: '{% if states.sensor.facebox_detection.state != "unknown" %} tts.google_say {% endif %}'
      data_template:
        entity_id: media_player.bluenano <chromecast>
        message: '{% if states.sensor.facebox_detection.state != "unknown" %}  {{ states<"sensor.facebox_detection"> }} is at the door {% else %} {% endif %}'
    - service: media_player.volume_set
      data:
        entity_id: media_player.bluenano
        volume_level: 0.9
Optimising Processing (optional)
By default Image-classifier components process the image from a camera at a fixed period given by the scan_interval. This leads to excessive processing if the image on the camera hasn't changed since the last processing. The default scan_interval is 10 seconds but you can over-ride this by adding to your config scan_interval:10000 (setting the interval to 10, 000 seconds), and then call the camera.scan service when you actually want to process a camera image.
Disabling Facial Recognition (optional)
If you only require face detection (counting number of faces) you can speed up the processing by Facebox by setting the environment variable -e MB_FACEBOX_DISABLE_RECOGNITION=true when you run the Facebox container As the variable name states, this disables facial recognition and in my experience processing time is reduced by 50-75%. Note that the teach endpoint is not available when you disable recognition.
Maintaining Facebox (free tier only)
As mentioned previously, a limitation of the Facebox free tier is that taught faces are lost each time the Facebox container is restarted (on the paid tier faces persist between restarts). Fortunately we can use Home-Assistant to automatically re-teach Facebox our faces after a restart of the Docker container. There are several steps to this process.
Step 1. The following shell script (saved in script.sh) will query Facebox to confirm that a previously taught face is still in the container, and return the associated name if the face is still there. The output is saved in a.txt file in a directory I created.
curl -H 'Content-Type: application/json' -d '{"url":"https://mydomain.duckdns.org/local/facebox/teach/xyx/xyz.jpg?api_password=XXXXXX"}' http://192.168.1.XXX:8080/facebox/similars | head -14 | grep -i "name" > /home/hass/docker/homeassistant/sensors_dir/x.sensors/x.facebox.txt
I use a cron job to run the script every minute.
The mydomain.duckdns part pulls the previously taught face from the directory (in my case it’s the directory I created initially to load the faces utilising the teach.py script) and compares it to what’s available in the Facebox container. If there’s a match it returns the name associated with that image, where xyz.jpg is one of the pictures loaded during the teaching process.
Step 2. I created a binary sensor in Home-Assistant which reads the results from the text file created in step 1 and returns on if the face is taught, or off if the face is not taught:
binary_sensor:
  - platform: command_line
    name: Facebox Loaded
    command: cat /config/sensors_dir/x.sensors/x.facebox.txt | awk 'FNR==1 {print $2}' | sed 's/"//g'
    device_class: connectivity
    scan_interval: 5
    payload_on: "xyz"
    payload_off: "dead"
    value_template: '{%- if value == "xyz" -%} xyz {%- else -%} dead {%- endif -%}'
Step 3. I add a shell_command to Home-Assistant to run the face teaching script teach.py
shell_command:
  facebox_teach: ssh -l hass 192.168.1.XXX "cd ~/docker/homeassistant/www/facebox/teach/ && python teach.py"
Note: As I run Home-Assistant in docker I must first ssh into the host machine to deliver the rest of the command. Hence the "ssh -l hass 192.168.1.XXX"element. This is not required if both Home-Assistant and Facebox are running on the same computer.
Step 4. Finally, an automation ties it all together. The automation runs every minute querying the state of the binary_sensor.facebox_loaded and running the shell_command for teaching Facebox if required:
automation:
- id: facebox_teach
 alias: 'Facebox Teach'
 initial_state: on
 trigger:
 - platform: time
   minutes: '/1'
   seconds: 0
 condition:
 - condition: state
   entity_id: binary_sensor.facebox_loaded
   state: 'off'
 action:
 - delay: 00:00:05
 - service: shell_command.facebox_teach
Warning on Code Samples
There is a bug on the Hackster.io platform, where code entered in the black cells above can be reformatted or disappear without warning - I have reported this bug. For valid code samples please use the code from the linked file at the bottom of this page.
Summary & ThanksIn summary this project has shown I've integrated Facebox face recognition with Home-Assistant to give TTS announcements of who is approaching a camera on my front door. All data and processing remain on my local network, guaranteeing complete confidence in the security of my personal data.
I want to thank the Home-Assistant and Machinebox teams for making this all possible; for free, and hosted locally and securely.


Comments
Please log in or sign up to comment.