


Hardware components | ||||||
| × | 1 | ||||
Software apps and online services | ||||||
 |
| |||||
| ||||||
| ||||||
This guide will show you how I managed to get started using the AWS IOT service with the Core 2.
Before we get started we need to download some software.
Step 1 - Go to https://code.visualstudio.com and download the visual studio IDE for you computer.
Step 2 - Go to https://marketplace.visualstudio.com/items?itemName=platformio.platformio-ide and instal the Platform IO environment for Visual Studio.
Step 3 - Once Platform IO is installed you need to clone the GitHub repository. Inside Visual studio, clink on the icon that looks like an ant head and the Platform IO menu will appear.
Click on "Clone Git Project" and an address box will pop up
type in https://github.com/m5stack/Core2-for-AWS-IoT-EduKit.git and ht return to clone the location. you will be asked to create a folder on your computer to save things into so give it a helpful name like AmasonAWSIOT and then click save.
Step 4 - We now need to install ESP Rainmaker onto a comparable smartphone. Rainmaker can be found in your smartphone app store.
Once ESPRainmaker is installed, open the app and you will be asked to register and sign in. Once complete you will be shown the following screen.
Step 5 - Unpack your shine new M5Stack Core 2 AWS and plug into the host computer. If you haven't already purchased one, the M5Stack Core 2 AWS can be purchased from this link : https://shop.m5stack.com/collections/m5-controllers/products/m5stack-core2-esp32-iot-development-kit-for-aws-iot-edukit?ref=pfpqkvphmgr
If everything works as its supposed to, we should be able to click the "ant" icon again for the Platform IO menu, click on the devices menu and see the M5Stack Core 2 listed under /dev/cu.SLAB_USBtoUART
Step6 - Now we need to open the AWS Getting started file by clicking on the platform IO logo, clicking home and then clicking on the open project button.
Navigate to the folder where you saved the GitHub files and open the Getting Started project.
Step 7 - Compile and upload the getting started project by typing pio run --environment core2foraws into the terminal at the bottom of the screen. I encountered an error here:
This error is a pain to deal with as it has nothing to do with Visual Studio of platform IO but is to do with the ESP-IDF /esptool software. There is a limit to what it can handle and any "White Spaces" in file names will cause it to crash. In my case ESP-IDF was installed to a potion called Macintosh HD and wouldn't run anywhere else. I deleted the space in the name and it ran.
Step 8 - Copy the compiled project to the M5Stack Core2 AWS using pio run --environment core2foraws --target upload
When complete type pio run --environment core2foraws --target monitor and the following will be shown:
Step 9 - Next you need to open the Esprainmaker app and connect the core2AWS to a wifi connection.
Click on the "Add Device" button and the screen will change requesting you to scan the QR code shown in the console output. The screen will change asking you to select a wifi network and type in the password. If you get the SSID and or password wrong here you will need to wipe the core2 and reinstall the firmware. using
pio run --environment core2foraws --target erasefollowed by
pio run --environment core2foraws --target uploadAnd then rerunning the monitoring console with: pio run --environment core2foraws --target monitor
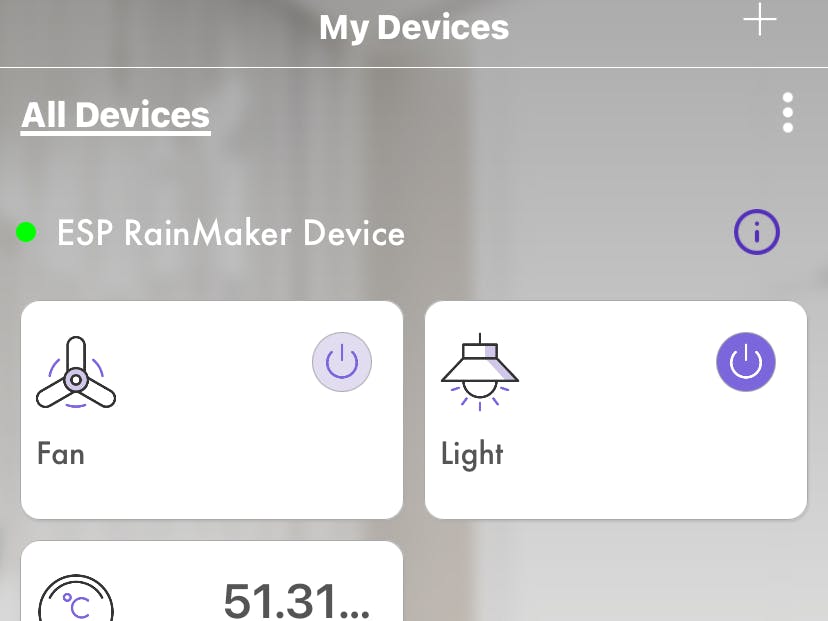
When you type in the correct SSID and password the screen will change again showing:
Click on done and the screen will change to show what functions are available in the getting started demo:
Congratulations you have now compiled, installed and connected the demo firmware to the Core2 AWS and connected it to the ESP Rainmaker app.


Comments
Please log in or sign up to comment.