


Hardware components | ||||||
| × | 1 | ||||
| × | 1 | ||||
Software apps and online services | ||||||
| ||||||
| ||||||
Hand tools and fabrication machines | ||||||
 |
| |||||
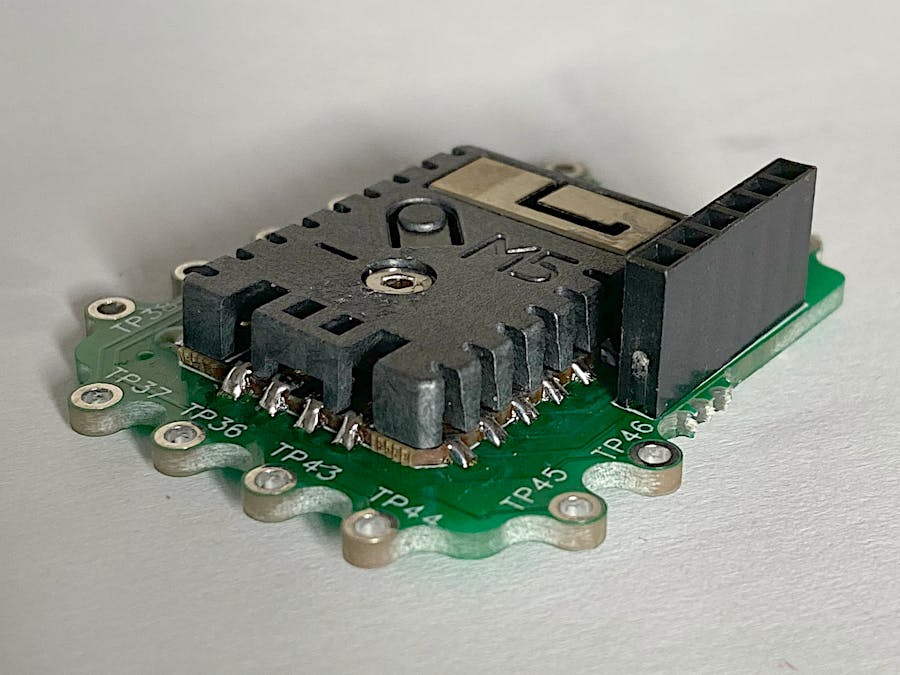
Getting started in ETextiles using the M5Stamp Pico D4 and the Stitch-N-Stamp PCB
I was asked about how to include M5Stack products into E-Textiles but the range was a bit on the bulky side to hide in designs. When the M5Stamp Pico D4 was released I immediately saw its use in E-Textiles and started work on designing a sewable pcbs for it.
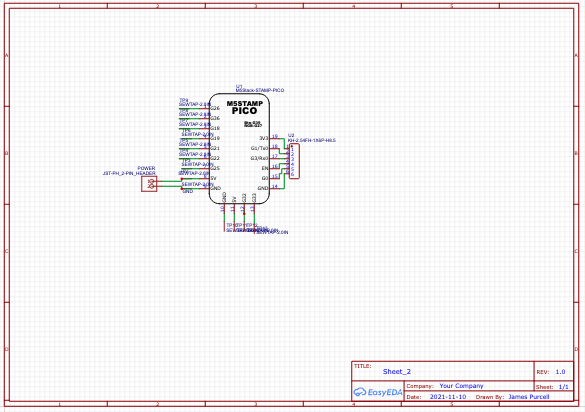
Below is the 2D render of the current design.
There are two ways to mount the M5Stamp Pico D4 to the PCB. the first is to directly solder which allows all the pins to be used or using headers which prevents the grove port being connected to TP10 to TP13 so that a grove connector can be connected to the M5Stamp Pico D4.
I chose to Solder the M5Stamp Pico D4 directly to the PCB so that there would be no chance of it coming loose from the Stitch-N-Stamp pcb.
To test that the PCB works, I purchased a lily pad kit of parts:
From the look of some of the parts and that a few don't have purple PCBs as shown here: https://www.sparkfun.com/categories/tags/lilypad
I took the conductive thread, sewed the - end of an LED to the GND and the + end to TP09 and then loaded up Thonny. (I put the wrong password into the wifi connect screen and can't reflash for a moment in order to reset the password.)
In order to connect to the M5Stamp Pico D4 we need to pug in the programming adapter,
Connect the programming adapter to a USB port and then in Thonny go to Run > Select interpreter.
This opens up the port panel that allows us to select what port the programming adapter is connected to and what kind of device we are using.
Thonny can use a selection of different interpreters and normally M5Stack devices use Micropython (ESP32) but for some reason, the M5Stamp Pico D4's only work when the interpreter is set to Micropython (Generic). Press Ok to close this panel and Thonny will attempt to communicate with the M5Stamp Pico D4 through the adapter.
Communications will fail because the M5Stamp Pico D4 is already running code and to interrupt the code and gain access press the red "STOP" button at the top of the screen followed by CTRL+C and this will drop us into the MicroPython REPL console running on the M5Stamp Pico D4.
After a struggle to get the M5Stamp Pico D4 into REPL using Thonny's terminal (an Issue with OSX) I was able to start controlling the LED.
In order to control the pin the LED is connected to I first needed to import the Micropython functions. These functions are held in a library of functions called machine and to call them I had to type
import machineOnce this set of functions had been called, I could then issue
pin1 = machine.Pin(26, machine.Pin.OUT)This creates a function called pin1, which calls the machine.Pin function and allows us to set a hardware pin of 26 and set the pins function as an output.
Next, by using the following commands,
pin1.value(1)
pin1.value(0)
I could turn the LED on and off.
This is not very exciting and so let's try to put this in a loop.
There are two types of loops we can use, a For Loop and a While loop.
For loops are used when we want a action to complete a set number of times and While loops continue while a condition is met. Before we can use the loops we need the time functions so we need to use
import timeThen by using the following code, the LED will flash 10 times.
import machine
import time

pin12 = machine.Pin(26, machine.Pin.OUT)

for i in range(10):
    pin12.value(1)
    time.sleep(0.5)
    pin12.value(0)
    time.sleep(0.5)
If we want the LED to flash forever we would use:
import machine
import time

pin12 = machine.Pin(26, machine.Pin.OUT)

while True:
    pin12.value(1)
    time.sleep(0.5)
    pin12.value(0)
    time.sleep(0.5)
And that's it, a simple basic introduction to the the M5Stamp Pico D4 in E-Textiles.
This is not the end and there will be a following up guide to do some more interesting things with the M5Stamp Pico D4 and the Stitch-N-Stamp.


Comments
Please log in or sign up to comment.