In this guide I will show you how to use LVGL and JSON to retrieve personal data from the https://community.m5stack.com/ forum to display on an M5Stack Core2 or Core2 AWS controller.
Please note: only use this for your own data! If myself or another mods find out you have using this guide to load other peoples data then we will not hesitate to issue a block or ban on your account!
We will be using UIFlow as the programming IDE for this guide in an attempt to make this as simple as possible.
Before we can start using JSON controls to read the data, we first need to find the data.
Your forum data can be found but typing in the address https://community.m5stack.com/api/user/your-name
When you visit the address, replace your-name with the user name you registered on the forum and you will be shown a page full of black and white writing. Save this to your computer as your name.json.
Next, open UIFLOW, make sure it is set as a Core2 or Core2 AWS and add an image to the screen.
Click on the UI>Image menu and drag the network image block into the UIFlow code panel on the right as shown in the image above.
Now we have the basics set up we need to find our profile image. Load the JSON file in Firefox and look for the following line:
Copy this address, add https://community.m5stack.com before it and past the full address into the network image name box.
Hit the run button and it may or may not work. if it worked, the grey image will be replaced with the forum image.
If it did not work, then the grey image will disappear.
This is because for the ESP32 to handle images, they have to be of a certain specification the biggest of is that they have to have a file of less that 25KB!
Image specifications are
- Image size: Up to 65520 x 65520 pixels.
- Colour space: YCbCr three components only.
- Gray scale image are not supported.
- Sampling factor: 4:4:4, 4:2:2 or 4:2:0.
however this can still result in images too large even when saved as.png
To compress the images data use a program like GIMP (gimp.org) and go to Image > Mode > Indexed and select the following settings.
This will help reduce the amount of data space used for the file size but if the file size is still to big then you will need to adjust compression ratio in the file save dialog.
Scaling the Image
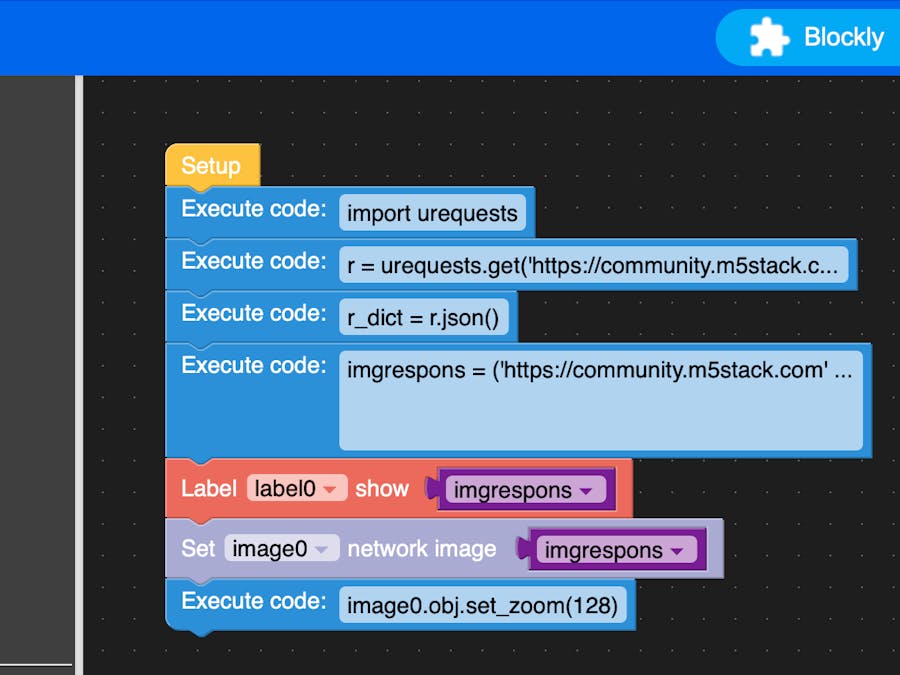
Once you have the image showing on the screen we need to alter the size as it takes up too much space on the screen. unfortunately be don't have a block for the function yet be we can use image0.obj.set_zoom(). This function uses 128 for half size, 256 for normal size and 512 for double size
Drop and Execute block onto the screen and past image0.obj.set_zoom(128) into the space.
Run the code again and we can see that the image has now shrunk taking up less space.
Repeating the steps in Micropython.
To do this in python we would use:
import request
r = requests.get('https://community.m5stack.com/api/user/******')
r_dict = r.json()
print('https://community.m5stack.com' + r_dict['picture'])
Which would display the forums web address with the address of the image appended to it:
Displaying the image on the screen is not a simple case of just issuing:
Image0 = https://community.m5stack.com/assets/uploads/profile/***-profileavatar.pngAs this will return an error saying
'bound_method' object isn't subscriptable.We need to do something else to parse the returned data for the image function to work. To solve this I created a variable called imgrespons and created an execute block to set the value of the variable to the string returned from the urequests query.
Ned all I had to do was add a variable value block containing the result to a Set Network Image block and the image is returned and displayed just as if I had directly called the the function as before.
I. have had to use a lot of Execute blocks here for the requests functions but now it retrieves the image and display it on the Cores screen.


Comments
Please log in or sign up to comment.