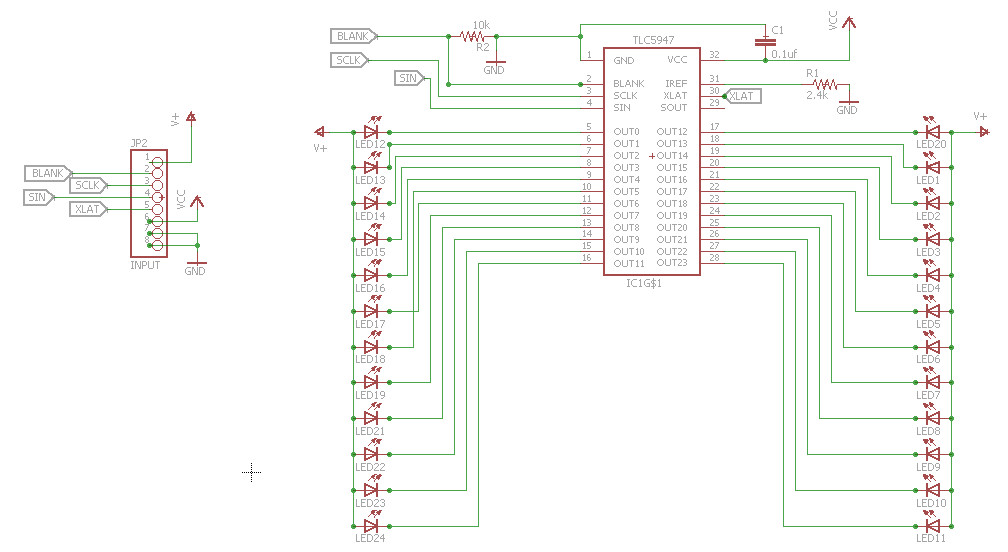
This write-up is a walk-through in which I'll explain how each component is designed and connected to each other.
This write-up is divided into 4 parts:
- Electronics
- Assembly
- Code
- Schematics
Let's get started!
ElectronicsThis section shows how everything is connected to each other. There are 3 major components: the speech module, Arduino Nano and TLC5947 LED board.
Speech recognition module:
The VR module I used is a SimpleVR module. It supports Speaker Independent(SI) recognition; that means it does not require any speech training and can recognize anyone's voice. The module has a USB port to flash commands using a PC software. The commands are stored in a text file and can be edited with any text editor.
A "Group number" is given to each text file. As you can see below, file "asrgrp1.txt" corresponds to Group number 1. The group number is what we will import in our code.
After "Downloading" commands on the module you can test it by connecting to Arduino via serial port. SimpleVR's library internally uses softwareserial for communication with Arduino, so any digital pin can be utilized as RX-TX pin.
Once powered, the module waits for voice activity above a certain threshold and returns the index of the recognized command. In reasonably quiet environments, accuracy is ~ 95%. Though it's not perfect, if you say any command/phrase that's not in the group list, it returns the index of the closet command that sounds similar.
Alternatives:
If you have VR module 2 or VR module 3.1, you can use them. The only drawback is that they need to be trained by speaking each command multiple times, that means they're Speaker Dependent. So, if you train the module and another person tries to speak the commands, it may not be able to recognize it and give you the wrong index/answer.
The LED Heart:
There are many options here; it really depends on what you want. For the LED chaser effect you can use shift registers, I/O expanders (MCP23017 chip). But if you want more control, then LED driver chips like TLC59x series or PCA9685 would be a good choice.
I used TLC5947 LED driver chip. It has 24 channels and 12-bit PWM resolution, so we get the range of 4095 steps. The chip is capable of sinking 30mA per channel which is more than enough for LEDs.
The chip comes in a Surface Mount (SMT) package, so you would either need a PCB or an SMT-to-DIP adapter board. I designed a custom PCB for my project. You can download the eagle schematic from my GitHub repo.
Here's the pinout for the LED board:
The circuit board is simple. The LEDs used are of SMD 1206 size. One resistor connected to pin IREF decides how much current each pin would sink. In this case, I used a 2.4k resistor so each pin sinks 20mA current. There are some standard resistor vs current values given in the datasheet.
The chip uses SPI protocol to communicate with Arduino. Although, it doesn't need to be hardware SPI, just clocked serial data (you would need hardware SPI if you're chaining many TLCs, but that's not the case here). (more info)
Alternatives:
TLC5940 chip comes in Through hole (DIP) package but only has 16 channels. Adafruit sells breakout bords for these chips. icstation.com even has a ready-made LED heart.
Power supply:
The Arduino Nano and VR module require 5v; the LED heart board requires two separate voltages for powering the LEDs and chip itself (V+ and Vcc). A 1200mAh Lipo battery is connected to a USB boost converter which provides a 5v supply to the Nano and the VR module. Supply for TLC5947 (Vcc pin) is taken from the Nano's 3.3.v out.
To power 24 LEDs, we need an external 5-30v supply connected to 'V+' pin. I used a 9v battery because I wanted to make it portable. Remember that 9v battery won't last long. If you don't want to make it portable you should use 12v external supply.
Now that we are done with electronics, it is time to put everything into a case. I used a Ferrero Rocher chocolate box.It has a transparent lid, so you can color coat it with red spray paint or with glass color.
I glued the LED board to a binding post to give it some elevation. This is required to scatter LED lights equally through the lid.


Comments