The world is facing a great pandemic i.e COVID19 virus. Doctors are struggling with the virus though the spread can't be controlled. Also many countries have relaxed the lockdown to some extent. Now, Let's consider the scenario of a public place like airport or hospital or railways, where temperature scanning is becoming an essential one and we cannot always rely on a person to do the job. Also there is a lot of possibilities for the person who checks the temperature of the people to get affected by COVID19 which may result in social spreading. And the another scenario is, consider a shop, people have started to go to shops. The shop keeper cannot monitor the temperature of the customer also, sometimes he will be unable to restrict the customer when number of customer inside the shop exceeds the limit. Also there will be switches that can be touched by everyone which can increase the spread of virus.
I've made a solution for those issue and this project explains you about my solution. And I wanna thank Arduino and Hackster.io for the free hardware for completing this projeect "The Arduino MKR Wifi 1010 board" !
The Protector:On considering the above scenarios, I've built a smart system using the Arduino MKR WiFi 1010 board and I named the system as "The Protector". This device can be used to monitor the temperature of the person entering into the hospital or airport or railway or into a shop. It is like a security system which scans the temperature of the person and if the temperature is below 100*F, it allows the person inside the place by opening the door by activating the solenoid lock.In case the temperature is above 100*F, the system will not allow the person into the place and it gives an alarm and transmits the data to the shopkeeper or the hospital incharge or railway incharge depending on the place. Also the system monitors the number of person entering and restricts entry of the person when number of person inside the place has reached the limit. Also, the system consists of ir sensors connected with the Arduino MKR WiFi 1010, along with relays to switch on the appliances without touching the switches. The appliances can be operated either by sensors or using our mobile phone wirelessly. It is totally a different solution from the existing solution, since we don't need to rely on a person to do the job. This device is very useful, reliable and stable since the entire process is contact less, device consists of a 32 bit microcontroller, accessible through mobilephones and there will be no fear about the spread of covid19.
How It Works?The system consists of a mlx90614 ir temperature sensor, a solenoid lock, ir sensors, buzzer, ultrasonic sensors and relays connected with Arduino MKR WiFi 1010. The temperature sensor will be fitted in the door or entrance of a place and it will monitor the temperature of the person when the person comes near the door. If the temperature of the person is high the buzzer gets on, the solenoid lock will not open and sends the information to the incharge of the place through wifi. Also when the number of person entering into the place exceeds the limit the lock will not be opened. Also the system has ir sensors to sense the human interaction over it and activates the relay to turn on/off the specified appliances. The Arduino MKR WiFi is going to be the brain and heart of "The Protector". The main features are, every process is contactless, highly secured, and the main motto is to prevent the spread of covid 19, this will be done efficiently and reliably. Also it is cheaper, smaller, and a low power project. Let's work together for a safer, better and positive world.
Getting Started:Prerequisites:
- Knowledge in using Arduino boards and Arduino IDE
- Basic programming skill
- Soldering Skill (Be Careful while using Solder!)
- Python 3 knowledge
Collect all the components that are required for making "The Protector". Once you have all the required components, Let's make building the project !
Our project consists of two units say "Inner Unit" and "Outer Unit". The inner unit consists of Protector's heart "Arduino MKR wifi 1010", IR sensors, Ultrasonic Sensor, Relays and Solenoid lock. The outer unit consists of MLX90614 IR temperature sensor, Ultrasonic Sensor, Buzzer and RFID reader.
Since the RFID reader, UltraSonic sensor and MLX90614 needs to be kept outside inorder to measure a person's temperature or to allow the owner of the shop to enter into the shop using his/her RFID tag we will be making an outer unit and inorder to keep the Arduino MKR Wifi 1010 safe and the IR sensors to control the indoor appliances and an Ultrasonic sensor to open the door we will make an inner unit.
Now, lets start with making the IR sensor for our project. I have made a simple IR sensor which can produce analog output. So, the output of the sensor will be given as input to our Arduino MKR wifi 1010's Analog pin's. The circuit diagram is given below.
Be Careful! while soldering the components. If you don't have experience in soldering components, ask someone who has experience in it to do the job to avoid problems with solder!
And after soldering the components, our simple IR sensor looks like this !
Great ! We have made our simple IR sensor, and don't forget to make 3 sensors since we'll be using three sensors in this project.I've cut the unwanted terminals except the Vcc, GND and Signal pin. After making 3 sensors, just place it in a piece of bread board like this:
If you want to make a neat circuit just use a dotted pcb. And remember to power the sensor only using 3.3v since in the getting started guide it is clearly mentioned that,
The microcontroller on the MKR WIFI 1010 runs at 3.3V, which means that you must never apply more than 3.3V to its Digital and Analog pins. Care must be taken when connecting sensors and actuators to assure that this limit of 3.3V is never exceeded. Connecting higher voltage signals, like the 5V commonly used with the other Arduino boards, will damage the MKR WIFI 1010.
So be careful while using I/O ports of MKR wifi 1010.
Things to remember before proceeding:
>>>Connect IR sensors to 3.3v port only
>>>Connect Relay modules with 5v only
>>>Connect RFID reader with 3.3v only
>>>Connect Ultrasonic sensors to 5v only
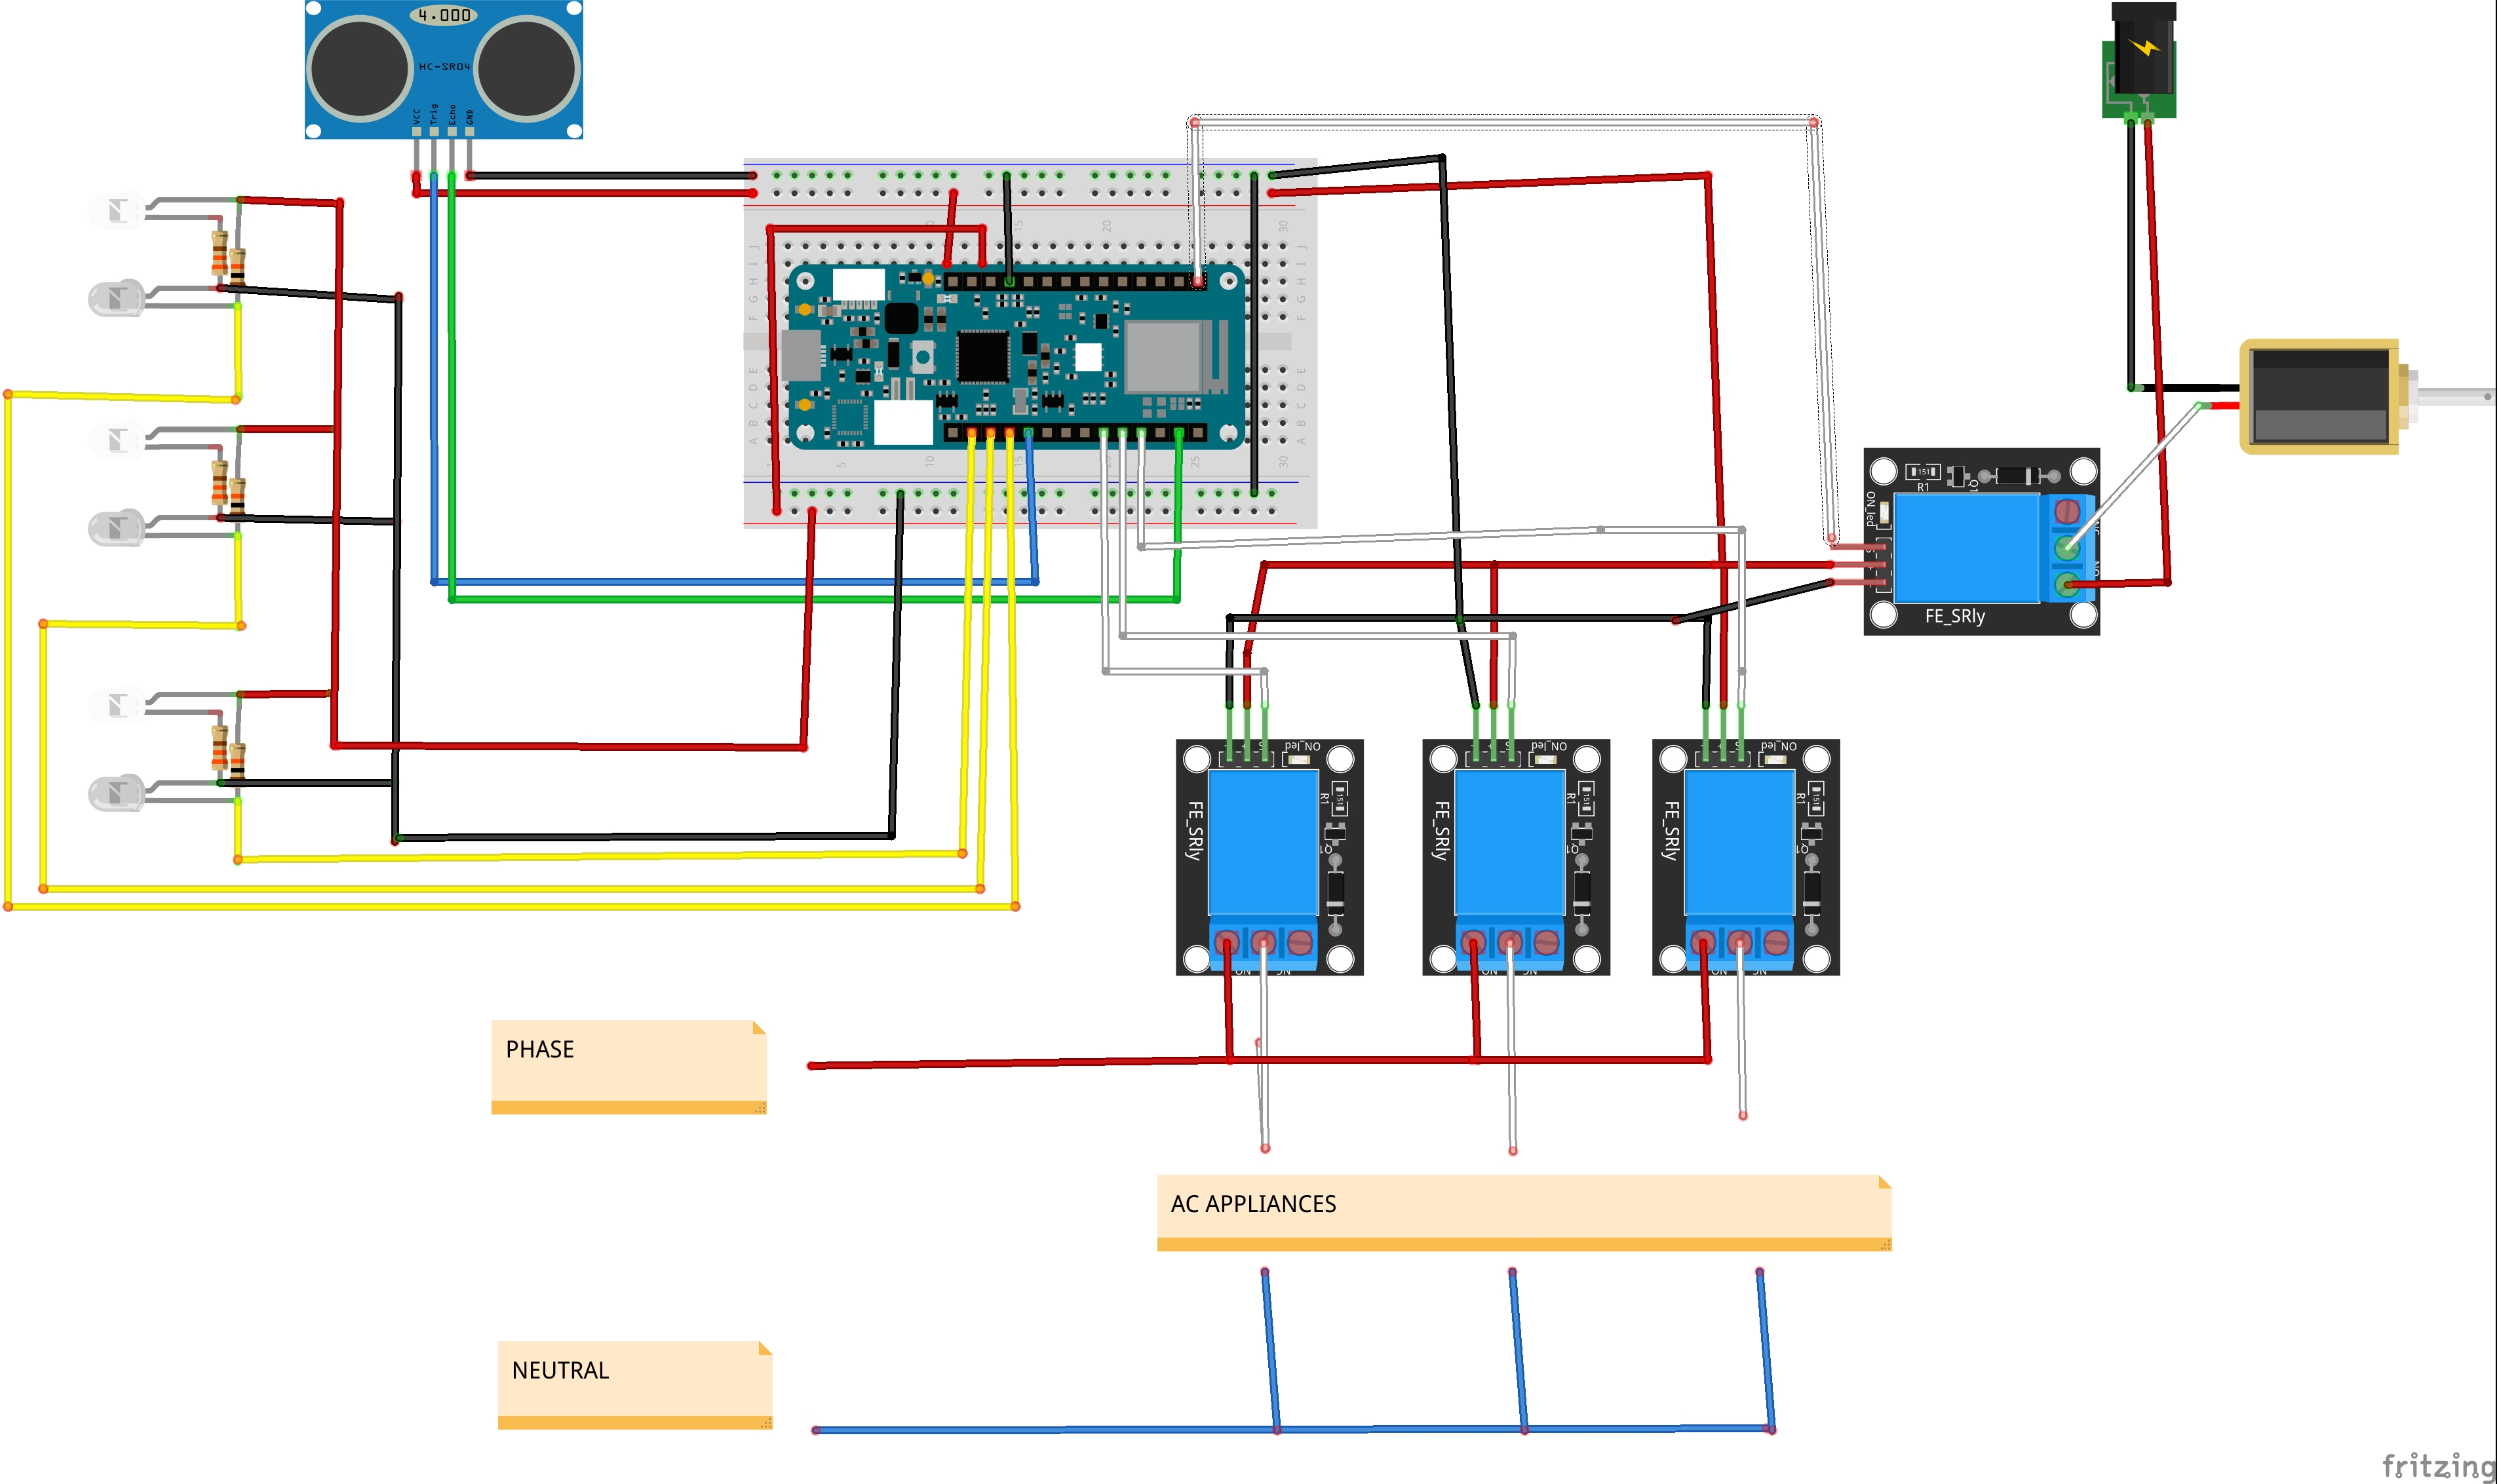
Step 2:Let's build our Protector's indoor unit ! Start it by connecting the IR sensors to theMKR wifi 1010. The circuit diagram for connecting the IR sensors to MKR wifi 1010 is given below.
Once the connections are made properly, attach the Ultrasonic sensor to the MKR wifi 1010. The connection is as follows:
Okay! Now let's connect the relay modules to the MKR wifi 1010. The connections are given below:
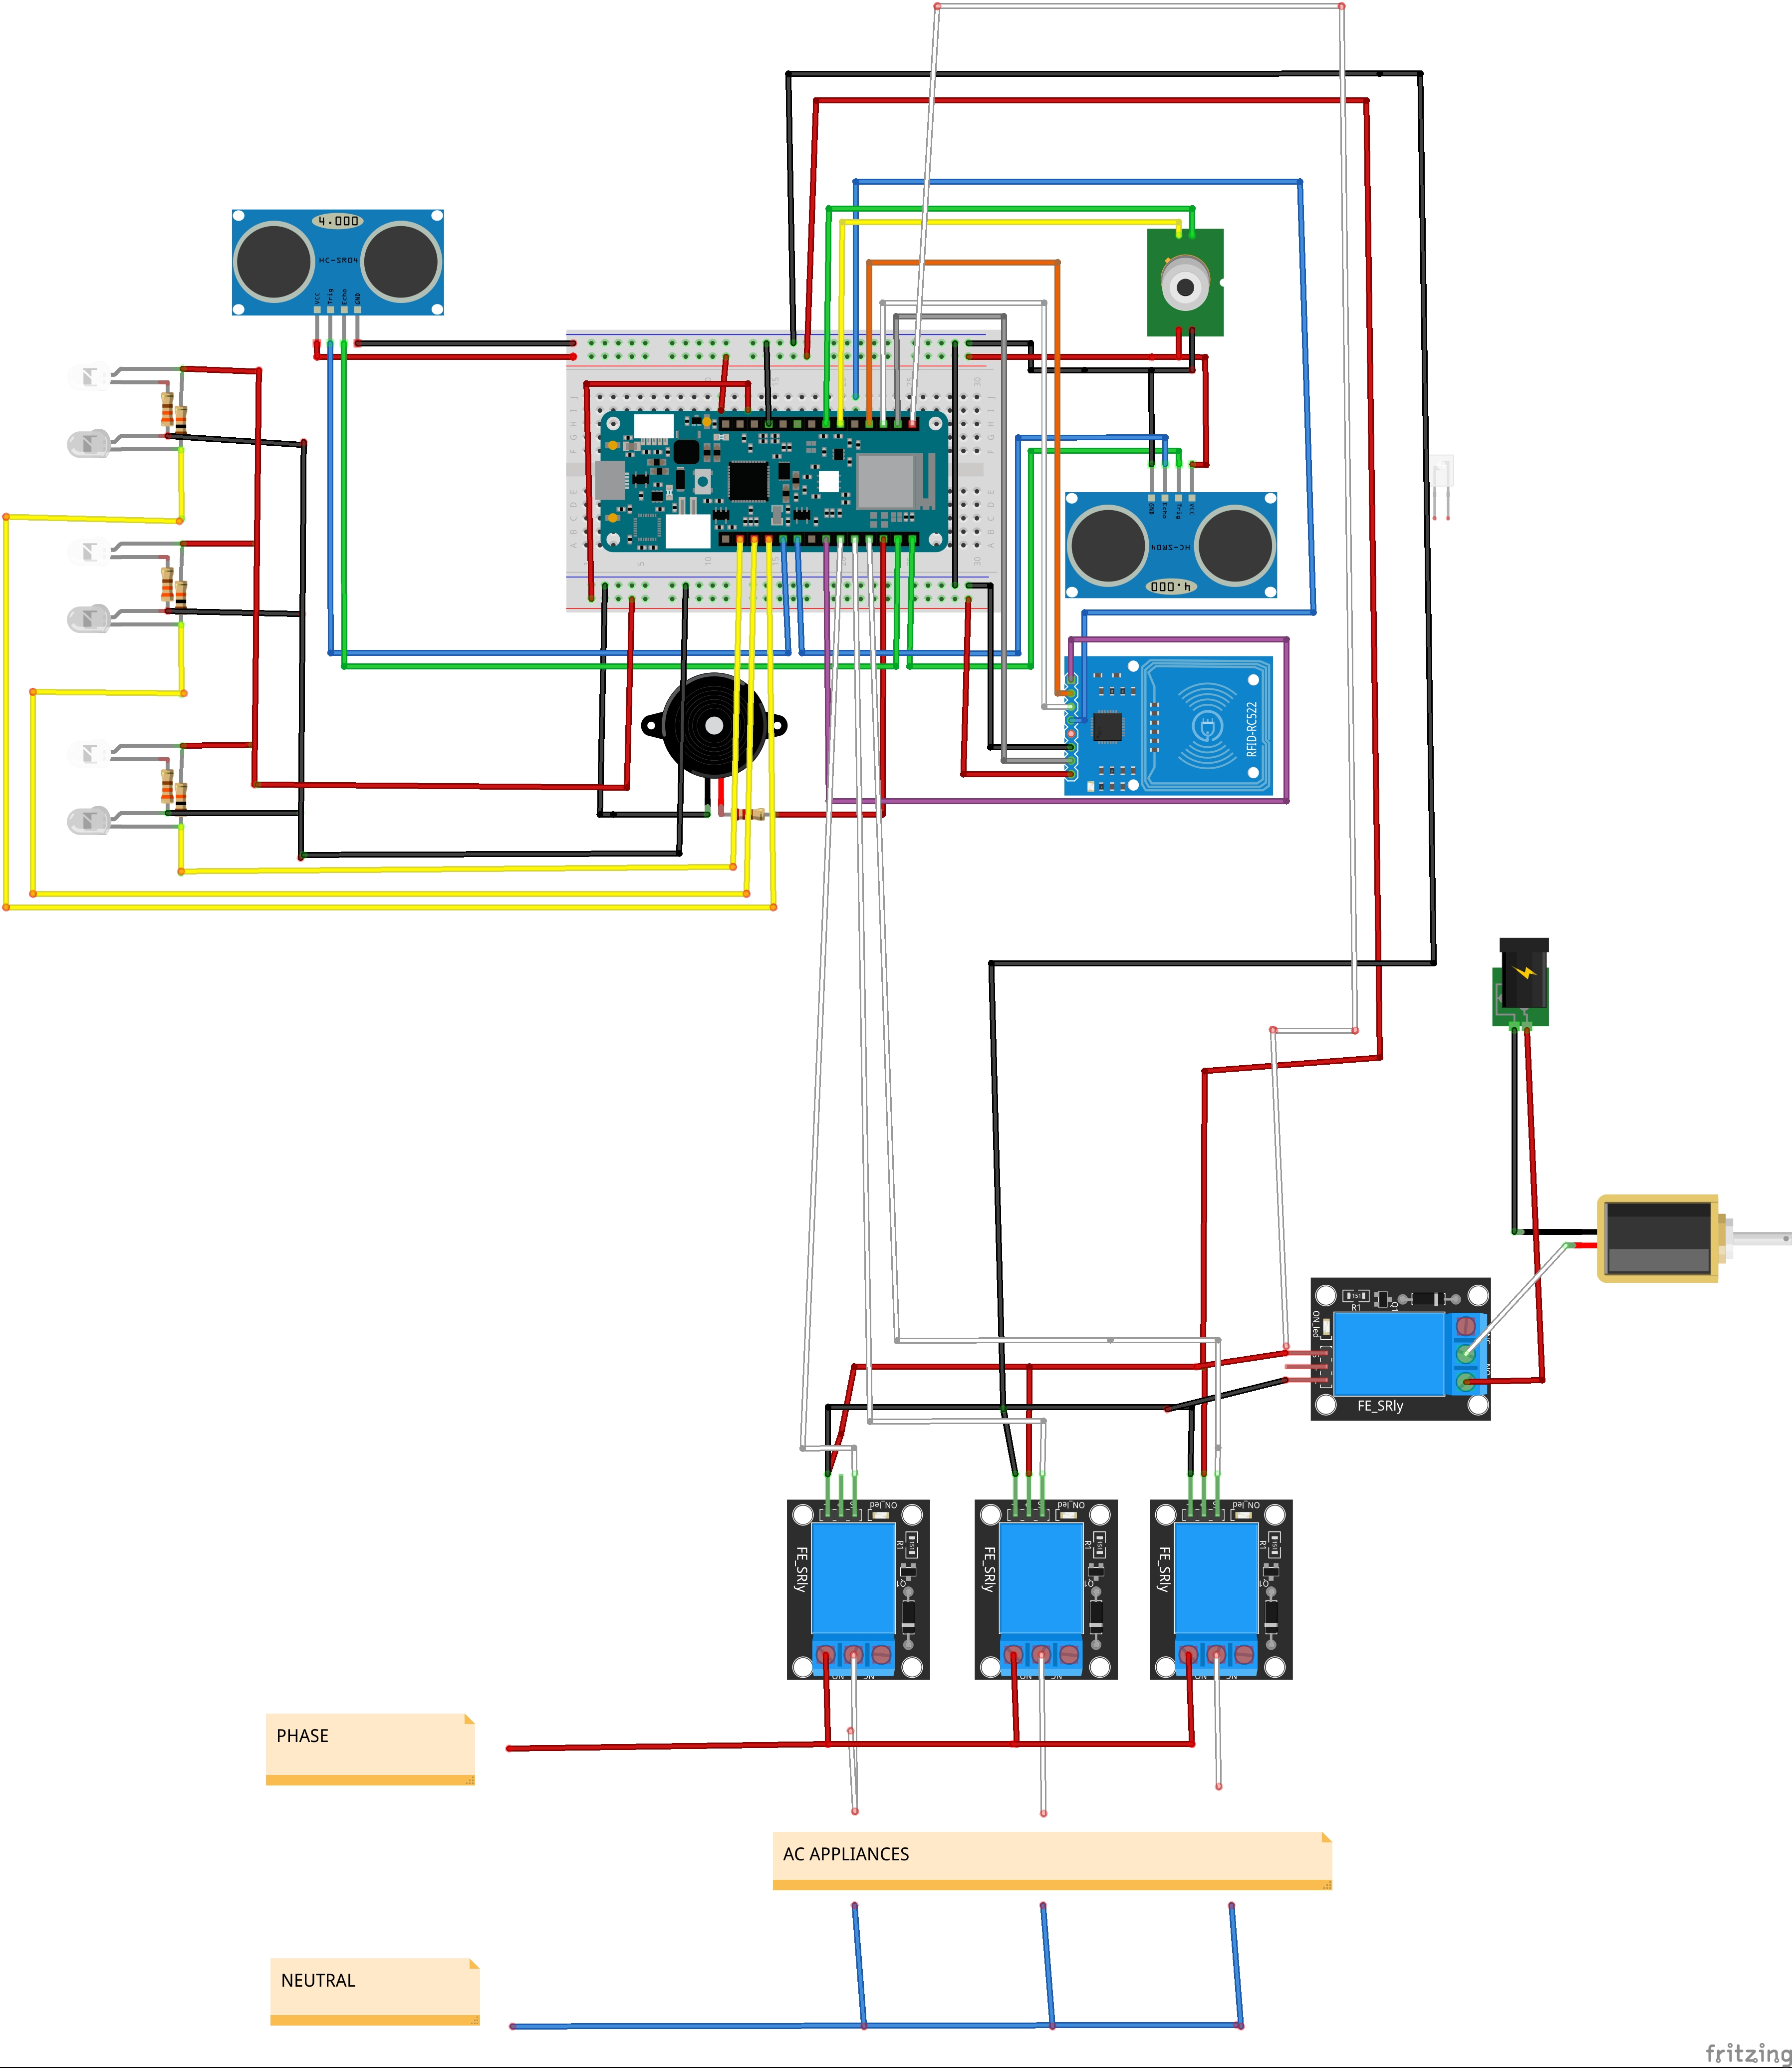
Great! We've completed building the circuit for our inner unit. Finally the inner unit circuit looks like this:
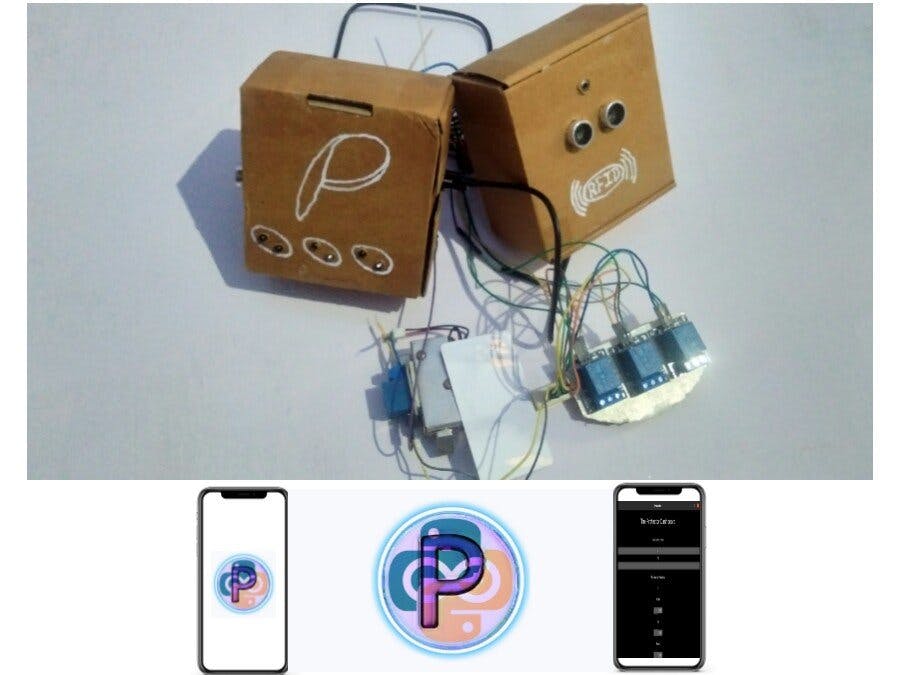
Cool! We've completed the inner unit circuit. Now, We need a casing inorder to make our setup loop good by hiding the messy wiring inside the case. I've made a simple casing using a cardboard box.
The above picture is the inner unit which I've made.You can also 3D print the casing according to your need.
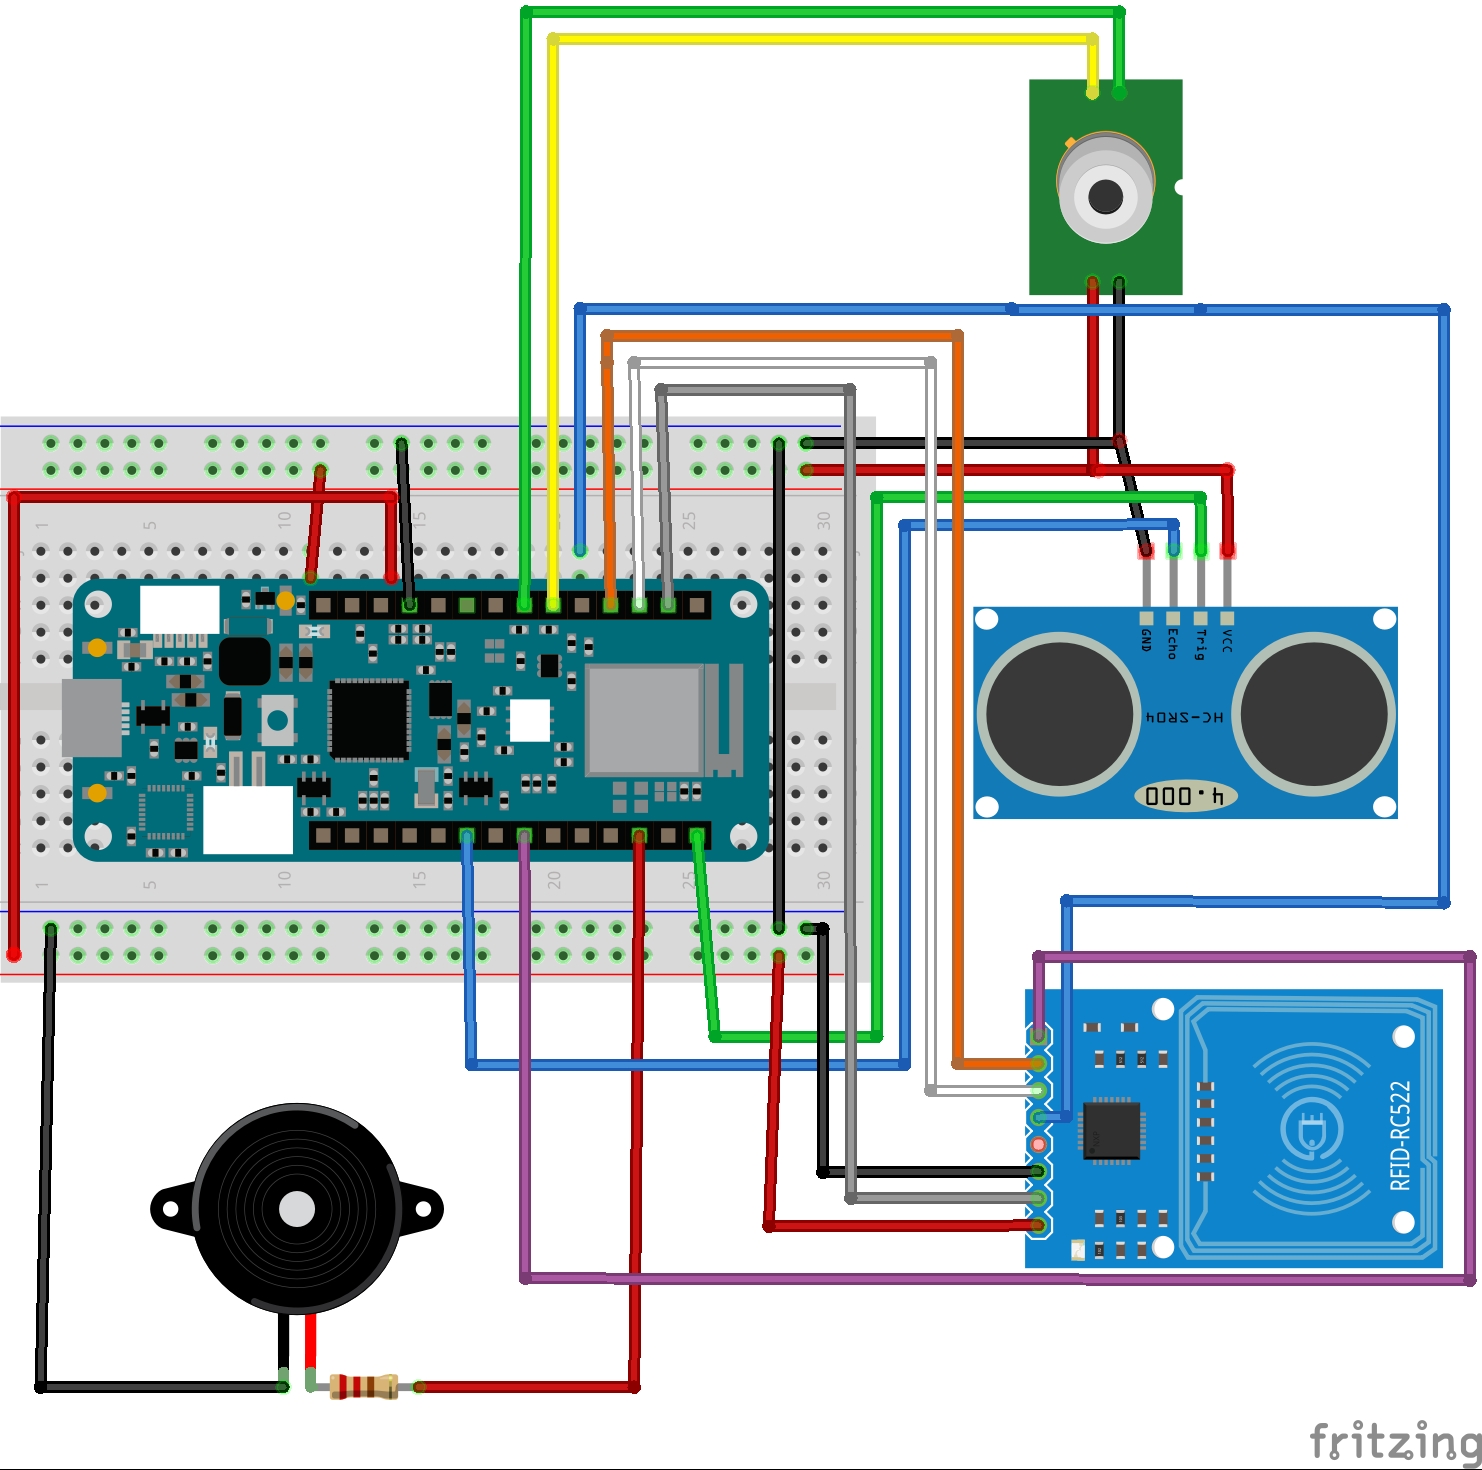
Step 3:Now, Let's build our Outer unit! Remember the outer unit consists only of an RFID reader, Ultrasonic sensor, and MLX90614 temperature sensor. Connect the RFID reader from the outer unit to inner unit the circuit diagram is as follows:
Okay! now let's connect the ultrasonic sensor and buzzer to the MKR wifi 1010. The connections are given below:
Great ! now let's connect the MLX90614 Temperature sensor to the system.
The entire outer unit circuit diagram is given below:
Now, We also need a casing for the outer unit. I used a cardboard box for the outer unit also. Just have a look at it.
That's Great ! We completed building our hardware for our Protector project !
Now download the Protector codes folder from my github repository and enter your RFID tag or card's Key in the RFID section also enter your network's SSID and PASS in the arduino_secrets.h tab and then upload the protector_server.ino to the Arduino MKR wifi 1010 board. Now lets build the app for the Protector.
Lets's build the Protector app ! And before proceeding make sure you have the following software:
>>>Python 3
If you already have python3 that's great ! Let's start building. I'am using Ubuntu 20.0 OS and I'm assuming that you are also using Ubuntu OS. Just follow the below instructions to complete building the app.
Since Kivy has many dependencies, I recommended you to install it in a Python virtual environment. Just open a new terminal by pressing Ctrl + Alt + T.
And here’s how you can create a Python virtual environment:
python3 -m venv protectorJust type the above command. "protector" is the name of the Virtual environment. Now activate the virtual environment by typing the command:
source protector/bin/activateGreat ! We have successfully activated our virtual environment. Now let's install the kivy package for python. Run the following command:
python -m pip install kivyNow, install some essential packages by using the below commands:
python -m pip install urllib3
python -m pip install bs4
Cool ! after getting the above steps done, let's check our app by running it in our computer. Just open the main.py in the Protector app folder and enter the IP address of your Arduino MKR wifi 1010 module in the following line:
root_url = "http://<Your MKR's IP>"That's awesome ! We're gonna run our app now. Just enter into the directory where the main.py is present using the cd command and run the following command:
python main.pyRemember the virtual environment should be in activated state and the Arduino MKR wifi 1010 should be powered up before proceeding the above command, else the app will not start ! Now You can see the dashboard of the protector ! The dashboard looks like this:
Great ! We successfully checked our app. Now its time to package the app for android (i.e we'll be converting our main.py code to a Protector.apk file). To accomplish this, first we’ll need to install a package called buildozer with pip:
pip install buildozerNow, navigate into the main.py folder and run the following command to build the app.
buildozer -v android debugThe build step takes a long time! Depending on your system specifications, it may take even longer, so just relax and wait for the system to finish the build.
Once the build gets completed successfully, you'll have a file named something like this Protector-0.1-armeabi-v7a-debug.apk in the bin folder.
Great ! we made it ! Now just copy the generated.apk file into your smartphone and install the app. Finally! we can interact with this this world with the help of "The Protector".
Working:- The Protector checks the person entering into a shop or other place when a person comes near the outer unit and if the temperature found to be lesser than the reference temperature and the number of persons inside is lesser than the limit, the device opens the door and allows the person.
- The owner of the shop or officials of a place can enter into the shop or place with the help of RFID tag.
- The inner unit is responsible for controling the appliances with the help of IR sensor.
- The owner of the shop can access the device using The Protector app in his/her smartphone.
- Also the ultrasonic sensor in the inner unit allows the person to unlock the door by just waving their hand near the sensor of inner unit.
- You may have seen that the device's wiring looks so messy, so that I'm working on a simplified circuit design for the device so that we can just assemble The Protector device with lesser wiring connections and planning to embedded "Arduino MKR wifi 1010" on the device.
- And you may have noticed that we need to push or pull the door manually by our hands. There will be some possibility for the spread of virus. A low cost automatic door opening system is being developed and tested by me. And planning to add it with the "Protector"
- You have seen that the casing of the "Protector" is not perfect and a stable design is needed inorder to make it user friendly and to easily attach it in doors. So I'm working on Protector casing's 3D design which can be easily fit on a door by a single drill on the door and soon will be made available here !
- Also I'm planning to add cloud feature using Arduino IoT cloud platform and for that I'm working on Arduino IoT cloud python SDK.
- And finally planning to make this project commercially available so that we can reduce the spread of COVID-19 through surface contacts as much as possible !
"The Protector" may look simple, yet it is a powerful solution!
Hope you enjoyed reading my project ! If you have any queries or suggestions regarding this project feel free to contact me. Let's work and fight together for a COVID-19 free world !
References:


Comments
Please log in or sign up to comment.