Always use technology to improve the world, if you are a black hat or gray hat hacker please abstain at this point......... or at least leave a star to make me feel less guilty XP.
Introduction:Home security is of paramount importance for everyone and despite the fact that most of us have constant vigilance by public law enforcement, we can’t always count on that. Alone in the US there is a home burglary approximately every 15 seconds (1) and 450 per every 100, 000 inhabitants. These statistics are quite alarming. You might think that the best solution is to protect yourself via a personal home security system. The problem is specifically in the price of these systems, they are quite expensive or they are very limited in the amount of functions they could have. Then you have a very low number of houses with smart security systems.
We will try to improve on the high price of those, to reduce the previously mentioned numbers as much as possible. And not only that, but will try to create a whole home ecosystem that will generate a more connected, secure and economical environment.
https://www.asecurelife.com/burglary-statistics/https://en.actualitix.com/country/usa/united-states-domestic-burglary.php
ObjectiveI will make an integral domotics security system with AI enabled security. With the next characteristics:
- Will work as a security system to avoid intruders.
- Will serve as a smart home system.
Some of the modern systems:
Ring Alarm: Various sensors that track the user and intruders.
- The problem is that it has no interconnectivity but with the brand's devices.
- Every sensor is sold separately.
- It requires a monthly payment.
- Not face recognition.
- It is not intelligent nor it has voice commands, and it has no domotics capabilities.
- Its price is about $329 USD.
Simplisafe: Safe monitoring system.
- It is not smart.
- No voice commands.
- It has no domotics integration.
- Not face recognition.
- The camera is sold separately. Price: $250
Vivint: Stationary monitoring system
- Components are sold separately.
- Requires subscription.
- Not face recognition.
- Not smart
- No voice commands
- No domotics.
Our solution will be different, it’ll have all the benefits of the previously mentioned systems, but in turn will be integrated into a voice-enabled platform and face recognition.
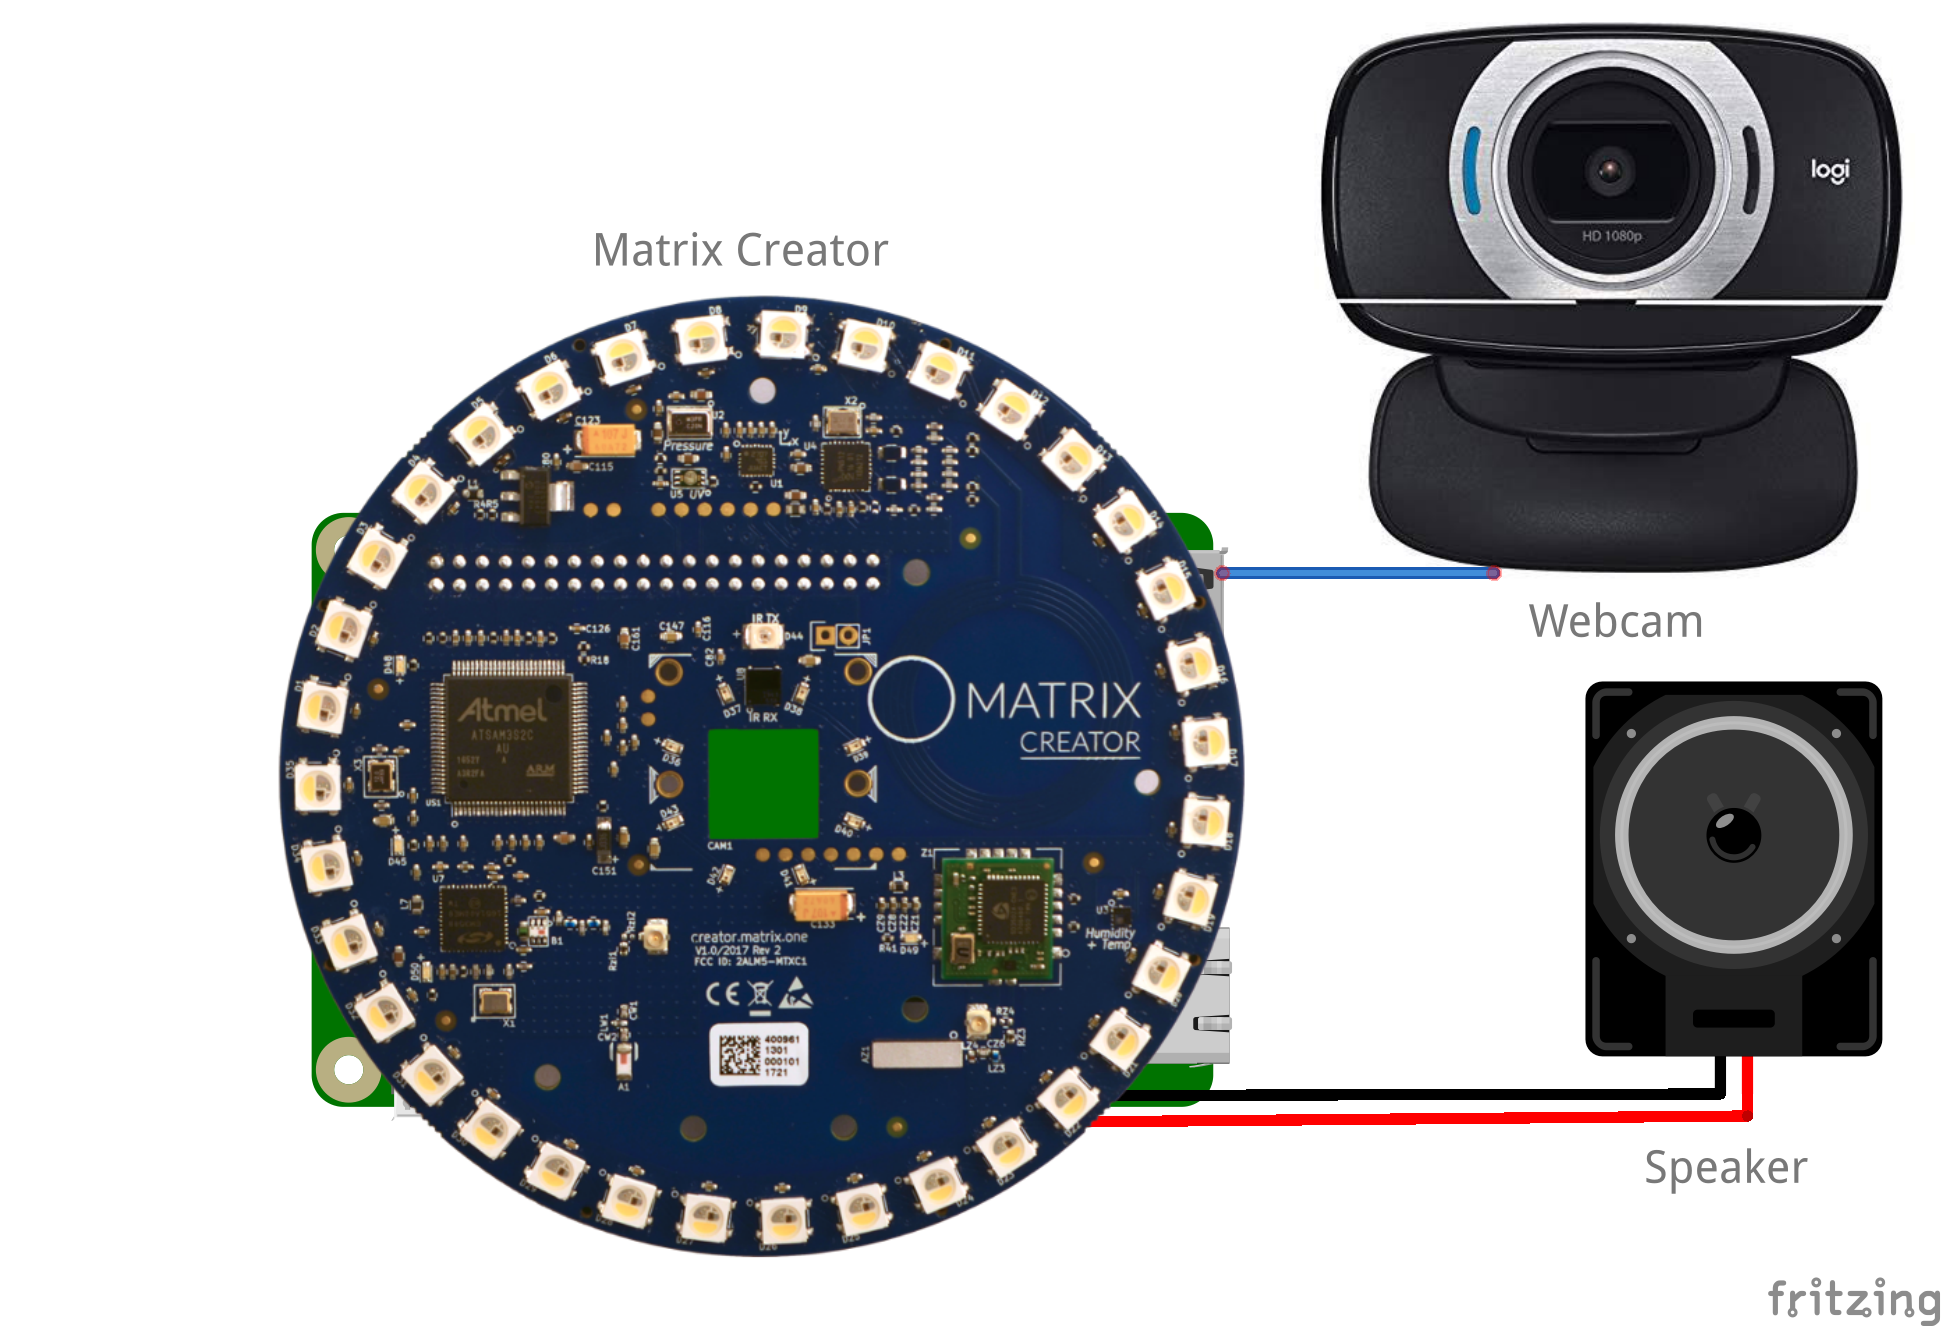
Connection Diagram:This is the connection diagram of the system:
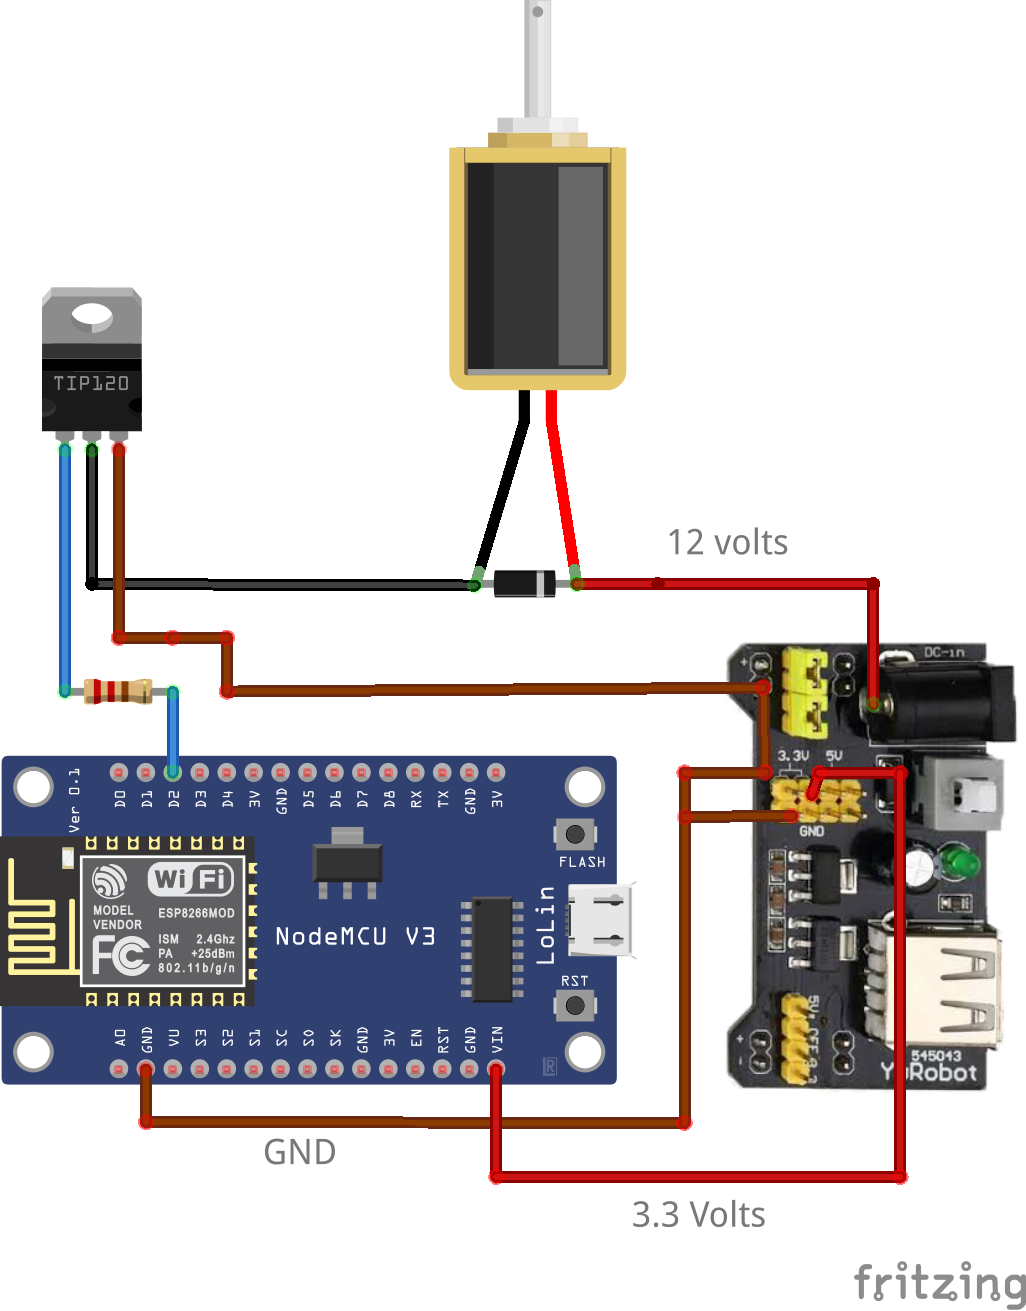
Lock Connection Diagram:
If you are new with Snips consider following the Snips official guide. https://docs.snips.ai/getting-started/quick-start-console
- After following this tutorial, you should be able to see the following window:
- Once you press the "deploy assistant" button you should obtain the following command, we will save this command to configure the raspberry afterwards.
- Command:
sam install assistant -i proj_XXXXXXXXXXXTo communicate Snips with the AWS Rekognition Service we need to create a User in the IAM console in order to authorize our RPI to use the service.
- The first step is to create a User that allows us to communicate with AWS.
- Please configure the user like so:
- Add the following permission to use the AWS rekognition service:
- Once we have created the user we will have to save both the "Access key ID" and the "Secret access key".
- Take a selfie, preferably a well iluminated one with a simple background.
- Once you have the png file, copy-paste it in the "/home/pi" folder so that the program may work properly.
If you are new to the raspberry consider setting up your raspberry with the following tutorial.
https://projects.raspberrypi.org/en/projects/raspberry-pi-setting-up
Download the following OS, it is the last Raspbian version compatible with SNIPS:
http://downloads.raspberrypi.org/raspbian/images/raspbian-2019-04-09/2019-04-08-raspbian-stretch.zip
If you try to download another version of Raspbian, here is the link with every version:
http://downloads.raspberrypi.org/raspbian/images/
For the following section, please follow the official Matrix documentation to install the Mic:
https://matrix-io.github.io/matrix-documentation/matrix-creator/resources/microphone/
Now, before proceeding, follow this tutorial to install the Sam command Line Interface which is SNIPS' software to intall SNIPS and its debugger.
Personally I use Windows. https://docs.snips.ai/getting-started/quick-start-raspberry-pi
Before using the "sam test speaker command" do the following:
- Add (portaudio_playback = "default") to the [snips-audio-server] section of your (/etc/snips.toml) configuration file. Use the next command to edit.
sudo nano /etc/snips.toml- Afterwards use this command:
sudo systemctl restart snips-audio-serverLeave aside the official guide and input the following commands:
- Login through SAM.
sam login- Once we have logged in correctly, run the command we saved on the previous section. NOTE: we have to run the command two times.
sam install assistant -i proj_XXXXXXXXXXX- After doing that setup we just need to go to the raspberry's desktop and select the analog audio exit, by right clicking on the audio icon on top.
After that you'll have to follow Matrix's guide:
https://matrix-io.github.io/matrix-documentation/matrix-core/getting-started/core-installation/
After that follow the next one. BUT, after executing the "pip3 install -r requirements.txt" command, STOP and go to the next point.
https://matrix-io.github.io/matrix-documentation/matrix-core/getting-started/python-installation/
- Execute the following commands:
pip3 install boto3 appdirs==1.4.3 backports-abc==0.5 certifi==2017.4.17 matrix_io-proto==0.0.10 packaging==16.8 protobuf==3.3.0 pyparsing==2.2.0 pyzmq==16.0.2 singledispatch==3.4.0.3 six==1.10.0 tornado==4.5.1
sudo apt-get install matrixio-protobuf libmatrixio-malos matrixio-malos -y
mv utils.py /home/pi/.local/lib/python3.5/site-packages
sudo reboot
sudo nano app.py
The last command will open the text editor where we will be able to paste the code provided in github inside "Raspberry Code" folder.
- Once the code is saved, we will install the AWS CLI to give the Raspberry Pi the access to AWS Rekognition.
sudo apt-get install awscli- After installing the CLI use the following commands to set it up properly.
aws configure
AWS Access Key ID [None]: YOURACCESKEY
AWS Secret Access Key [None]: YOURSECRET
Default region name [None]: us-east-1
Default output format [None]: json- After that run the following ones to finish the initial setup.
pip3 install opencv-python
sudo apt-get install libatlas-base-dev
sudo apt-get install libjasper-dev
sudo apt-get install libqtgui4
sudo apt-get install python3-pyqt5
sudo apt install libqt4-test
Because of SNIPS' configuration, it will initialize at the same time the Raspberry does, meaning that the assistant will run without a problem. So, we have to do the same with our CV program, for that follow:
https://www.instructables.com/id/Raspberry-Pi-Launch-Python-script-on-startup/
- After that, run the following command to obtain the ip for the MQTT service.
hostname -I- Finally! Run the next one and after rebooting everything should run correctly.
sudo reboot- If you were able to assemble the circuit shown in "Connection Diagram" upload the script provided in the github inside "Arduino Code" folder, but edit the following data related to your SSID and MQTT:
const char* ssid = "YOUR_SSID";
const char* password =  "YOUR_PASS";
const char* mqttServer = "YOUR_RPI_IP";- Once you upload the program to the ESP then everything should be ready to be installed inside a good case (files also provided!)
Snips Module:
ESP8266 Lock Module:
The project is pretty much finished as it is. Nevertheless the way that it is developed and programmed allows us to integrate any other security, home automation or smart application we might want to integrate. If anyone wants to expand on it, feel free to do so. Hope everyone likes it and thank you for reading.
If you have any question or anything of the sort about steps of the official documentation, how to create an assistant or anything else, please ask.


Comments
Please log in or sign up to comment.