My little brother works for Facebook and in Building 14 they have an amazing LEGO wall! I knew I needed one in my house! LEGO has always been my therapeutic way to calm or wind down for the night. It's my way of relaxing.
I decided to use the Bare Conductive Touch Board and Electric Paint to make my LEGO wall interactive and come to life!
You don't need to know any programming for this project.
Step 1: Bill of Materials (BOM) ListBare Conductive Touch Board Starter Kit
The Touch Board Kit includes:
- 1 x MicroSD card! Wahoo!
- 1 x Touch Board
- 1 x Electric Paint 10ml Tube
- 1 x Electric Paint 50ml Jar
- 1 x Guidebook
- 1 x MicroSD Card Reader
- 1 x Micro USB Cable
- 1 x Mini Speaker
- 10 x Alligator Clips
- 1 x Stencil
- 1 x Stencil Brush
- 12 x Sticky Tabs
- 3 x Velcro Stickers
- 2 x Paper Cutouts
I used 92 x Blue LEGO Base plates that measure 32x32 studs or 10" square.
You can make the wall any size you want.
You don't have to drill sheets of plywood into your wall, you could just use the Liquid Nails to apply the LEGO Baseplates to your wall. I choose to use plywood and a few screws so if I ever sell my house one day I wouldn't have to sheetrock the walls when trying to remove the LEGO baseplates.
I let the wall completely dry for 24 hours before I started to add brick designs and electronics.
Step 3: Bare Conductive Touch BoardPower Up
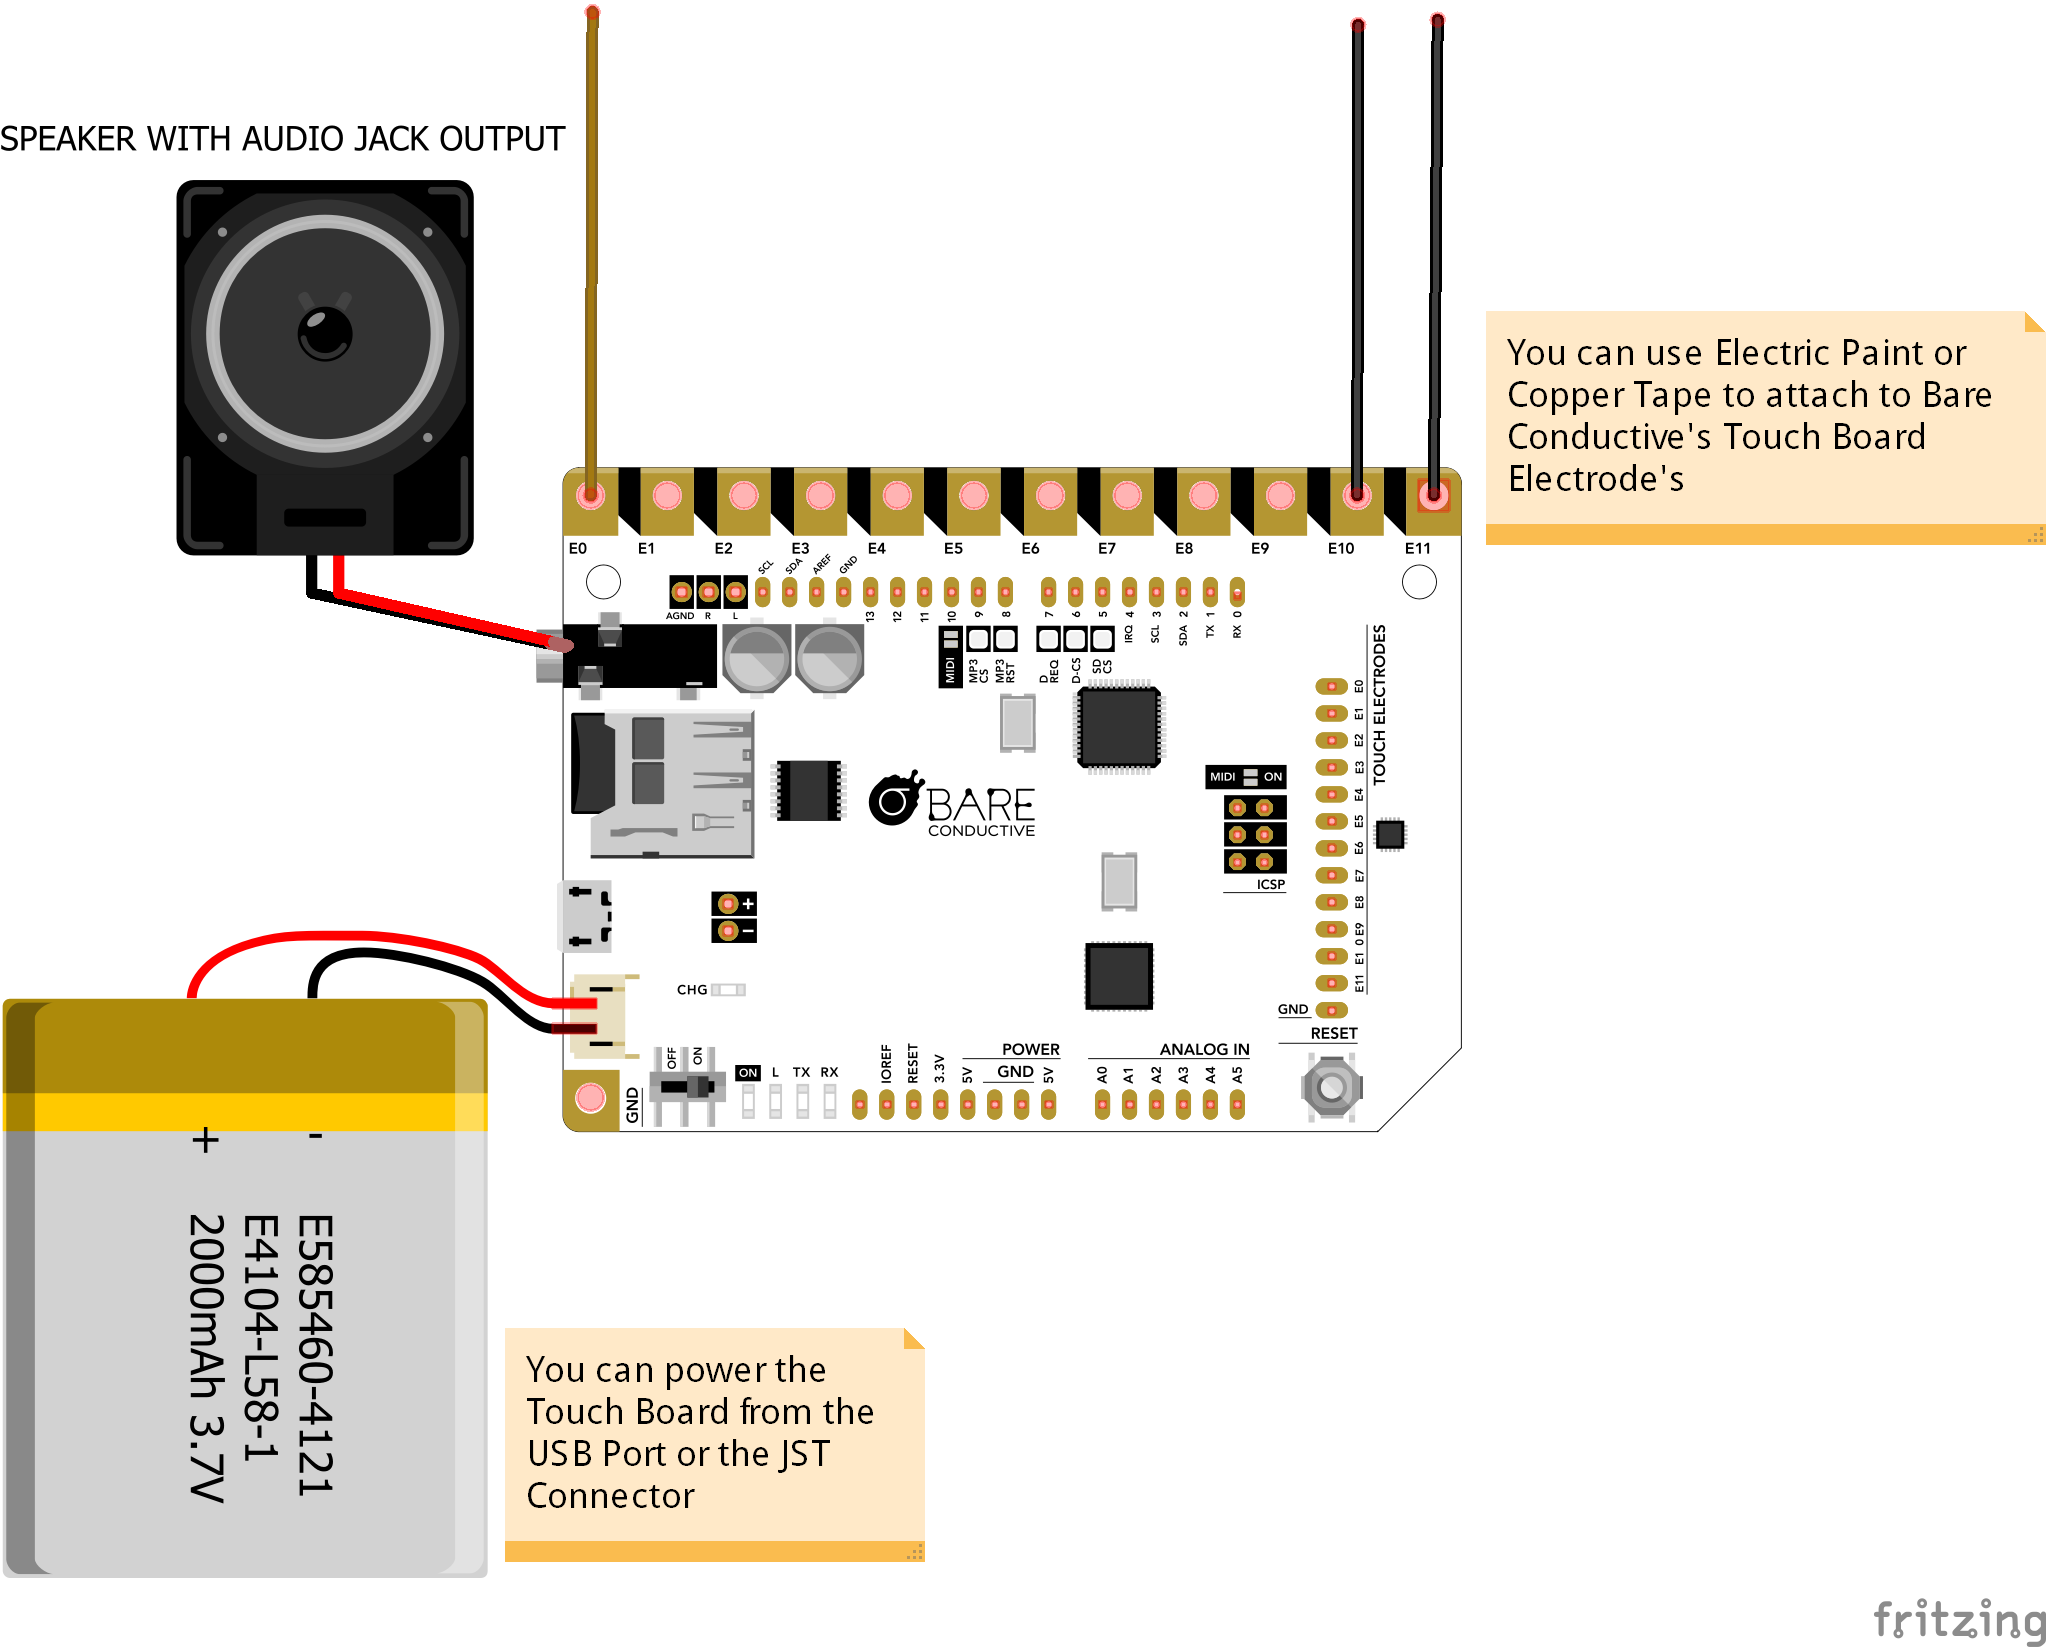
Plug your micro USB cable into the Touch Board. You can power the board directly from your computer or from a USB charger. Make sure the on/off switch at the bottom left hand corner of your Touch Board is switched to ON. You should see the green light next to the on/ off switch come on. This means your Touch Board is live.
Audio Jack
Plug your speaker (or headphones) into the audio jack on the top left hand corner of your board.
Electrodes
Now, touch the electrode on the upper lefthand corner of your board. Can you hear Becky’s voice? The electrodes are the twelve golden squares that run along the top edge of your Touch Board. They are numbered E0 to E11. Listen to the Audio Guide to find out more about the Touch Board and it’s different features. Once you’ve explored it and you’re ready to upload your own sounds, just move on to the next tutorial.
Step 4: Load Sounds on the MicroSD CardThe Touch Board comes pre-loaded with an Audio Guide to help you with all it’s features. One of the first things you may want to do is change the sounds that the Electrodes will trigger. Changing the sounds on your Micro SD by plugging in the micro SD card into your computer, it should show up on your desktop under the name “TB AUDIO”.
When you click on it, you should see a series of files that look like the image on the right. The document titled “README.txt” contains instructions on the Touch Board Audio, as well as the Audio Guide in written form. Don’t delete this document unless you remember everything and will never forget the instructions ever again.
Amie's in Game-Hint:
It's important that you keep all the files in the top level of the SD card, a lot of these files are related to the workings of the Touch Board, so deleting or moving them may affect your board’s functionality. You will see twelve tracks titled:
TRACK000.mp3
TRACK001.mp3
TRACK002.mp3 up to TRACK011.mp3
00 is for electrode 0, 01 is for electrode 1, 02 is for electrode 3, each TRACK name has to be named to match the electrode. Also make sure you do not have multiples on the SD Card (example TRACK000.mp3 TRACK000.mp3)
These are the files you need to replace to input your own audio. Bare Conductive recommended mp3cut to clip your own mp3 sound files. It free, simple and easy to use. Make sure the files are named correctly on the sd card.
Step 5: What Is Conductive Electric Paint?Electric Paint conducts electricity when dry. You can paint, stencil or screen print, it's air‐drying non-toxic and solvent free. Must be fully dry to work. Easily removable with soap and water. Seal with acrylic paint or spray varnish. Can last years if treated properly and kept dry.
Works on:
- Paper
- Cardboard
- Wood
- Plastic
- Glass
- Plaster
- Some rubbers
- LEGO
- Textiles, etc…
- Connect batteries
- LEDs and other components
- Great for attaching components and for PCB repair.
- Can be used as a cold solder and wire paint.
- Can be used with conductive thread and e-textiles.
- Can be painted or sprayed over for protection or multi-layered circuitry
- Surface resistivity approx 55 ohms/square at 50 microns layer thickness
Other project examples and resources at Bare Conductive Make.
Step 6: Apply Electric Paint to Electrodes and WallIt takes 15-30 minutes to dry. You can see the paint starts to have a 'matte' finish look when dry.
Step 7: Questions?You can read more at Bare Conductive
My info is www.AmieDD.com
Twitter: @amiedoubled
Instagram: @amiedoubled


Comments
Please log in or sign up to comment.