


Hardware components | ||||||
 |
| × | 1 | |||
 |
| × | 1 | |||
| × | 1 | ||||
 |
| × | 1 | |||
 |
| × | 1 | |||
| × | 1 | ||||
Software apps and online services | ||||||
 |
| |||||
| ||||||
Hand tools and fabrication machines | ||||||
| ||||||
This project was built using XinaBox ☒CHIPS by simply clicking together the different ☒CHIPS and writing basic code. I could then control a piezo-electric buzzer from my phone using a Blynk Project which I created.
Firstly, you need to download Blynk on your iPhone or Android phone from the Apple Store or Google Playstore respectively. Create an account for yourself which is fairly straight forward. Login using your newly created details. Select 'New Project' and then give your project a name. I've named mine Piezo Blynk as illustrated below. Also select the ESP8266 board using the drop down box. Press on Create and your new project will be created. A pop up will appear notifying you that an authentication token was sent to your email; press OK.
Next we need to add our widget to switch the buzzer on or off from our Blynk Project. Select the plus sign (+) in the top right corner. Your Widget Box should appear. Select the 'Button' widget by simply pressing it once. The Button should now appear on your project's work space. Refer to the below screenshots for graphical instructions up to this point.
Now press on the button which you just added to open up 'Button Settings'. Select 'PIN' and choose 'Virtual' on your left. You may then select any virtual pin on your right side. I've chosen V10 for my project. You may change button labels if you want but that is not necessary. Select 'SWITCH' for better control and leave everything else as is. Press back and you have now completed setting up Blynk. Follow the image below for guidance.
Connect your IP01 programmer ☒CHIP with CW01 using an XC10 bus connector as shown below. Then insert the combination into an available USB port on your computer.
In order to use the ☒CHIPS, you'll need to download the following libraries and add them to the Arduino libraries.
- xCore - Core library for ☒CHIPS.
- xOC01 - Library for the high current DC switch
- Blynk - Blynk library to use Blynk functionality
Next, Download the code in the Code section or copy and paste it into your Arduino IDE. Enter your WiFi details and copy and paste the authentication token that was emailed to you in Step 1 into their respective fields. See below.
You may now upload the code to your board after you've run a successful compilation.
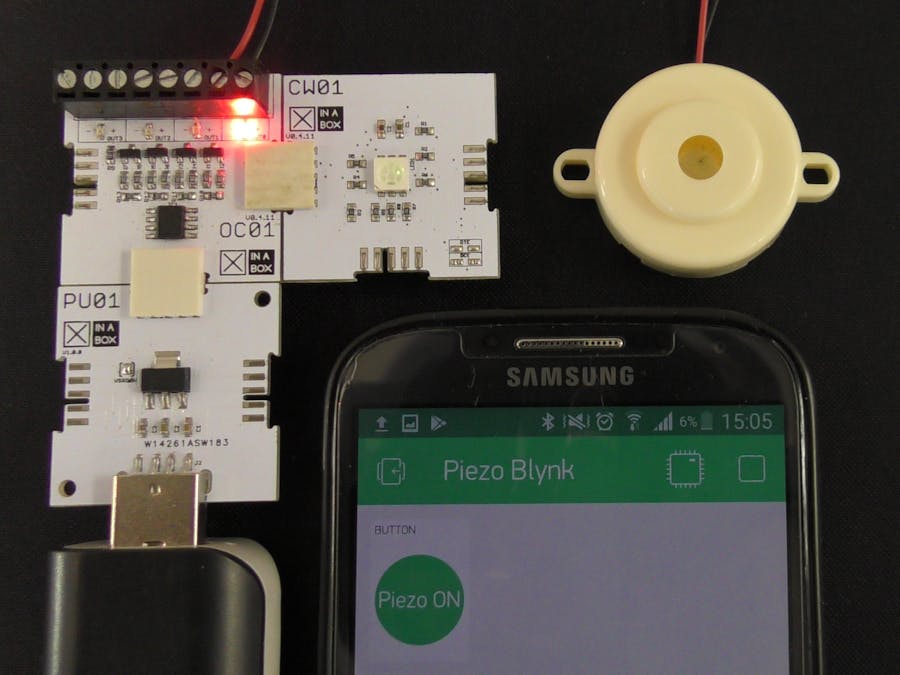
Step 4: Final AssemblyOnce uploaded remove the combination from your computer and replace IP01 with PU01. Place IP01 aside as you will no longer require it. Now assemble your project as per the image below. You may connect the ☒CHIPS any way you want as long as all the identification names are orientated in the same direction.
As seen above, the piezo buzzer is screwed into the terminal output which was used in our program; in this case OUT0. You may select any of the four outputs of your choice; just remember to make the changes in your code. You can screw the red wire in the positive terminal and the black wire in the negative terminal as a convention but it doesn't matter since piezo buzzers aren't polarity conscious.
Step 5: Power UpYou may power up your project with your computer or a normal power bank. Insert the project into the power bank. Open up your project which you created earlier on your Blynk application and select the play button in the top right corner. If your project is powered up, a connection will be established. You may now press the widget button you've previously added and the red LED on OUT0 output should light up along with your piezo buzzer sounding. Press the button widget on and off and be fascinated about how you can control a buzzer with your phone.
This project took about 25min to complete. I simply clicked together the ☒CHIPS and screwed in the piezo buzzer into the terminals. No soldering and no mess. You can turn on any 5V element over a WiFi connection using your phone.


Comments
Please log in or sign up to comment.