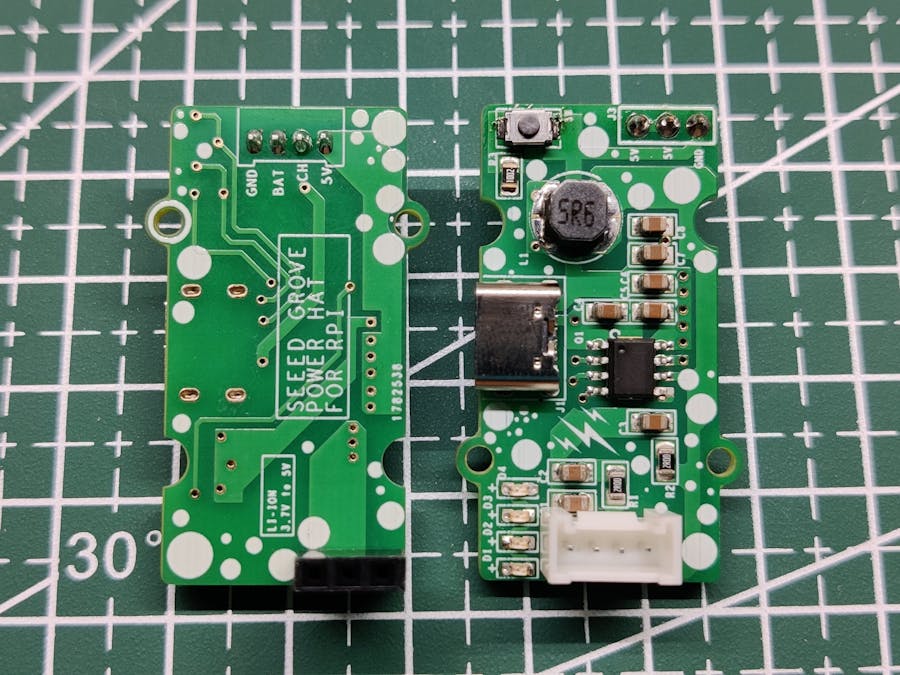
So this is the Seeed's Grove - Power hat for Raspberry Pi, It can power up the Raspberry Pi that uses 5V to operate by using a 3.7V Li-ion or LiPo cell.
This Module boosts the 3.7V into a stable filtered noiseless 5V output for the Raspberry pi to work properly without any malfunction, it also contains features like thermal shutdown and power cut-off when cells get too close to their low discharge voltage.
Seeed Studio Grove System is being used in this Module however because it's not a Sensor board, it's being utilized to add a battery to this module and distribute power through two remaining wires. Two wires are for Battery connection and the other two are for 5V Output and Charging IN.
With this module, we can power any version of Raspberry Pi directly from a single or collective lithium cell. We can even prepare handheld projects by utilizing this Module as a power source and that's pretty much what I'm planning to do with this setup.
As for its feature, it offers Low and High Cut Protection and even short circuit protection with thermal shutdown as well. It also has an indication setup for battery capacity level which is really handy as we can monitor the battery through it.
PlacementThis Hat can be added on the 5V and GND Port of Raspberry Pi, we can then add the Lithium Cell's Positive and negative to a CON4 Wire Harness according to the Battery Connection labeled on the lower part of the board.
Diagram and SchematicAs for this module's topology, all the components were placed according to IP5306 Datasheet's placement guide, Capacitors on the input side and Output side both are near the IC, and there's also a thermal pad for dissipating heat from the IC.
There are four 0603 Package LEDs that show the battery level.
A Type C Port is also added for charging the Lithium Cell, this Type C Port is connected to the Input side of IC, There's a CON3 header Pin for connecting this module to Raspberry Pi, two of those pins have 5V Output and a third pin is GND.
This Layout of CON 3 Pin was made according to Raspberry Pi Header Pin socket pinout.
We can directly add this Hat to the Raspberry Pi Header Pin socket's 5V and GND Pin.
Testing the output Voltage- We Plug in the Battery on the Grove Sensor connector and press the button for turning the setup ON. By Double tapping the button, the setup immediately turns OFF.
- We then use a Multimeter to measure the output Voltage which was 5.1V which is suitable for running any 5V Device in my case a Raspberry Pi Model 3 B Plus.
This Module uses IP5306 IC which is a fully-integrated multi-function power management that comes in the SoC package.
It has an internal Boost Converter setup along with a proper Li-ion Battery charge management setup that has a low discharge and high charge cut feature which is a must-have function when working with Li-ion cells.
Li-ion cells are dangerous if overcharged so we generally use a BMS Module to cut off its voltage when attached to any charging source, IP5306 has this function which means we don't have to attach any Battery protection setup with it.
Also, we get battery status LED Indication feature.
It can boost the Voltage of any cell from 2.8V ~ 3.7V to 5V 2A.
Datasheet- http://www.injoinic.com/wwwroot/uploads/files/20200221/0405f23c247a34d3990ae100c8b20a27.pdf
Adding Li-ion Cell- We first connect the CON4 Wire Harness's first two wires with the Lithium Cell by using a crimping tool. we left the two wires idle as they are for charging IN and 5V Out. GND is common with Battery's negative terminal.
- As for the Lithium Cell type, we can use the 18650 or Lipo cell both with this setup, it should be a 3.7V Lithium Cell with a High Cut voltage of 4.2V and low cut around 2.5V.
Now here's the project that I've been working on, a game console setup that uses a Raspbeery Pi Flashed with a Game EMulation OS.
As for the EMulation OS, I'm using RecalBox here which is first downloaded and written on the SD Card through the raspberry pi imager software.
After this software puts the OS on SD Card, we add the SD Card to Raspberry Pi and move on to the next step which is to add the Grove sensor to the Pi.
Connections with RPI- We place the Grove Power Hat on Raspbeery Pi 5V and GND Header Pin and then press the button for turning the step ON.
- Raspberry Pi powers up and its indication LEDs also lits up.
- Next, we connect an HDMI display with the Pi along with a keyboard and game controller.
As you can see here, the Raspberry Pi is powered solely by a single lithium Cell whose voltage is Bosted from 3.7V to 5V in order for RPI to work.
No extra wire has been added or any USB Cable is being used to power the Pi.
This isn't the final form of the project as this is just a testing part for the Power Hat, actual project will use a small ILI9341 Display that will also get its power through the Power Hat.
Huge thanks to Seeed Studio for providing the custom PCBs and PCB Assembly service for preparing this custom Grove Sensor Module.
If you want to learn more about Grove Sensors then do checkout Seeed Studio Page for more details.
Leave a comment if you need any help regarding this project, and will be back with a new project soon.
peace out.


_LWNORVejBN.png?auto=compress%2Cformat&w=48&h=48&fit=fill&bg=ffffff)
_wWPaikDx3r.jpg)


Comments