


Hardware components | ||||||
| × | 2 | ||||
 |
| × | 1 | |||
| × | 1 | ||||
| × | 1 | ||||
| × | 1 | ||||
| × | 1 | ||||
Hand tools and fabrication machines | ||||||
 |
| |||||
 |
| |||||
| ||||||
An electric menorah is a bit ironic from a traditional standpoint but it certainly makes Hanukkah extra fun and bright if that's the vibe you're going for! This menorah is actually a gift for a friend who I recently discovered didn't have a menorah to celebrate with in her new home. We've been talking about it since around October of this year so it's great to see it finally come together (and right before Hanukkah starts so right on schedule!).
I knew that I wanted to use NeoPixels to have the rainbow cycle effect for the lights. I went with the 8mm individual pixels for both their size and ease of wiring. I wanted to be able to turn each individual NeoPixel on and off without affecting the color effect. During prototyping, I discovered that to do this I had to daisy chain the data in leads on the NeoPixels together rather than connecting data in to data out, which would be the traditional wiring. Since I was cutting power, it seemed to interrupt the data flow or cause things to glitch out. This means that each pixel is the same color and they're all changing together at the same rate rather than having a wipe effect across all nine but I think the effect is still cool.
For a housing, I went with PVC pipe because it could easily achieve the form factor that I was going for without too much modification. I used a mix of tee and elbow pieces for the main part of the menorah along with one cross piece for the middle and a few straight pieces to connect to the base.
The base however was a completely new process for me. I very recently, and finally, procured a 3D printer; specifically a Monoprice Mini Delta. Although small, it's definitely proven itself to be an accurate workhouse and I'm definitely hooked on 3d printing already. I was originally going to use a larger PVC pipe joint for the base but in the end decided to design and print a custom part. It's a dome with a slight lip on the top that fits a 1/2" PVC joint without a tiny bit of breathing room. It's hollow except for a bar going across the bottom for the joint to rest on. That same joint has about 33% of the bottom half cut out to allow for the power cable to fit. There's a small half circle on a bottom edge of the dome to allow for the cable to run without affecting the balance of the menorah or causing the cable to bend. This was the first time I ever used CAD software or printed my own design and I'm really happy with how it came out. It definitely adds to the finished look of the menorah.
With the logistics figured out, it was time to put this plan into action and it proved to be a bit challenging, but if you want to make your own version I have some ways to make it easier for you so that you hopefully don't go thru what I did.
This involved a decent amount of wiring. I decided to solder all of the NeoPixels and wires to a breadboard protoboard first since the holes are already connected. I did this because I was worried with the close proximity of all the solder joints that jumping the connections with solder on a traditional perf board would be a bit dangerous and leave me open to shorts. What I should have done though was preemptively cut the breadboard protoboard into smaller pieces before I soldered rather than cut after soldering. When I first tested this idea of smaller pieces of perf board with the other traditional board, it cut very easily. The breadboard type though is a much higher quality and thicker so it was very difficult to get thru. That combined with avoiding wires and connections made things very tedious. Despite going slowly and as carefully as I could, I still managed to cut some leads and wires which I then re-soldered. Some of these mistakes haunted me thru the entire assembly process and resulted in a lot of finagling to make connections work properly, so basically do as I say not as I do.
So after I'd assembled this spaghetti circuit of lights and switches I added dabs of hot glue to all of the solder connections and any exposed leads or pads to prevent shorting since this was all going into a rather confined space. This was the first time I did this and I'll definitely be doing it again. It gives you great piece of mind and if for some reason there's a problem (problems? in this project?) then you can just peal the glue off and have access again.
After everything was glued and I had only touched the glue while it was still hot twice it was time to stuff the circuit into the housing. First I dremeled out small holes in the PVC pipe to allow for the switches to sit comfortably. On the tee joints I ended up originally dremeling in a not so great spot so I had to do a second hole. When you're dremeling with PVC be sure to wear eye protection and a face mask because it gives off a ton of very fine particles. I also covered my work area with an old towel to make clean-up easier.
At first it seemed like the wiring was going to go really smoothly. But by the time I got to the 3rd and 4th joints and accompanying NeoPixels circuits I realized I had a ton of wire and not enough PVC volume. I was able to finesse things along, trying to gently, yet forcefully, fit all of the scraggly bits in. My biggest choke point was the portion of the circuit where all of the power was connected. The protoboard length combined with the number of wires made it almost impossible to fit in (almost). I eventually jammed everything in but not without causing some disconnections on the power and ground lines. One pixel was even having issues with data. After a lot of troubleshooting, re-seating, twisting, de-soldering, re-soldering and hot glue everything was working. I sealed up the pipes with PVC clamps that screw on to tighten. This also makes getting back inside easy for any future repairs.
I mentioned earlier that the base is hollow to allow for power to pass thru comfortably. You can find the Trinket m0 there being powered by a USB micro B power supply. All of the connections are soldered directly to the Trinket.
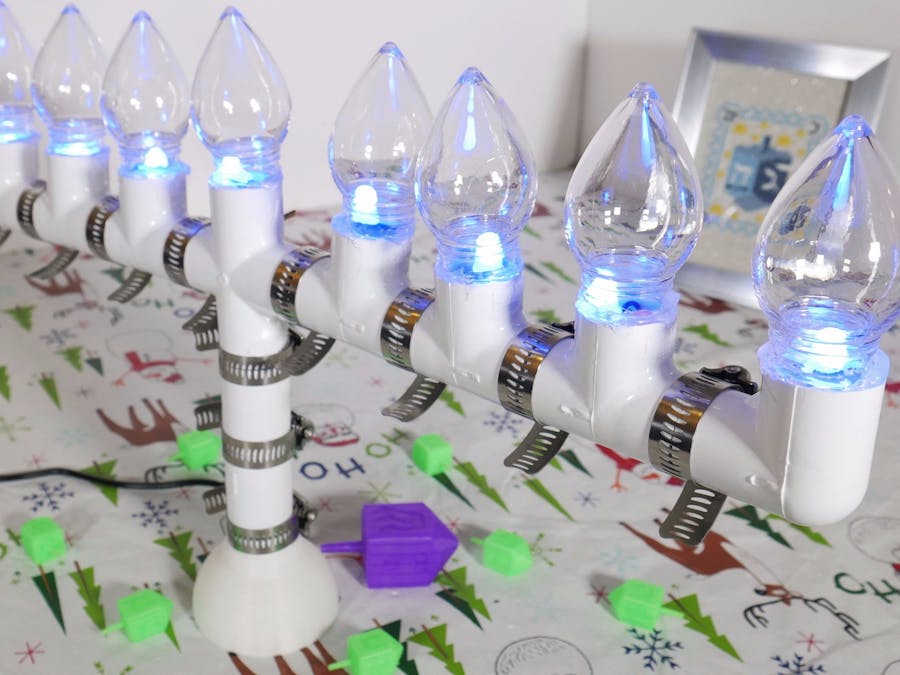
The final touch were some plastic bulbs that are actually empty plastic Christmas ornaments. They had metal(ish) screw-on bases with holes for hooks but I removed that portion to have the bulb. The opening was an almost perfect fit to the PVC opening and the plastic diffused the NeoPixel lights quite well and help with the proportions of the project. The bulbs are held on with a ring of hot glue, which doesn't show too badly. I considered using E6000 glue but went with hot glue since it can be pealed away if any repairs need to be made where as E6000 glue is much more permanent.
RecommendationsI'd recommend that if you try to replicate this project with the same materials that you first:
- Cut the pieces of protoboard
- Solder the NeoPixel portion, waiting to wire up the switches
- Run the connected NeoPixel circuits thru the pipe & apply hot glue
- With everything in the pipe, solder the switches so that you aren't trying to squeeze all that write bulk and additional piece of protoboard into the pipes post-soldering & then hot glue the switches and power line
- Then clamp the pipes together & hot glue the bulbs
I think that order of operations would make things go a lot easier. If anyone does replicate this project please let me know your process and maybe we can collaborate on better procedure.
But after all of that, you have a very pretty electric menorah ready to light-up for eight crazy nights. Although it foregoes the traditional candles which are very important to the holiday, many apartment buildings (including mine) and public spaces do not allow the burning of candles because of fire codes. At least with this version, it allows people to be able to celebrate the traditional lighting without lighting anything on fire that they aren't supposed to. A fun update to this project would be to convert it to IoT to automatically turn on the appropriate number of pixels at sundown. This would also make it work for people observing the Sabbath. So maybe next year you'll see an updated menorah from me. Until then, I'll be staring at the colors change on this one.

Comments
Please log in or sign up to comment.