In January, I uploaded a project called “Arduino Controlled Pinball Machine”.
https://www.hackster.io/BobB/arduino-controlled-pinball-machine-525863
It was a tutorial on how to build a pinball machine using an Arduino to control the game play. One of the biggest differences between this unit and a commercial pinball machine was the absence of sound effects and music. These elements are a key component of pinball experience. This project describes how to add these to a pinball machine using a Wav Trigger board. That board is then directed by the Arduino controlling the pinball machine game play. This allows me to change songs with every ball and trigger sound effects when various pinball components are activated.
The Wav Trigger is an excellent board to use for this application. The main reason is that it is polyphonic. This means that it can play multiple sound files as the same time. This is critical in this project, since we want the sound effects not to affect the music playing in the background.
To ready the Wav Trigger board for use, I first had to attach a header. If you are like me and had never previously soldered a header to a board, I strongly suggest that you check out the link below. Specifically, I recommend watching the video called “Soldering Your First Component”. It does and nice job and can help prevent a lot of problems.
https://learn.sparkfun.com/tutorials/how-to-solder---through-hole-soldering
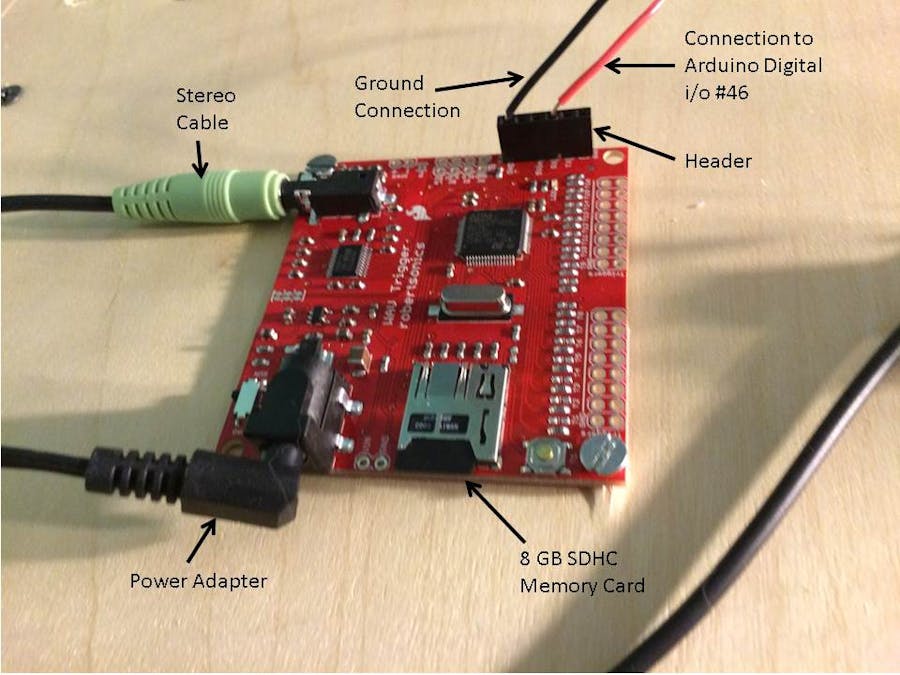
At this point, I screwed the board to the underside of the pinball machine and connected it as shown in the picture below.
For a power adapter, I used a 6V unit that I happened to have lying around. The stereo cable runs to a pair of old computer speakers. These speakers get their power from a USB port, so I simply used a USB-to-AC adapter so that I could plug them into the power strip mounted on the back of the pinball machine. The Ground wire simply ran back to the ground for the Arduino board and the only other wire went from the RX location on the Wav Trigger to the Digital i/o port #46 on the Arduino Mega 2560 I used to run the pinball machine. (We’ll talk about why #46 later!)
I then loaded my .wav files unto the SDHC memory card. The Wav Trigger requires .wav files that are designed to run at 44.1kHz. To convert my sound files to this format, I did as the Wav Trigger manufacturer (robertsonics) recommended and downloaded a free program called Audacity from the website below. It did a nice job. Simply load the file, select 44.1 kHz in the bottom left of the screen, and then export it as windows .wav file.
https://sourceforge.net/projects/audacity/
For the files, I used 5 music files, one for each ball you get when playing the pinball machine. I also downloaded some pinball special effects sounds from the link below. While these files were already in .wav format, I still had to import them into Audacity to change them to the 44.1kHz format.
https://www.freesound.org/people/relwin/packs/10675/
That’s it for the hardware. For the Arduino software, I needed to install two additional libraries. If you’ve never installed Arduino libraries before, you can find the procedure at the link below.
https://www.arduino.cc/en/Guide/Libraries
The first library you will need is called AltSoftSerial. Which can be obtained from the link below.
https://www.pjrc.com/teensy/td_libs_AltSoftSerial.html
This library handles the serial communication between the Wav Trigger and the Arduino. You may recall that I had previously used a similar library called SoftSerial to handle communication between the Arduino and the LCD display I used to show the score and ball #. Fortunately, these programs don’t conflict.
On the above website, you will find the number of the pin you need to use for your particular Arduino board. For the Mega 2560 I used, I need pin 46, which is why I connected the Wav Trigger as described above.
The other library you will need is called the “WAV-Trigger-Arduino-Serial-Library”.
https://github.com/robertsonics/WAV-Trigger-Arduino-Serial-Library
This is where you will find all the different commands you can do with the board. While the board can do much more, I only needed to start and stop the playing of specific .wav files on command. To do so, I needed to use the following commands.
wTrig.start() – Used at the start to initialize serial communication.
wTrig.masterGain(int gain) -- To set the initial volume. I used a value of zero for the int gain. My speakers have a volume control on them, so I didn’t have to be too picky.
wTrig.trackPlayPoly(int t) – This is the command that you need to run a specific .wav file. When loading the files onto the memory chip, it is import to rename the files so that they begin with a three digit number, such as 001, 002, etc. It is this number that you will use to select the file that you will run.
wTrig.stopAllTracks() -- Stops all tracks.
And that’s it! The attached video will show you what it all sounds like. The attached code will show you how the above functions were used to get the sounds/music to work when needed.
I hope you found this interesting and helpful.
Bob


_wzec989qrF.jpg?auto=compress%2Cformat&w=48&h=48&fit=fill&bg=ffffff)


_3u05Tpwasz.png?auto=compress%2Cformat&w=40&h=40&fit=fillmax&bg=fff&dpr=2)
Comments
Please log in or sign up to comment.