


Hardware components | ||||||
 |
| × | 1 | |||
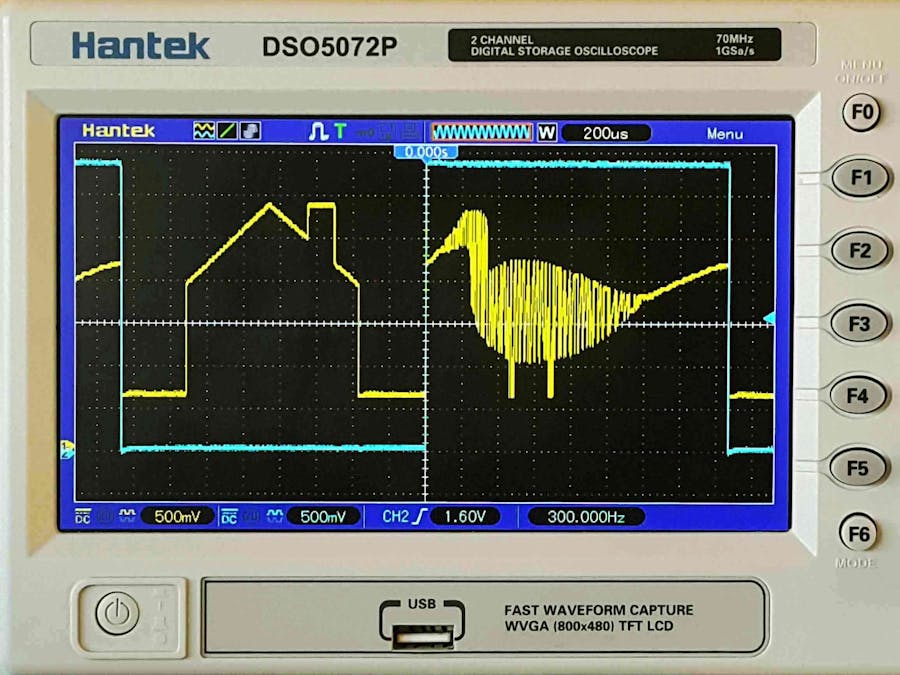
Arbitrary waves can be drawn, saved and sent to the Due via USB.
Classic waves can be created, and all waves can be mixed together.
Wave parameters can be adjusted & the new waveshapes saved.
Analogue wave max freq: 100kHz. Square wave max freq: 42MHz.
Min freq: Over 10,000 seconds per cycle.
Duty cycle adjustable from virtually 0% to 100%
Accurate white, pink or brown noise can also be produced.
Music can even be composed, saved and played by the Due.
The Due can also run alone, controlled by pots & switches.
Start-up default settings can be changed.
Easy to build - see Installation below.
Example Music Scores created in the Music Window:
The many new features of version 2.0 are listed below, but for anyone new, here are the features of the original version, which are also included in version 2:
This is a two part project: The sketch for the Arduino Due board, and a controller GUI to be used on your PC. If you prefer, for most functions the Arduino can also be controlled by the Arduino IDE, or it can be used on its own, controlled by pots, switches and LEDs. The sketch works with the Due board only.
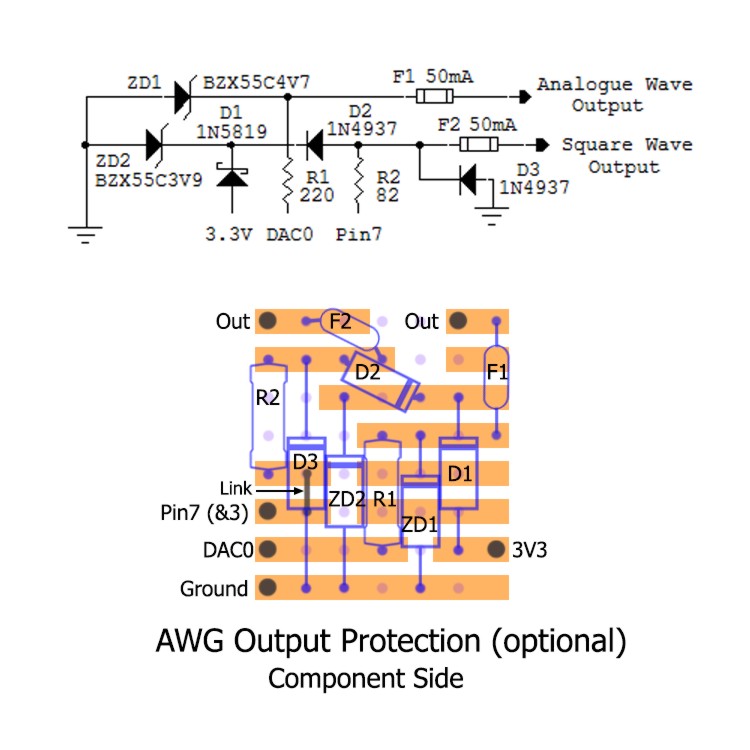
No circuitry is needed, although an optional output protection circuit is offered which should protect the Arduino board from accidentally connecting the outputs to voltages of up to plus and minus 30V or so, as well as static protection.
By using the controller GUI on your PC, arbitrary waves can be drawn, edited, saved and uploaded to the Arduino Due, automatically connected via the USB port. A comprehensive help file is included.
A "stepped" wave feature allows any number of sharp (one sample) steps in the arbitrary wave to be easily produced if desired. Additionally, the output can be switched to sinewave or triangle / sawtooth instead.
Also, a square wave is simultaneously produced which can be either synchronized or completely independent. The waves can be controlled by the frequency or period. The duty cycle can be set from virtually 0% to 100%. Or the pulse width can be set constant.
The new settings can be directly typed via the PC's keyboard or the program's keypad. Or, pressing "SLIDE" allows a sliding adjustment.
An Exact Frequency Mode is available for the analogue wave, which avoids the "frequency steps" normally associated with direct digital synthesis (DDS) waveform generators. This makes a more precise frequency possible by allowing access to frequencies in between those "frequency steps" because the output is not a division of the Arduino clock frequency when Exact Freq Mode is on.
A (log) frequency sweep feature for either or both waves is included, and there is also a timer with positive or negative Arduino output.
Version 2.0 New FeaturesThanks for your many comments below. Some of your suggestions have been incorporated into this new version. Here's a list of most, but not all, of the new features:
More classic waves can now be created by adjusting a myriad of wave parameters in SETUP, where all waves can be greatly modified and even mixed together to produce a composite wave, creating virtually unlimited effects. Two sine waves can even be created simultaneously and mixed to produce phase shift effects, etc. Thanks to mszoke01 (in comments) for inspiration on much of this.
Your newly created waveshapes can not only be saved to file, but they can also be saved to Due's flash memory in one of 50 Presets, each of which can hold any combination of waveshapes, and an arbitrary wave as well. Presets allow other possibilities too, such as an easy to make stand-alone Audiometer. Thanks to chhckm (in comments) for this idea.
Start-up default settings can now be changed (saved in flash memory) so the Due will boot-up with any waveshape, frequency and mode of your choice, including an arbitrary wave. Thanks to gagarinui (in comments) for this idea.
By clicking MODULATION in the SETUP window the wave amplitude can be modulated in real time by a voltage applied to Arduino pin A2.
If the USB connection to the Arduino is lost it can now be restored with a single click, without restarting the controller program; and all your settings will be automatically restored on the Arduino.
Random waves can be produced in the drawing window by clicking AUTODRAW to find RANDOM, then just click DRAW.
Arbitrary waves with any number of waypoints can now be edited in the drawing window.
Arbitrary waves now upload to the Due much faster than version 1.
After uploading an arbitrary wave to the Due, more can be uploaded and added onto the end of it, creating a string of arbitrary waves!
Accurate white, pink or brown noise can now be created using the Due's unique built-in True Random Number Generator, TRNG. And by adjusting the Noise Colour setting in SETUP every combination in between can be produced too!
If that's not enough, you can even compose music scores which the Due will play using the waveshape you created! Or you can use the following built-in instruments: Piano, Guitar, Marimba, Trumpet, Saxophone and Violin. You can save your score to file, and you can even save up to 50 tunes in Due's flash memory so they can be played by the Arduino in stand-alone mode, using switches. Plus you can set any one of the tunes to play automatically at boot-up!
And there's more: You can change instruments multiple times during a tune or score... and that's not all... If the tune or score uses the WAVE instrument you can link it to a Preset so, when playing, the Arduino will automatically use the waveshape you saved in that Preset. (The Preset must be saved when the Music Window is open to enable this feature.)
The help file has been greatly expanded to include the extra features.
Although the music produced is only monophonic, if anyone is lucky enough to have more than one Due board it should be possible to connect their I/O pins together so they can all start playing the same tune number together, triggered by switches connected to them. So if different soundtracks have been saved to the same tune number on each individual board you have polyphony!
This program has been exhaustively tested, but because of its complexity (especially the music window) it can’t be guaranteed that there are no more bugs remaining, so it should be regarded as a beta version and I would appreciate it if any more bugs found are reported in the comments section below, giving specific circumstances of when they occurred so I can re-create and fix them. Thanks.
InstallationThe GUI Controller program for your PC is "portable" so does not need installing.
For Windows users, simply extract the .zip file into a folder of your choice and make a short-cut to the .exe file. Note: The "DueAWGController-win64.zip" file is intended for 64 bit systems, but the 32.zip file often works more reliably anyway since it has java embedded. You may need to install java on your system for the 64.zip version.
For Linux users, extract the DueAWGController-linuxXX.zip file into a folder, then double click the DueAWGController file or add it to the system menu.
DueAWGController-linux64.zip file has java embedded. You should install java on your system for the other versions so the DueAWGController displays correctly. On the command line (in Terminal), type: sudo apt install default-jdk
You might also need to gain permission to access the USB before you can connect to the Arduino. In Terminal, type: sudo usermod -a -G dialout $USER
Also included are two "arm" files for Raspberry Pi etc, but they have not been tested. Please let me know if they work, to help other users.
The Arduino sketch needs only one easy to find library which allows storing of personalized start-up settings, presets and tunes to Due's flash memory. Called "DueFlashStorage" it can be found through the Arduino IDE program, via Tools > Manage Libraries.
Expect the Arduino sketch to take a while to upload as a lot of data needs uploading. Most of the available program memory on the Due board is used in this version. 43% is used by the program and 50% is allocated to storage of Presets, Arbitrary waves and Tunes. That leaves only 7% unused! And about 80k of the available 96k of RAM is used by variables, too!
The GUI program should automatically find and connect to the Arduino when starting, so there's no need to set the COM port. However, manual COM port selection is enabled if automatic selection fails.
There are a few example arbitrary wave files in the Arbitrary Waves folder, some example music score files in the Music Scores folder and a couple of settings files in the Settings folder to help you get started.
As well as the GUI program, the Arduino waveform generator can also be controlled with the Arduino IDE's serial monitor set to 115200 baud. Type “?” (or any unused character) for help.
To use pots, switches & LEDs for control, the start of the Arduino sketch lists the pin connections. However, you will still need the above mentioned GUI program to create music scores and tunes.
Wave output pin connections: Connect Arduino pins 3 and 7 together with a link (or a low value resistor approximately 47 ohms). Take the square wave output from pin 7 if using a resistor and the analogue wave output from DAC0. DAC1 can be used instead by following the simple instructions at the very end of the .ino file.
If connecting to an external amplifier, etc you will need to use a coupling capacitor as the produced waves have a DC bias of half Arduino’s supply voltage of 3.3V. Also, it is VERY STRONGLY suggested that you use a protection circuit, such as the one offered below, otherwise just a little static WILL instantly destroy your Arduino output pins. This has happened many times, so don’t risk it! Just two components are needed for static protection of the analogue output only – see below. The circuit should be connected directly to the Arduino, before the coupling capacitor.
OPTIONAL output protection circuitry
If only using the analogue output for connection to an amplifier (e.g. for music) only ZD1 and R1 are needed for static protection (before the coupling capacitor). ZD1 can then be a low current type and a considerably higher voltage if necessary but not lower, and make R1 a much higher value (approx. 1 – 5k). Only two non-critical components needed, so don’t risk destroying your Arduino! (Note: A second similar resistor, in series with the coupling capacitor, would protect ZD1 if it’s a low current type.)


Comments
Please log in or sign up to comment.