In this tutorial we will light up a custom made sign to let us know when someone has posted on a Slack channel. Pretty cool huh! Yeah I know what you're thinking, I have a phone for that Travis. Well if you don't like to have fun then you can skip this one :)
I have my twitter account connected to Slack as well so any time there is activity on twitter like someone liking a tweet, tagging us in a tweet, you name it, it will post to my Social channel on Slack. That will then in turn trigger a function call to my controller through Particle's cloud and trigger a relay and a buzzer to light up the sign.
Step 1 Gather MaterialsFor this application you will need a 2 channel Particle Photon relay controller. I am using Solid State relays because the transformers that drive these LED panels are really nasty. They throw out some really bad induction so the solid state relays isolate the control electronics on the 2 channel Particle Photon relay controller. You will of course need a Particle Photon module plugged into that 2 channel relay controller. You will also need a 12VDC power supply to power the controller. You could absolutely use a 1 channel controller as well, you will just need to make some slight modifications to the instructions in this tutorial to do that.
I also have a buzzer wired up so when either of the signs activate a buzzer goes off so I can look over and see which channel just fired. This is handy if you do not happen to be looking at the sign when it goes off. The buzzer can also be used to scare your wife.
Lastly you need a couple of light up signs. These can really be about anything. I happened to have a couple of LED light panels and a vinyle sticker printer so I made that work. Unfortunately these signs are not the exact same color temperature and I do not know where I got them(have had them for a while). I posted a link to a panel similar in size on Amazon.
Step 2 Flash Some CodeI recommend starting by getting the firmware flashed into the Particle Photon module. This is pretty easy to do.
Install the Particle Photon module into the 2 channel relay controller if it is not already.
Apply a regulated 12VDC power source to the 2.1mm barrel connector or power supply input screw terminals.
Follow instructions here to setup your Particle Photon module for your WiFi network and associate it with your Particle Account so we can interface with it and flash in firmware.
Go to Particle's WEB IDE(build)
Click the Target Icon on the left and make sure your Particle Photon module is connected and selected here. Click on the Libraries Icon on the left, then search Community Libraries for NCD2Relay. Make sure the Slack_Sign.cpp tab is selected, then click the Use this Example button. Now click the devices icon on the left(looks like a target) and make sure your controller is online and selected. Now click the Flash button on the left(looks like a lightning bolt) to flash the firmware into your controller.
After the module is flashed with this firmware and reboots you are set.
The complete source for this firmware is available on our GitHub repo.
Step 3: Hook.io setupSo unfortunately we cannot connect Slack directly to our Particle account at this time. Slack does have support for webhooks but it is not capable of doing HTTP Post requests which is required to call a function on our Photon module through Particle's Cloud API. There is a work around though. We will use www.Hook.io to take a request from Slack and then send a post to call our function on Particle. Super cool! So go to www.hook.io and setup an account.
Once logged into your account on www.hook.io we need to click on Create a new Service at the top of the page.
In your new service enter a name for the service. This can be anything you want, just make it easy to remember. Then scroll down Hook Source Make sure it is set for JavaScript and enter the code available here(Slack_Sign_1/Slack_Sign_2). In that code you will see one spot where it says: ENTER_YOUR_PARTICLE_ACCOUNT_ACCESS_TOKEN
Replace that with the Access Token for your Particle account. The easiest way to get your Particle Account Access token is by going to build.particle.io click on the settings cog icon on the left, then copy the access token there and paste it in place of the ENTER_YOUR_PARTICLE_ACCOUNT_ACCESS_TOKEN text.
Next there are two places in the code where you will find:
#ENTER_DEVICE_ID_HERE# replace that text with the ID of your Particle Photon Module. The best place to find that is back on build.particle.io Click on the devices icon on the left(looks like a target), click on the arrow to the right of the module you flashed the firmware onto and it will display the module's ID. Copy and paste that in place of #ENTER_DEVICE_ID_HERE#.
Finally click Save Hook at the bottom. You will find a URL to call this hook. Copy that down as we will need to enter that in the webhook for Slack. If you are doing two signs like me you will need to create two hooks on Hook.io one for each channel/relay. This means you will have two Hook urls, one for each.
Step 4: Slack Channel ConfigYou will need a valid Slack channel account and at least one channel there. I am using my Social and Development channels to trigger the sign. Go ahead and sign into your Slack channel.
Once signed in you see your user dashboard I suppose you would call it. In the top left corner there is the name of your channel with a little drop down arrow. If you click that you will see a menu drop down. You want to click on Apps and Integrations.
In the Apps & Integrations UI you can click on Build up in the upper right corner. From there click on the Make a Custom Integration button(Green at the moment). Select Outgoing Webhook. On the next page click the Add Outgoing WebHooks Integration button.
Here is where we do the dirty work. You can start by closing Outgoing Payload and Responses. We will not be using that.
Under Channels you can select a Channel to listen on. I selected #develop as the channel on my first webhook. Note I had to create two of these Outgoing WebHooks, one for each channel.
Under Trigger words you can enter a specific phrase that must be typed in order to trigger this Outgoing Webhook. I left mine blank so any post to the channel would trigger. This is up to you.
Under URLs you need to enter the URL which triggers your Hook.io hook. Make sure you get that entered correctly!
I Left the default token in there. You can get fancy and listen for that token in your Hook.io hook but I didnt. I left everything else just at default so really all I did was select a channel and entered the URL for my Hook.io hook.
When you are all done and feeling good about yourself click the Save Settings button down at the bottom.
At this point if you write a post on that Slack channel it should trigger the relay. Pitty there isn't anything connected yet. Lets get on to that next.
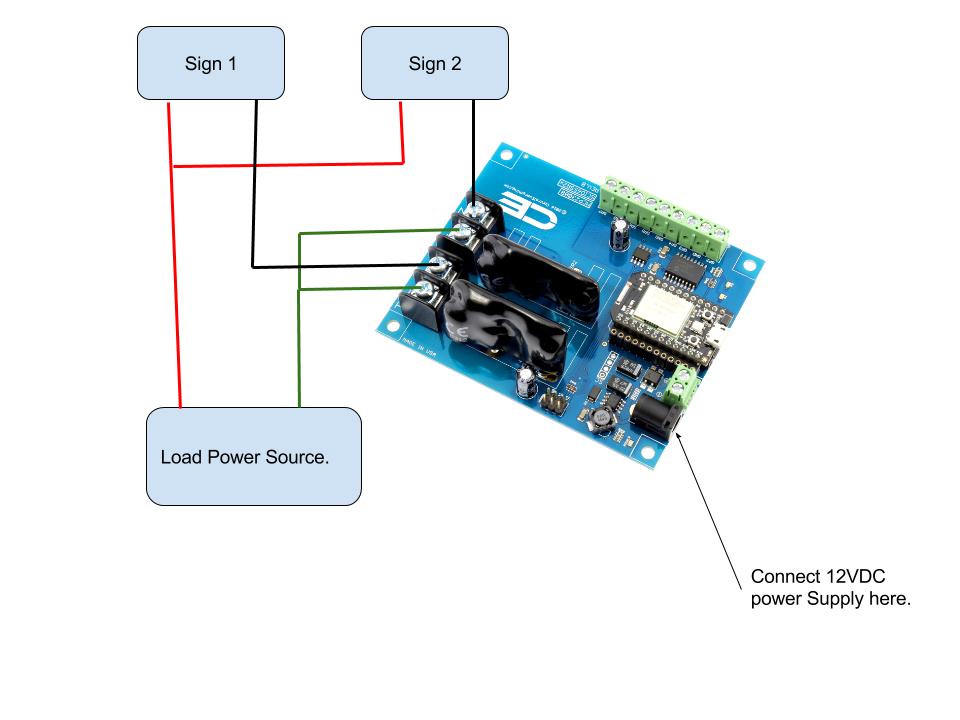
Step 5: Wire your signNow this will probably be different for everyone. I am using LED panels. Maybe you're just using a light bulb or something, totally your porogative there. Just wire your sign/device up to the relay board and go. I have posted a schematic for my setup if you want to take a look at that. It's a relay we are talking about here so be creative and have fun with all the funny things you can do when something is posted to the Slack channel. Oh, and have fun!


Comments
Please log in or sign up to comment.