


Hardware components | ||||||
_ztBMuBhMHo.jpg?auto=compress%2Cformat&w=48&h=48&fit=fill&bg=ffffff) |
| × | 1 | |||
 |
| × | 1 | |||
 |
| × | 1 | |||
Software apps and online services | ||||||
 |
| |||||
As we all know, architecture represents the accomplishment, wealth, and creativity of a city or a nation. No one wants to afford damage to them. Fire accident is one of the major cause which harms not only buildings but also human beings.The most usual causes of house fires are electrical distribution, lighting systems, cooking, Etc. In this technological era, the use of engineering is the best way to avoid such accidents. Today, we will learn about an interesting project using Arduino for safety purposes using a flame sensor.
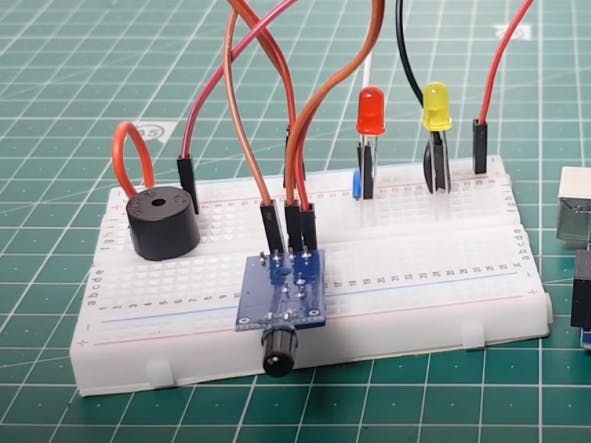
Supplies:The components required to build this project are mentioned below.
Arduino Uno
Flame Sensor
Buzzer
Jumper wires
Breadboard
USB Cable
Add TipAsk QuestionCommentDownload
Step 1: What Is Flame Sensor?The flame sensor detects the presence of fire or flame. It uses the infrared flame flash technique for working.
This explicit flame detector is consists of a Photo Transistor. It is often located at the front of the module in the form of a black LED. As a flame detection system works within the infrared spectral band, it ranges between 4.3 to 4.4 micrometers. This range covers the resonance frequency of Carbon Dioxide, which is generated by the burning of organic compound materials.Greenhouse gases generated from the fire create radiation emission and special patterns in infrared emission. A flame sensor detects both of them. It is faster as well accurate than a fire or smoke detector. If you are still reading this, it means you are surely interested in its interfacing with Arduino. So, let’s move forward with its working.
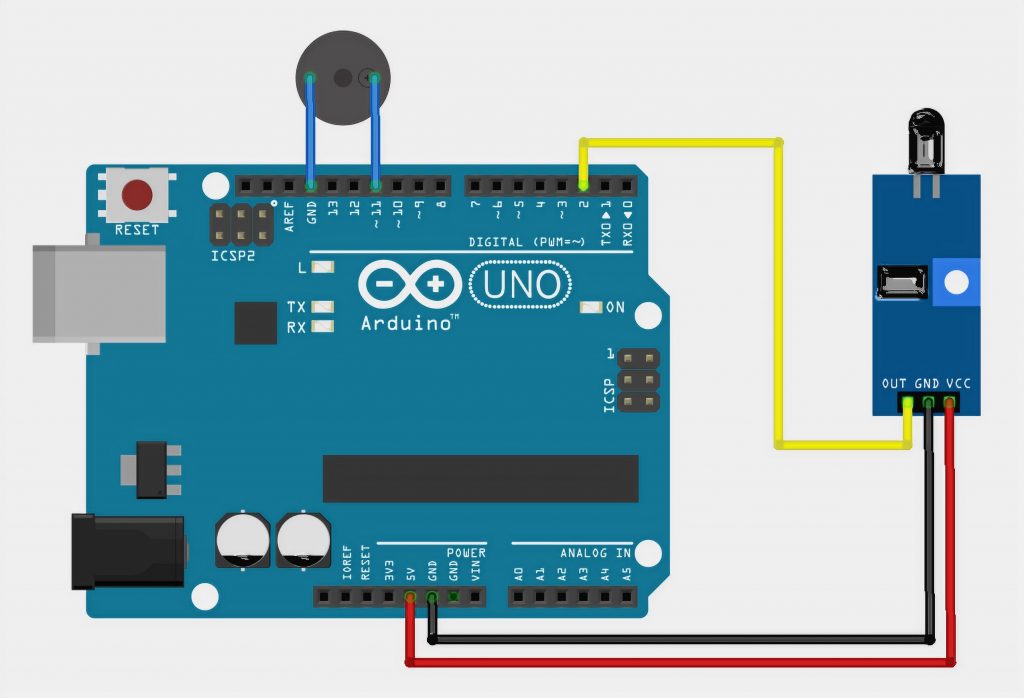
Step 2: Circuit DiagramTo interface the flame sensor with Arduino, make the connection as per the diagram shown below. After uploading the code to the Arduino board, Place any fire source in front of the flame sensor.
s soon as the flame sensor detects fire or flame, it gets triggered. This sensing is based on parameters like humidity, temperature, smoke, Etc. These signals can be in the form of analog or digital. In this project, we have used the digital output of the flame sensor.When Arduino receives this signal, it performs the resultant action in response. That may contain ringing of a buzzer or any fire suppression activity. Here we have connected a buzzer as a detection device.
Step 3: As You Can See Here, the Buzzer Starts Ringing When the Flame Sensor Detects Fire.The range of flame detection may vary up to 100 cm. In addition to this, fire suppression may act as a result of the detection system.
Step 4: Code:
const int buzzerPin = 11;
 const int flamePin = 2;
 int Flame = HIGH;
void setup()
{
pinMode(buzzerPin, OUTPUT);
pinMode(flamePin, INPUT);
 Serial.begin(9600);
 }
void loop()
{

 Flame = digitalRead(flamePin);
 if (Flame== LOW)
 { Serial.println("Fire is Detected");
 digitalWrite(buzzerPin, HIGH);
}
else
 {
Serial.println("No Fire is Detected");
 digitalWrite(buzzerPin, LOW);
}To receive the digital signal from the flame sensor, port A1 is used, which can be changed in the sketch to any general-purpose port;This sensor has a “logical unit” signal on the digital output when an open flame appears up to 1 meter away from the IR receiver.
Step 6: Output:Interfacing the flame sensor with an Arduino is the simplest way to save lives by warning the occupants about emergence. It is very important to detect the disaster early to create a healthy environment and avoid destructions.
Additionally, it is cost-friendly to implement. We can perform further modifications by adding auto fire suppression techniques. As you can see here, the buzzer starts ringing as the flame sensor detects fire.
Step 7: NextpcbThis article is sponsored by nextpcb.com
Nextpcb are also sponsor of this project. Nextpcb , is the one of the largest PCB prototype enterprise in China and a high-tech manufacturer specializing in quick PCB prototype and small-batch PCB production. You can order a minimum of 5 PCBs for just $0 it mean 1st order is free for makers. To get the PCB manufactured simply login Nextpcb.com upload the.zip of the gerber files or you can also drag and drop the.zip files. After uploading the zip file, you’ll see success message at the bottom if the file is successfully uploaded.


Comments
Please log in or sign up to comment.