

Hardware components | ||||||
 |
| × | 1 | |||
Software apps and online services | ||||||
 |
| |||||
 |
| |||||
I attended the AWS re:Invent conference in Vegas last October and was lucky enough to score a free AWS IoT button. I have a keen interest for cutting edge technologies, and have recently been testing out the new AWS IoT platform in conjunction AWS Lambda. And since our San Francisco office has a new beer fridge, I figured let's mash up all of these things and see what happens.
The goal of this article is illustrated below:
The process goes like this.
- An AWS IoT button is attached to the beer fridge.
- When it's party time, then tap this button. A message will be sent by the button's wifi connection up into the cloud to the AWS IoT platform which in turn will invoke a Node.js Lambda function.
- This Lambda function will fetch a random animated gif from the Giphy API and post it into a Slack channel.
- All subscribers of the Slack channel will get a notification informing them that it's beer o'clock, party time!
So that sounds simple enough, let's get into the code.
PrerequisitesTo run this demo you will need an AWS IoT button and accounts with Slack and AWS. You can register for a free Slack account here and signup for an AWS account here (which includes 12 months worth of free credits).
ApproachSince we have a cascading series of dependencies in the process flow, let's start at the end and work backwards.
1) Configuring an Incoming Webhook in Slack
Slack is a tool which provides an open, informal and fun collaboration between employees of an organisation. We've recently adopted this tool at Tigerspike and are exploring the use of bots and webhooks in our every day workflows. Slack provides two types of webhooks for integration and we'll be setting up an "incoming webhook".
To do this go to the following URL https://slack.com/apps/A0F7XDUAZ-incoming-webhooks
To configure the WebHook, choose a channel and click on "Add Incoming WebHooks integration". On the following screen, scroll down to see the integration settings:
Here you can change the channel to post to, copy the webhook URL (we'll use this in the next step) and personalise the integration with a custom name and icon. Here's the image I used for the Slack bot to give it some personality:
Now that we have configured Slack to receive messages, let's work on the next stage.
2) Creating a Lambda function
AWS Lambda lets you runs your code in the cloud, no servers required. AWS handles the operational aspects such as scaling, provisioning & logging and you focus on your logic. This makes it simple to launch a highly scalable service rather quickly. AWS Lambda can currently run Node.JS, Java and Python. In this demo, I'll be writing a Node.JS function to retrieve a random animated gif from Giphy and then post it to the Slack webhook we previously configured.
Giphy is a collection of animated gifs with a neat API. There's a public key so getting started is rather trivial. On https://github.com/Giphy/GiphyAPI#random-endpoint there are simple instructions to perform a GET to retrieve a random image. Try clicking on this link:
http://api.giphy.com/v1/gifs/random?api_key=dc6zaTOxFJmzC&tag=beer
and it will return a random gif related to the search term "beer". Here is a sample response:
  "data": {
    "type": "gif",
    "id": "c1zviFHCf4pq0",
    "url": "http:\/\/giphy.com\/gifs\/beer-random-homer-simpson-c1zviFHCf4pq0",
    "image_original_url": "http:\/\/media3.giphy.com\/media\/c1zviFHCf4pq0\/giphy.gif",
    "image_url": "http:\/\/media3.giphy.com\/media\/c1zviFHCf4pq0\/giphy.gif",
    "image_mp4_url": "http:\/\/media3.giphy.com\/media\/c1zviFHCf4pq0\/giphy.mp4",
    "image_frames": "6",
    "image_width": "500",
    "image_height": "340",
    "fixed_height_downsampled_url": "http:\/\/media3.giphy.com\/media\/c1zviFHCf4pq0\/200_d.gif",
    "fixed_height_downsampled_width": "294",
    "fixed_height_downsampled_height": "200",
    "fixed_width_downsampled_url": "http:\/\/media3.giphy.com\/media\/c1zviFHCf4pq0\/200w_d.gif",
    "fixed_width_downsampled_width": "200",
    "fixed_width_downsampled_height": "136",
    "fixed_height_small_url": "http:\/\/media3.giphy.com\/media\/c1zviFHCf4pq0\/100.gif",
    "fixed_height_small_still_url": "http:\/\/media3.giphy.com\/media\/c1zviFHCf4pq0\/100_s.gif",
    "fixed_height_small_width": "147",
    "fixed_height_small_height": "100",
    "fixed_width_small_url": "http:\/\/media3.giphy.com\/media\/c1zviFHCf4pq0\/100w.gif",
    "fixed_width_small_still_url": "http:\/\/media3.giphy.com\/media\/c1zviFHCf4pq0\/100w_s.gif",
    "fixed_width_small_width": "100",
    "fixed_width_small_height": "68",
    "username": "",
    "caption": ""
  },
  "meta": {
    "status": 200,
    "msg": "OK"
  }
}
The response contains some JSON with a variety of attributes relating to the random GIF. There are a variety of sizes to choose from and we'll go with this one:
fixed_height_downsampled_url
which in this sample contains the HTTP location of this animated gif:
Now that we can retrieve a random GIF, let's create our Lambda function.
First, go to:
https://console.aws.amazon.com/lambda/home?region=us-east-1#/functions
and click on "Create a Function". On the "Select Blueprint" screen click on "Skip" and you'll be brought to the "Configure function" screen:
Give the function a name and description and ensure Node.js is selected. In the "Lambda function code" area, ensure the "edit inline" option is selected and copy paste the following code into the area provided:
var http = require('http');
var https = require('https');
var fs = require('fs');
exports.handler = function(event, context) {
    console.info('Received event', event);
    var post_data ='';
    //get a random image from Giphy
    var request = http.get("http://api.giphy.com/v1/gifs/random?api_key=dc6zaTOxFJmzC&tag=beer", function(response){
        console.log(response.statusCode);
        //Read the Data
        response.on('data', function (chunk) {
            var parsed = JSON.parse(chunk);
            var image_url = parsed.data.fixed_height_downsampled_url;
            console.log('image_url='+image_url);
             // package up body
            var resp = {};
            resp.text = "It's beer o'clock!";
            resp.attachments = [];
            var info = {
                    'image_url': image_url
                };
            resp.attachments.push(info);
            post_data = JSON.stringify(resp);
            console.log('post_data='+post_data);
        // an object of options to indicate where to post to
        var post_options = {
            host: 'hooks.slack.com',
            port: '443',
            path: '/services/xxxxxxx/xxxxxxx/xxxxxxxxxxxxxxxxx',
            method: 'POST',
            headers: {
                'Content-Type': 'application/json',
                'Content-Length': post_data.length
            }
        };
        //setup the post request
        var post_request = https.request(post_options, function(res) {
            var body = '';
            res.on('data', function(chunk)  {
                body += chunk;
            });
            res.on('end', function() {
                context.done(body);
            });
            res.on('error', function(e) {
                context.fail('error:' + e.message);
            });
        });
        // post the data
        post_request.write(post_data);
        post_request.end();
        context.succeed("posted image");
        });
    });
};
Important - ensure that you replace the:
/services/xxxxxxx/xxxxxxx/xxxxxxxxxxxxxxxxx
with the path to the webhook (the part after http://hooks.slack.com") that Slack generated in the previous step.
Finally, ensure that the Lambda function has the necessary permissions to execute (the default role will work fine) and leave the function with the default settings for memory and timeout:
Once you've done that, then click Next and review the function.
Click "Create function" will create the function (surprise!) and gives you the option to test it:
So go on and click on "Test". Scrolling down you can see the execution result including the log output:
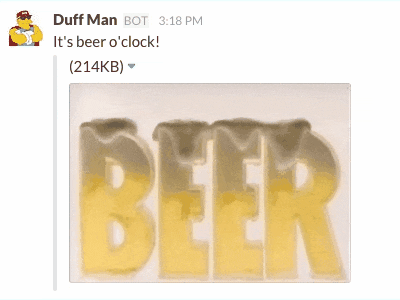
And when you visit the Slack channel, you should see a new message:
Ok, now that we can post a random animated Gif into Slack, let's hook it up with the IoT button.
3) Connecting to the Internet of Things
To get started with the AWS IoT button, you need to connect it to the local wifi. To do this:
- press the button for 15 seconds and it should blink blue
- on your computer or phone, connect to the "Amazon ConfigureMe - XXXX" Wi-Fi network. The XXXX will be the last 4 digits of your device’s serial number.
- in a browser, (Safari not supported) navigate to http://192.168.0.1
- enter in the network you want the button to connect to and the network password.
Now that the IoT button has an internet connection, it's time to register it with the AWS IoT platform. To do this, visit this page: https://aws.amazon.com/iot/button/
and click on the "Go to Button Activation Wizard". This wizard will guide you through activating your IoT button:
Now that we have an active IoT button, we need to create a rule by clicking on "Create a rule". Fill out the form as follows ensuring the the action is to invoke a Lamda function and you select the function we created in the previous step.
And that's it!
So now when the IoT button is pressed, it will send a message into IoT, invoking a Lambda function to retrieve a random animated gif, posting the message into a Slack channel and notifying everyone that it's party time!
Summary
In this tutorial, I have illustrated how cloud technologies can be used to notify users of an important event. Although this is a trivial example, the technology utilised can scale to millions of connected devices and billions of messages. I have used a simple IoT button as the input mechanism, but a more involved application would be to use sensors (temperature, humidity etc) that periodically send in their measurements, and more complex rules in IoT to perform actions when certain criteria have been met. All interesting ideas best pondered over a cold, frosty beer, oh yeah!


Comments