Nowadays, security systems made using open source hardware is widely used where you can develop your own security application according to your needs. But AI is hard to deploy. Thanks to the open source project from Seeed’s Github and it shows how to use Node-RED, COCO Dataset and NVIDIA Jetson to fully deploy an algorithm to provide realtime object detection. Maybe you can now easily make your smart camera systems which involve some object detection models like Santa Claus, Alien.
In this tutorial, we are going to make a security Camera using a USB Webcam, COCO Dataset, NVIDIA Jetson Nano, and Node-RED. The project focuses on the ability to detect, in real time, whether someone has entered the environment through a camera and send an email notification if a bottle is detected.
Step 1. Preparing HardwareConnect the USB Webcam to your NVIDIA Jetson Device. Power up the Jetson device and connect to the network.
Open a command line window in NVIDIA Jetson and enter the following command to download the required files to Jetson.
$ git clone https://github.com/Seeed-Studio/node-red-contrib-ml.gitOnce the download is complete, run the following command to start the required docker.
$ cd node-red-contrib-ml
$ sudo ./docker-ubuntu.sh
The whole installation and start-up process will take about 7 to 9 minutes.
Step 3. ConfigureOnce the installation is complete, open a web browser, type jetson_device_ip_address:1880 on the search box, drag and drop nodes and connect them as follows
- video input: This node is used to get the video stream from the camera input. This can be set up to select a RTSP IP camera or a local USB camera etc.
- detection: This node is used to select the model to be recognized. The input video stream will be recognized using the model you have selected. For the time being, only the COCO dataset can be used under this version.
- video view: This node is used to output the processed video stream on the screen.
The program shown above is the one that takes the input video stream from the camera and then uses model detection to input the result of recognizing the object.
Step 4. DeployOnce the nodes have been placed, we still need to make a simple configuration of the nodes before they can be used. If you want to set up a particular nodes, you can double click on it and the corresponding settings box will pop up on the right hand side.
- 4.1 Let's start by setting up the video input node.
- Device type: Here you can set the type of camera you have, currently two types of camera are supported, RTSP IP camera or local USB camera.
- Video: Select your camera here. If there is no camera available here, please double check that the camera is supported or that it is connected successfully.
- Resolution: Select your camera resolution here. Selecting the wrong resolution may result in a runtime error.
- 4.2 For object detection node, the settings are as follows.
Once you have done so, click on the Deploy button in the top right hand corner of the interface and the program stream will start running.
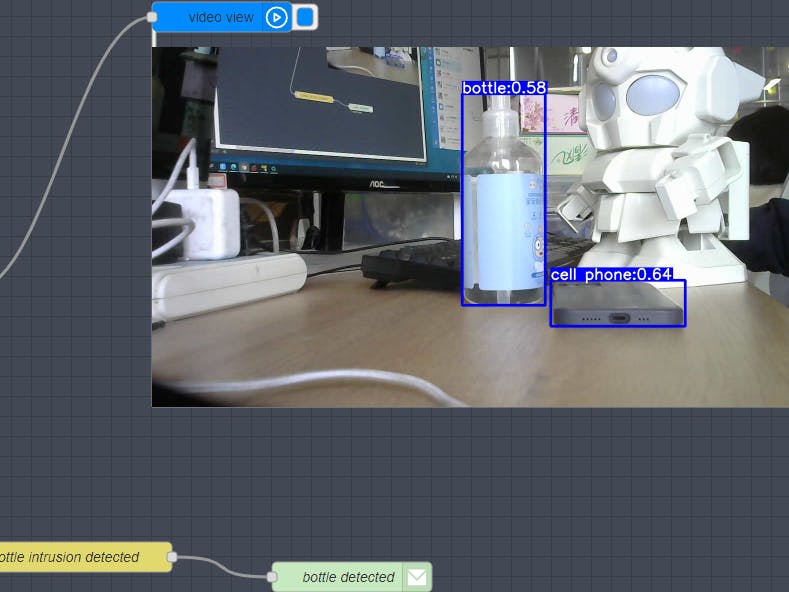
If everything is OK, you can see that the objects identified by the video stream are circled by boxes and given confidence values.
For this security system, we set up email notification if a bottle is detected. We can download as many nodes as we need to complete more complex projects.
In this project, two new nodes are used, switch and email. In the Setup Area on the right, there is a button for more options, we select Manage palette.
On the pop-up page, you can see the installed nodes and select Install to download more nodes. Here, we take the example of the mailbox node.
After installation, the newly installed nodes can be seen at the bottom of the nodes section.
Then,drag and drop nodes and connect them as follows
The switch node is where you feel the program is going based on the judgement information you set. For example, in this program I have named the switch node bottle intrusion detected and filled in the property payload.labels. payload.labels is the key value of the previous node object detection. When the value of the property is equal to bottle, the node connected after switch is executed.
The email node is a little easier to set up, you just need to fill in the email address and server address that you want to receive messages from, depending on the protocol your mailbox supports.
Once you have done so, press DEPLOY to see it in action!
If you want to deploy your trained models for object detection, which can recognize Santa Claus or Alien. Please refer to the Tutorial


Comments
Please log in or sign up to comment.