There is a lack of photo and video cameras that really use powerful AI algorithms, from segmentation to stable diffusion. There are several solutions right now that use AI to improve the image but not much to analyze it or to make changes in REAL TIME.
Introduction:In the increasingly digital world, consuming video content has become a fundamental part of our daily routine. Many platforms have transformed the way we consume information, entertainment and education, offering a wide range of content ranging from tutorials and vlogs to series and movies.
However, with the advancement of GAI (generative artificial intelligence), it has allowed a revolution in the way content is generated, since it is now possible to generate high-quality images, audios and videos from the comfort of your home. This not only democratizes content creation, allowing people with fewer resources to access high-quality production tools, but also opens up new creative possibilities by challenging the limits of what is possible to generate in an automated way.
That's why today I present to you VidSynth: Real Time AI Video Generator.
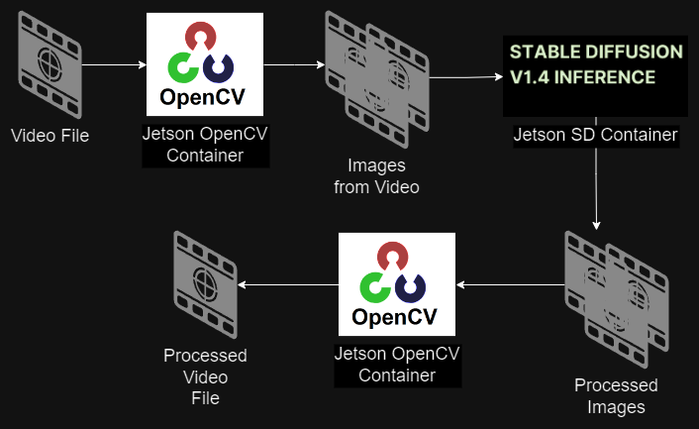
Solution:I created a small workstation using CLI that allows us to easily carry out the process of transferring all the images of a video into a stable diffusion model such as SD-1.4.
At the same time, with OpenCV it is possible to recompose the original video once it has passed through the stable diffusion network.
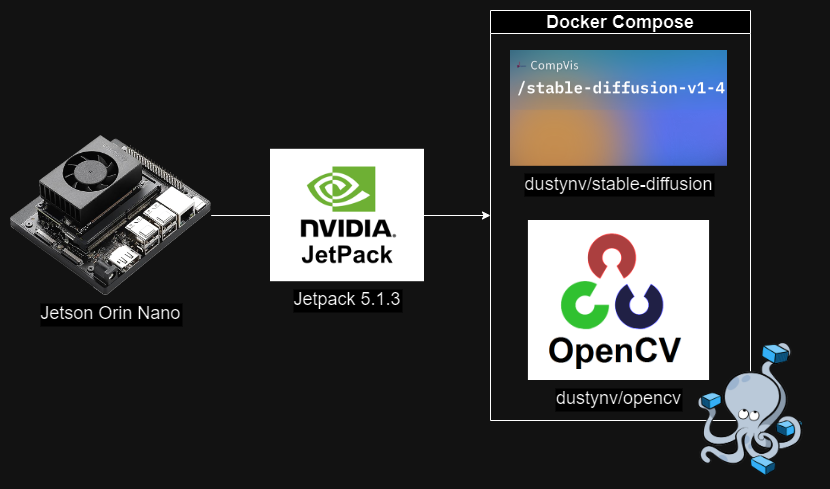
- The main function of the Jetson Orin Nano is to be the CPU and GPU processor of my project.
- As the board's operating system, I used Jetpack 5.1.3, I will explain later why this version.
- Use Docker's native container orchestrator, Docker Compose Plugin.
- Finally, the containers I used were Stable Diffusion and OpenCV, which are already compiled for the Jetson Nano Orin.
First we are going to setup the board and workspace to make the containers work correctly.
NVME SSD:One of the prerequisites for deploying this project is to setup an NVME SSD in the Jetson Nano, because it will improve the performance of the card.
The NVME has to be placed in the correct port, you can also use a mini NVME card, but its price is much higher than traditional NVME SSDs.
Remember to check that the port is type M, any other type of port will not work.
As a first step we will have to put a jumper in the FC and GND port of the rear headers of the card, this in order to allow us to correctly flash the OS.
Nvidia's SDK Manager was used to facilitate the installation of the OS. However, this process must be done on a Linux machine, so I recommend using a virtual machine with Ubuntu to carry out this process, use VMware because Virtual Box did not work for this process.
It is important that the container runtime is installed, without it we will not be able to make the project work, and configuring it manually can be very complicated.
The first thing we have to do once we have the system ready is to connect via SSH to the board, particularly with VScode, manipulating the containers graphically is very simple.
Now we will download and install the scripts necessary for the containers to function.
sudo apt-get update && sudo apt-get install git python3-pip
git clone --depth=1 https://github.com/dusty-nv/jetson-containers
cd jetson-containers
pip3 install -r requirements.txt
Due to the size of the Stable Diffusion models, we will have to create a swap memory with the following commands.
sudo systemctl disable nvzramconfig
sudo fallocate -l 16G /mnt/16GB.swap
sudo mkswap /mnt/16GB.swap
sudo swapon /mnt/16GB.swap
Now, in Jetpack 5.1.3 we have the problem that Docker does not provide the Docker Compose script, so we will have to install it manually.
We install the official docker keyrings.
sudo mkdir -p /etc/apt/keyrings
curl -fsSL https://download.docker.com/linux/ubuntu/gpg | sudo gpg --dearmor -o /etc/apt/keyrings/docker.gpg- We install the official docker keyrings.
sudo mkdir -p /etc/apt/keyrings
  curl -fsSL https://download.docker.com/linux/ubuntu/gpg | sudo gpg --dearmor -o /etc/apt/keyrings/docker.gpg
We add docker to the apt package manager.
sudo echo "deb [arch=$(dpkg --print-architecture) signed-by=/etc/apt/keyrings/docker.gpg] https://download.docker.com/linux/ubuntu $(lsb_release -cs) stable" | sudo tee /etc/apt/sources.list.d/docker.list > /dev/null- We add docker to the apt package manager.
sudo echo "deb [arch=$(dpkg --print-architecture) signed-by=/etc/apt/keyrings/docker.gpg] https://download.docker.com/linux/ubuntu $(lsb_release -cs) stable" | sudo tee /etc/apt/sources.list.d/docker.list > /dev/null
Finally we install the docker compose plugin.
sudo apt update
sudo apt install -y docker-compose-plugin- Finally we install the docker compose plugin.
sudo apt update
  sudo apt install -y docker-compose-plugin
Finally, we will have to add Docker to the User Groups to avoid the need to sudo when using docker.
sudo usermod -aG docker $USERIt is quite simple to lower the containers by running the following command.
cd jetson-containers
./run.sh $(./autotag opencv)
Thanks to this command we will download the OpenCV container.
And in the same way we will lower the Stable Diffusion container.
cd jetson-containers
./run.sh $(./autotag stable-diffusion)
After these commands we can use the Stable Diffusion and OpenCV tools without problem.
The first thing we will have to do to edit a video will be to download the server folder from this repository and paste it into the Jetson Orin Nano.
In this folder we will have all the files necessary to use the project, we will only have to enter the server folder and execute the command. I would recommend checking the file docker-compose.yml to review the execution details.
docker compose up -dThis command will run the two OpenCV and Stable-Diffusion containers with everything configured and ready to go.
With both containers working and connected, we are first going to convert a video to images using OpenCV, inside the input folder we will put the video to edit, in this case a drone flight.
The conversion of video to images is done with the following command.
python3 video2imgs.pyOnce the command is executed, all the frames of the video will now be in the framesin folder
Now that we have the video in frames, in the Stable Diffusion container we will execute the following command, which will start the conversion process of each frame with the stable diffusion model.
python3 img2img.py --n_samples 1 --n_iter 1 --ddim_steps 40 --init-path /framesin --outdir /framesout --prompt "flying space ship, starwars, speed, racer, drone, space, cyberpunk, cyber, masterpiece,best quality,ultra high res,raw photo,beautiful lighting, realistic, photo-realistic, illustration, ultra-detailed, photorealistic, sharp focus, highly detailed, professional lighting, colorful details, iridescent colors, intricate details, 8k uhd, high quality, dramatic, cinematic" --strength 0.3 --seed 10000 --increase 0 &In this case I invite you to modify the parameters of the command to improve results, especially strength and prompt.
Depending on the Jetson model you have, this process may take a long time. We recommend the Jetson Orin AGX as a base to work with these video files.
Once the processing is finished, we will go back to the OpenCV container to perform the final processing of the generated images into a video.
python3 imgs2video.pyAnd as a final result we obtain the following video.
In this case, by varying the conversion parameters, the model and even the seed, we will modify the result of the generated video, improving or worsening it, so modify the parameters in order to obtain better results.
DEMO:Commentary:This project shows the basic idea of using stable diffusion models for video creation, with better models like SD 2.0 or a better development card, this project can work much better due to the intense GPU processing it requires.
References:Links:
(1) https://www.jetson-ai-lab.com/tutorial_stable-diffusion.html
(2) https://github.com/dusty-nv/jetson-containers
(3) https://huggingface.co/CompVis/stable-diffusion-v1-4


Comments
Please log in or sign up to comment.