

Hardware components | ||||||
_ztBMuBhMHo.jpg?auto=compress%2Cformat&w=48&h=48&fit=fill&bg=ffffff) |
| × | 1 | |||
| × | 1 | ||||
 |
| × | 1 | |||
 |
| × | 1 | |||
 |
| × | 1 | |||
| × | 4 | ||||
 |
| × | 1 | |||
| × | 1 | ||||
Software apps and online services | ||||||
| ||||||
| ||||||
Hand tools and fabrication machines | ||||||
 |
| |||||
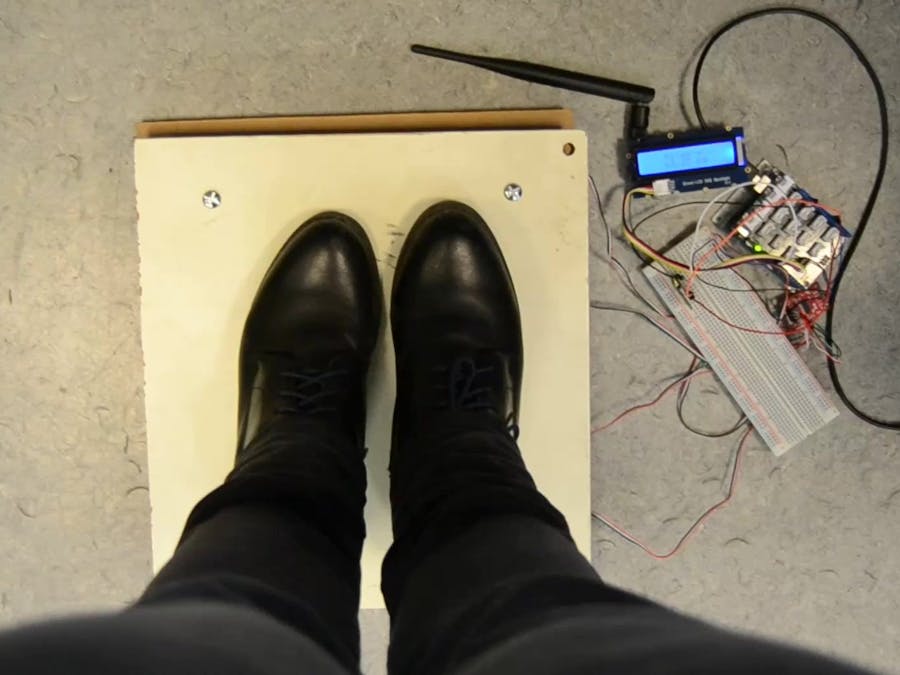
As an IoT school project at Polytech Sorbonne, we decided to work on a medical weight scale connected with the Sigfox techonology.
At first the idea was to create a secure prototype with fog computing, but we had very little time and had to work with available material.
This prototype can weigh up to 200kg, it transfers the values via Sigfox and Node-Red (IBM Bluemix) back to a database hosted on the Raspberry PI and graphs created from the database's content are viewable on a custom website hosted on the Raspberry PI. This was made possible by sharing connection from a phone.
THE SCALEOurs had to be able to weigh a person and we had to use what was available in order to make it sturdy. We had a 30*30*2(cm) plywood piece for the upper board and a 30*30*0.8(cm) plywood piece as a base.
You need to drill four holes on each board, equally spaced in the corners so that you can mount the cells like in the picture.
Each load cell is fixed on the base board and the edge showing the direction of the force with the arrow is fixed on the upper board. Keep some space so that the bar can flex without being stopped by the base board.
Solder together all matching colored wires and make sure all wires are of the same length.
The wires are connected to a Load Cell Amp (HX711) by color. The output is pretty straight forward, we connected DAT to pin 3 and CLK to pin 2 and the information is handled with the HX711 library.
We chose pins 3 and 2 so that we could work with timer interruptions, but you will see in the code that the work is not done yet.
The HX711 library gives a code to calibrate the input.
SEND VALUESWe use a Wisol BRKWS01 breakout board with an antenna that can send messages to Sigfox. The breakout board is connected with a SoftwareSerial, but you can use the hardware serial ports (0 and 1).
The connection needs a baud rate of 9600. With the function getID and getPac you can check the communication. With Sigfox you can send 12 bytes by messages.
Once the value is stabilized and the input is registered, in order to send it to the database without loosing the precision of the float, we transform it into bytes.
You can then follow this tutorial - https://developer.ibm.com/recipes/tutorials/connecting-a-sigfox-device/ - to connect your Sigfox device to IBM Watson and Node-Red. The information then flows out to a public broker.
Set up IBM cloud by following this great and simple tutorial: https://developer.ibm.com/recipes/tutorials/connecting-a-sigfox-device/
Edit the Node-Red flow like this:
You need the API Key from IBM cloud to edit the IBM IoT node.
We use a public and online broker: http://www.hivemq.com/demos/websocket-client/.
You can choose to put a password or not but beware that anybody can publish or subscribe to your broker if there is no password.
In Subscription, add the topic and your broker is created.
The MQTT node in the flow chart needs the broker address: broker.mqttdashboard.com, and set a Topic (here it's: /Medisures/Data).
DATABASE and WEBSITEThe raspberry pi is subscribed to the messages containing measures. When a message comes from the broker, the raspberry pi gets the value and stores it in the database.
The website is hosted on the raspberry pi. The patient has a personal space on the website were graphs giving the evolution of vital signs are shown.
The page is updated regularly so the graphs are always up to date.
To set up a database and a website you have to install Apache2 and php:
sudo apt-get install Apache2 php5-common
Install Mysql and phpmyadmin to easily set up your database:
sudo apt-get install MySQL phpmyadmin
Now if your installations are all successful you can access to the website. If your raspberry pi is on the same network as your computer, write the IP address in the browser and you will see this:
On Phpmyadmin you can create your custom database, here we got 2 tables: measures and clients.
(Clients is used to connect on the website)(Measures stores the vitals values)
Python software:
To connect your raspberry pi to the broker you can use the Paho mqtt.
You need the Ip address of the broker, with the hivemq broker the ip address is 212.72.72.12 and you set 1883 on the port for an unencrypted connection.
client.connect(“IP_ADDRESS”,PORT)
When you use the on_connect function you will see an error message, when the connection is working the code is 0.
The on_message function will be called every time when a message is sent to the broker on the topic.
Connection to the SQL database
import mysql.connector
cnx = mysql.connector.connect(user='scott', password='password', host='127.0.0.1',                             database='employees')
cnx.close()
Then if you want to add your data in the DB:
cursor = cnx.cursor()
add_employee = ("INSERT INTO employees "
 "(first_name, last_name, hire_date, gender, birth_date) "
 "VALUES (%s, %s, %s, %s, %s)")
data_employee = ('Geert', 'Vanderkelen', tomorrow, 'M', date(1977, 6, 14))
cursor.execute(add_employee, data_employee)
emp_no = cursor.lastrowid
cnx.commit()
cursor.close()
JSON
import json
With sigfox you will receive a json file from the broker, so we have to decode it with:
object = json.loads(jsonObject)
print( object[‘NameOfYourData’]
Now you know how to receive your message and how to use them.
Codes for the website are given as an example. It is a plain php website that uses JavaScript to draw graphs. This website lets you create personal spaces for each patient.
Polytech Sorbonne - EISE5 - Levert, Maury, Rosanne
 Elisabeth Levert


_3u05Tpwasz.png?auto=compress%2Cformat&w=40&h=40&fit=fillmax&bg=fff&dpr=2)
Comments
Please log in or sign up to comment.