


Hardware components | ||||||
 |
| × | 1 | |||
| × | 1 | ||||
| × | 1 | ||||
 |
| × | 1 | |||
 |
| × | 1 | |||
| × | 1 | ||||
| × | 1 | ||||
Software apps and online services | ||||||
| ||||||
| ||||||
| ||||||
| ||||||
Hand tools and fabrication machines | ||||||
 |
| |||||
I wanted a tangible project to familiarize myself with Itron's new Riva Edge Development boards, learn I2C serial communication, gain more working experience with Linux and bash scripting, and refresh my binary manipulation skills. Temperature sensors and 7 segment displays are a cheap and tangible way to dive into any embedded Linux environment.
Development BoardI work for an electric & gas utility company that is deploying Itron's new Riva AMI (Automated Metering Infrastructure). This system is revolutionary in that we will be installing electric meters that each have an embedded Linux OS that is accessible on an IPv6 network. Having this computational capability at the "grid edge" opens up enormous opportunity to improve how we serve our customers in the future, especially in a time when electric cars, rooftop solar, and other emerging technologies require a more sophisticated grid optimization to ensure we maintain cheap and reliable electric service.
The temperature sensor I chose was the MCP9808 due to its I2C capability (and good Amazon reviews). The MCP9808 datasheet can be found here.
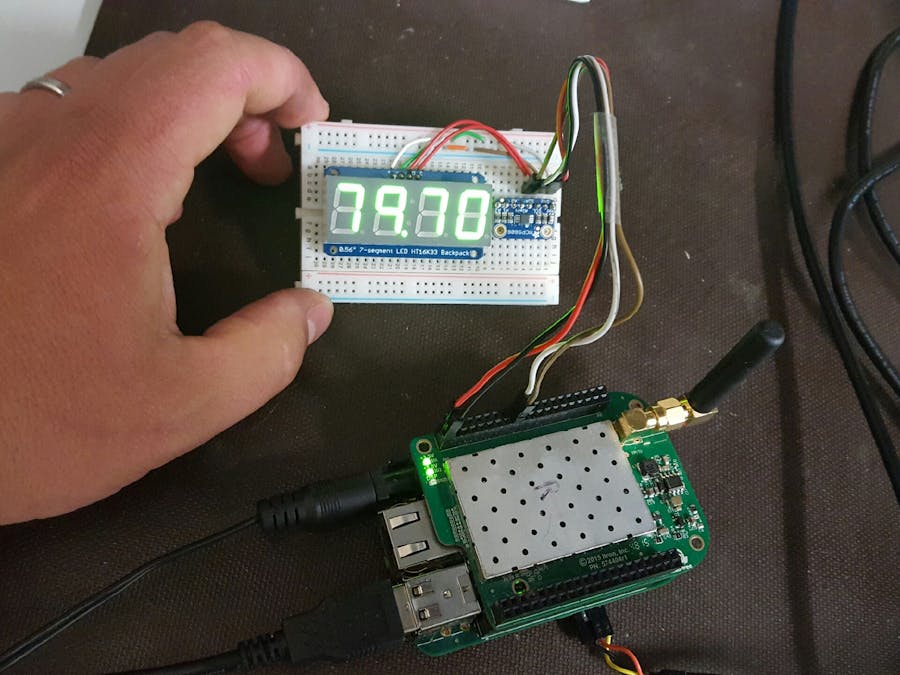
I didn't simply want to see the temperature readout on a computer screen, so I needed some type of digital display. A number of displays could have been used, but I felt a simple 4 digit 7 segment display that supported I2C communication would fit the need (and it was relatively cheap).
Adafruit created a Python library to interface with the 7 segment display, but I wanted to see if this could be done with bash scripts. I2C-tools is a command line software package that allows user to detect devices on an I2C bus, read data from those devices, and write data to those devices:
- i2cdetect: command to probe the bus for I2C chips & their addresses
- i2cget: command to read a particular register on an I2C chip
- i2cset: command to write a value to a register
Before getting started, be sure to go through the 'Riva Edge Getting Started' guide to get the Edge board up and running and connected to a Linux machine (or VirtualBox) via the USB-serial cable. The following command-line screenshots are taken from a Linux laptop using the minicom command line application to open up a remote shell into the Riva Edge board.
Also, use an anti-static mat and wrist strap, properly grounded, to avoid static discharge damage to any of your components.
You should also now solder the header pins onto both the MCP9808 and 7 segment displays.
I2Cdetect – Nothing ConnectedOnce an I2C device is properly wired to the Edge board, i2cdetect should show the chip addresses. Run i2cdetect to see what the output looks like before the chips are connected:
i2cdetect –r 2
Review the “Itron Riva Edge Design Guide” before moving on to ensure the pinouts have not changed.
We will use I2C bus 2 (I/O header P8), so use the male-female breadboard pins to direct connect the four I2C connections on the MCOP9808:
- SDA (serial data) is pin 17
- SCL (serial clock) is pin 19
- VDD (+5V) is pin 2
- GND is pin 1
Once connected, run ‘i2cdetect –r 2’ and note the difference. There is now a device seen at chip address 0x18; this is your MCP9808 (this address can be different depending on the I2C display device you chose)
This device is hard-coded to be at address 0x18, so every time you connect or reboot, this will be your address. Most I2C devices have pins you can solder jumpers on to change the address so that you can fit up to 8 of the same device on the same I2Cbus, but that's beyond the scope of this project.
i2cget – MCP9808Refer to page 24 of the MCP9080 datasheet. The temperature register address, in hex, is 0x05. So to read it via i2cget:
i2cget –y 2 0x18 0x05 w
You will see a hex value that means nothing at first glance.
If you press your finger against the chip itself while repeating the i2cget command, you will see the hex value get larger. Take your finger off and it will fall. The actual temperature value in Celsius is buried in this register. We will extract that via shell script later on.
i2cdetect – Connect 7 Segment DisplayRemove the MCP9808 and connect the 7 segment display in the same fashion. i2cdetect shows that the 7segment display is at device address 0x70.
Now that we're connected to the 7 segment display, we need to figure out how to turn on and off the individual LEDs to form numbers 0-9. There are two commands we need to send to turn the oscillator on and to show the display:
i2cset –y 2 0x70 0x21
i2cset –y 2 0x70 0x81
You should now see some random LEDs lit up on the 7 segment display.
Each digit has an internal register address (including the colon). They are (from left to right):
0x00 0x02 0x04 0x06 0x08
Address 0x04 is the colon.
Each LED on the display is represented by a bit in that digit's register value. To turn off all LEDs on a digit (or colon):
i2cset –y 2 0x70 [digit register] 0x00
To turn on a specific LED, we need to know which bit operates which LED. Here's a reference:
These values are in decimal so we need to convert to hex; this is where MS Calculator comes in handy. Lets say we want to turn on the middle LED (64). Go to 'View --> Programmer', enter '64', then click the 'Hex' radio button and you'll see the hex value is 40 (or 0x40). So we would write 0x40 to a digit register to turn on that LED.
Turning on a single LED isn't so useful though; we want to turn on multiple LEDs to form digits. To do that, simply add together all the values of the LEDs and convert that sum to hex. In addition, if you want the decimal to light up, add 128 to the value before converting to hex. To display a 9 on the left most digit:
i2cset –y 2 0x70 0x00 0x67
Use the breadboard to wire the MCP9808 and 7 Segment Display in parallel on the I2C bus 2.
Use i2cdetect –r 2 to ensure both chips now show up:
Now we need a way to read the temperature from the MCP9808 and return an actual temperature value. The temperature value is embedded in the register and extracting it with bash script is somewhat cumbersome. Refer to the 'temp.sh' attachment.
- Mask each temperature value bit to see if it exists [lines 8-23]
- Assemble the whole number portion [line 30]
- Bash cannot deal with fractions, so we call ‘awk’ to assemble the fractional value and then the final temperature value in Celsius [lines 33-37 & 40]
- Optional: Use ‘awk’ to convert Celsius to Fahrenheit [line 47]
A separate script to write a value (0-9) for a specific digit helps separate functionality into discreet parts. Refer to the attachment 'write7seg.sh'.
Refer to script write7seg.sh.
- Parse input parameters [lines 5-7]
- Segment [1->4]
- Decimal value [0 -> 9]
- Display decimal point [1/0]
- Convert segment to its register address [lines 15-25]
- Pre-assemble the hex values needed to write a specific digit to a register and parse requested digit value [lines 27-51]
0 = 0x00   1 = 0x06   2 = 0x5b   3 = 0x4f   4 = 0x
5 = 0x6d   6 = 0x7c   7 = 0x07   8 = 0x7f   9 = 0x67
- Add a period if applicable [lines 54-56]
- Use i2cset to write the value [line 58]
Now we can combine these two scripts with a third script to read, write, and then loop.
- Refer to script
tempTo7Seg.sh
- Read value by calling temp.sh [line 6]
- Decide which digits to display [lines 7-12]
- In this example, values > 99.99 will not display properly
- 2 whole numbers and two fractional
- Ensure digit 0x06 displays the period by adding 128 (0x80) to the value
- Write digits to display by calling
write7seg.sh[lines 15-18]
- Sleep 1 second & loop
And that's it! I hope this little warm-up project was as helpful to you as it was for me.


Comments
Please log in or sign up to comment.