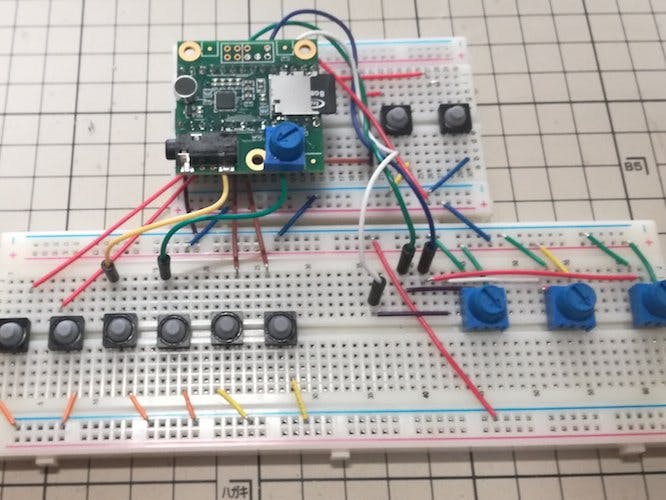
I made sampler using the Teensy Audio Board. It can be made easily with an audio system design tool.
Tutorialhttps://www.pjrc.com/teensy/td_libs_Audio.html
Schematichttps://www.pjrc.com/store/teensy3_audio.html
Structure
The Audio Board is mounted on Teensy 3.2.
Audio SampleThis Audio Board can store the sound source in the SD card and built-in memory. Here, we play six short sound sources from memory and two wav files from SD card.
SD Card
The format of the wav file to be saved to the micro SD card is as follows. 16 bits, 44.1 kHzJust put the SD card in the Audio Board after saving.
Internal Memory
In order to record sound source to memory, you need to convert wav file to binary format for Arduino.I download wav2sketch software below.
For Windows
For Mac
Put the wav file you want to convert to the folder with downloaded wav2sketch. The format must be 16 bits, monaural at 44.1 kHz.At the terminal, do the following:
> cd [Folder with wav2sketch]
> ./wav2sketch
Instrument.h file and.cpp file are generated in the folder.
Arduino ProgramPlace the.h file and.cpp file of the generated internal sound source in the same folder as the Arduino program.
#include <Audio.h>
#include <Wire.h>
#include <SPI.h>
#include <SD.h>
#include <SerialFlash.h>
#include <Bounce.h>
//Audio System Design Tool
//https://www.pjrc.com/teensy/gui/index.html
// GUItool: begin automatically generated code
AudioPlaySdWav playSdWav2; //xy=205,343
AudioPlaySdWav playSdWav1; //xy=208,295
AudioPlayMemory playMem3; //xy=211,519
AudioPlayMemory playMem1; //xy=212,418
AudioPlayMemory playMem2; //xy=213,470
AudioPlayMemory playMem4; //xy=215,567
AudioPlayMemory playMem5; //xy=215,618
AudioPlayMemory playMem6; //xy=220,667
AudioMixer4 mixer1; //xy=374,329
AudioMixer4 mixer2; //xy=432,475
AudioMixer4 mixer3; //xy=530,567
AudioFilterStateVariable filter1; //xy=662,573
AudioMixer4 mixer_Mid; //xy=808,593
AudioMixer4 mixer_Low; //xy=809,521
AudioMixer4 mixer_High; //xy=811,672
AudioMixer4 mixer8; //xy=955,584
AudioOutputI2S i2s1; //xy=1088,583
AudioConnection patchCord1(playSdWav2, 0, mixer1, 2);
AudioConnection patchCord2(playSdWav2, 1, mixer1, 3);
AudioConnection patchCord3(playSdWav1, 0, mixer1, 0);
AudioConnection patchCord4(playSdWav1, 1, mixer1, 1);
AudioConnection patchCord5(playMem3, 0, mixer2, 3);
AudioConnection patchCord6(playMem1, 0, mixer2, 1);
AudioConnection patchCord7(playMem2, 0, mixer2, 2);
AudioConnection patchCord8(playMem4, 0, mixer3, 1);
AudioConnection patchCord9(playMem5, 0, mixer3, 2);
AudioConnection patchCord10(playMem6, 0, mixer3, 3);
AudioConnection patchCord11(mixer1, 0, mixer2, 0);
AudioConnection patchCord12(mixer2, 0, mixer3, 0);
AudioConnection patchCord13(mixer3, 0, filter1, 0);
AudioConnection patchCord14(filter1, 0, mixer_Low, 0);
AudioConnection patchCord15(filter1, 1, mixer_Mid, 0);
AudioConnection patchCord16(filter1, 2, mixer_High, 0);
AudioConnection patchCord17(mixer_Mid, 0, mixer8, 1);
AudioConnection patchCord18(mixer_Low, 0, mixer8, 0);
AudioConnection patchCord19(mixer_High, 0, mixer8, 2);
AudioConnection patchCord20(mixer8, 0, i2s1, 0);
AudioConnection patchCord21(mixer8, 0, i2s1, 1);
AudioControlSGTL5000 sgtl5000_1; //xy=542,377
// GUItool: end automatically generated code
// WAV files converted to code by wav2sketch
// Internal sound source
#include "AudioSampleSlip1.h"
#include "AudioSampleSlip2.h"
#include "AudioSampleSlip3.h"
#include "AudioSampleSlip4.h"
#include "AudioSampleSlip5.h"
#include "AudioSampleSlip6.h"
// Create an object to control the audio shield.
//
AudioControlSGTL5000 audioShield;
// Bounce objects to read six pushbuttons (pins 0-5)
//
Bounce button0 = Bounce(0, 5);
Bounce button1 = Bounce(1, 5); // 5 ms debounce time
Bounce button2 = Bounce(2, 5);
Bounce button3 = Bounce(3, 5);
Bounce button4 = Bounce(4, 5);
Bounce button5 = Bounce(5, 5);
Bounce button6 = Bounce(8, 5);
Bounce button7 = Bounce(21, 5);
// Use these with the Teensy Audio Shield
#define SDCARD_CS_PIN    10
#define SDCARD_MOSI_PIN  7
#define SDCARD_SCK_PIN   14
int state1 = 0;
int state2 = 0;
void setup() {
  Serial.begin(9600);
  // Configure the pushbutton pins for pullups.
  // Each button should connect from the pin to GND.
  pinMode(0, INPUT_PULLUP);
  pinMode(1, INPUT_PULLUP);
  pinMode(2, INPUT_PULLUP);
  pinMode(3, INPUT_PULLUP);
  pinMode(4, INPUT_PULLUP);
  pinMode(5, INPUT_PULLUP);
  pinMode(8, INPUT_PULLUP);
  pinMode(21, INPUT_PULLUP);
  // Audio connections require memory to work.  For more
  // detailed information, see the MemoryAndCpuUsage example
  AudioMemory(10);
  // turn on the output
  audioShield.enable();
  //Wav file mixer volume adjustment
  mixer1.gain(0, 0.4);
  mixer1.gain(1, 0.4);
  mixer1.gain(2, 0.4);
  mixer1.gain(3, 0.4);
  SPI.setMOSI(SDCARD_MOSI_PIN);
  SPI.setSCK(SDCARD_SCK_PIN);
  if (!(SD.begin(SDCARD_CS_PIN))) {
    while (1) {
      Serial.println("Unable to access the SD card");
      delay(500);
    }
  }
}
void loop() {
  //Volume adjustment
  int knob = analogRead(A1);
  float vol = (float)knob / 1030.0;
  audioShield.volume(vol);
  //Filter adjustment
  int knobL = analogRead(A6);
  float volL = (float)knobL / 1030.0;
  mixer_Low.gain(0, volL);
  mixer_Low.gain(1, volL);
  int knobM = analogRead(A2);
  float volM = (float)knobM / 1030.0;
  mixer_Mid.gain(0, volM);
  mixer_Mid.gain(1, volM);
  int knobH = analogRead(A3);
  float volH = (float)knobH / 1030.0;
  mixer_High.gain(0, volH);
  mixer_High.gain(1, volH);
   // Update all the button objects
  button0.update();
  button1.update();
  button2.update();
  button3.update();
  button4.update();
  button5.update();
  button6.update();
  button7.update();
  //Built-in sound source playback
  if (button0.fallingEdge()) playMem1.play(AudioSampleSlip1);
  if (button1.fallingEdge()) playMem1.play(AudioSampleSlip2);
  if (button2.fallingEdge()) playMem1.play(AudioSampleSlip3);
  if (button3.fallingEdge()) playMem1.play(AudioSampleSlip4);
  if (button4.fallingEdge()) playMem1.play(AudioSampleSlip5);
  if (button5.fallingEdge()) playMem1.play(AudioSampleSlip6);
  //SD card sound source playback / stop
  if (button6.fallingEdge() && state1 == 0){
    playSdWav1.play("slip9.wav");
    state1 = 1;
  }else if (button6.fallingEdge() && state1 == 1){
    playSdWav1.stop();
    state1 = 0;
  }
  if (button7.fallingEdge() && state2 == 0){
    playSdWav2.play("slip10.wav");
    state2 = 1;
  }else if (button7.fallingEdge() && state2 == 1){
    playSdWav2.stop();
    state2 = 0;
  }
}
// GUItool: begin automatically generated code ~// GUItool: end Although it specifies the composition of sound source, mixer and filter between automatically generated code (lines 11 to 51), it is a graphical software similar to Node-Red called Audio System Design Tool, Placing and routing the mixer and "Exporting" it will generate the code. I just need to copy this
playSdWav is a wav sound source, playMem is a built-in memory sound generator. Three bands of Low, Mid and High are passed through the mixer, respectively, and the headphones are outputted in i2s1 by connecting the sound sources with a mixer and filter. With this handy software you can also make a synth and DJ mixer, as well as sampler.
Operation


Comments
Please log in or sign up to comment.