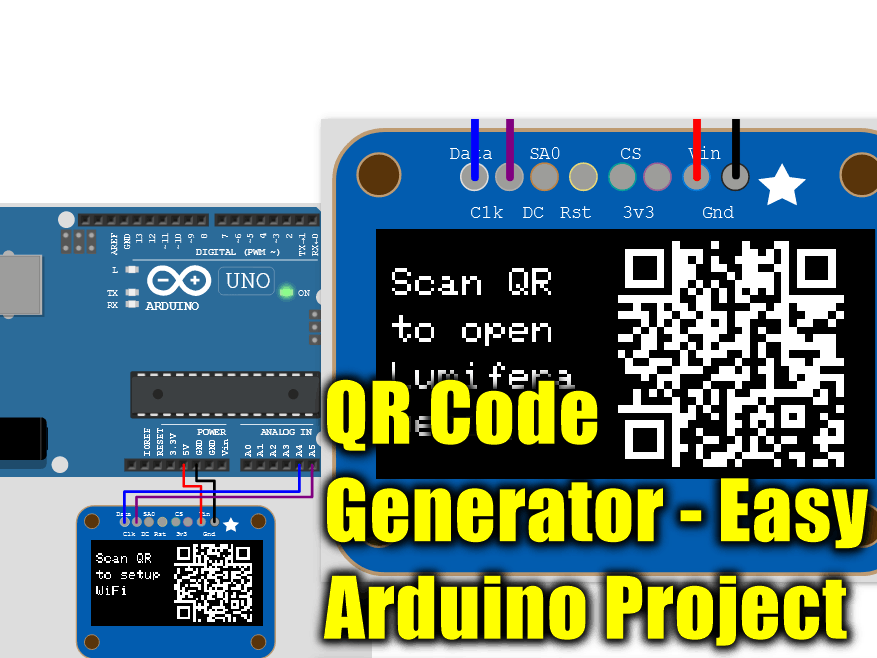
/**************************************************************************
 This is an example for our Monochrome OLEDs based on SSD1306 drivers

 Pick one up today in the adafruit shop!
 ------> http://www.adafruit.com/category/63_98

 This example is for a 128x64 pixel display using I2C to communicate
 3 pins are required to interface (two I2C and one reset).

 Adafruit invests time and resources providing this open
 source code, please support Adafruit and open-source
 hardware by purchasing products from Adafruit!

 Written by Limor Fried/Ladyada for Adafruit Industries,
 with contributions from the open source community.
 BSD license, check license.txt for more information
 All text above, and the splash screen below must be
 included in any redistribution.
 **************************************************************************/

// Bits stolen from: https://github.com/kyumdbot/WiFi_QRCode_Generator/blob/master/ESP32_QRCodeGenerator/ESP32_QRCodeGenerator.ino

// #include <SPI.h>
#include <Wire.h>
#include <Adafruit_GFX.h>
#include <Adafruit_SSD1306.h>
#include <qrcode.h>

#define SCREEN_WIDTH 128 // OLED display width, in pixels
#define SCREEN_HEIGHT 64 // OLED display height, in pixels

// Declaration for an SSD1306 display connected to I2C (SDA, SCL pins)
#define OLED_RESET     4 // Reset pin # (or -1 if sharing Arduino reset pin)
Adafruit_SSD1306 display(SCREEN_WIDTH, SCREEN_HEIGHT, &Wire, OLED_RESET);

QRCode qrcode;

const char* MESSAGE_CONFIGURE_WIFI[4] = { "Scan QR", "to setup", "WiFi", "" };
const char* MESSAGE_OPEN_WEBAPP[4] = { "Scan QR", "to open", "Lumifera", "webapp " };

void setup() {
  Serial.begin(9600);

  // SSD1306_SWITCHCAPVCC = generate display voltage from 3.3V internally
  if(!display.begin(SSD1306_SWITCHCAPVCC, 0x3D)) { // Address 0x3D for 128x64
    Serial.println(F("SSD1306 allocation failed"));
    for(;;); // Don't proceed, loop forever
  }

  // Show initial display buffer contents on the screen --
  // the library initializes this with an Adafruit splash screen.
  display.clearDisplay();
  display.display();

	// Wifi QR code options: https://en.wikipedia.org/wiki/QR_code#Joining_a_Wi%E2%80%91Fi_network
	// const char* qrStr = "WIFI:S:Lumifera Setup;T:nopass;P:;;";

  // const char *lines[4] = { "Scan to", "Join", "Lumifera", "WiFi" };
	drawQrCode("WIFI:S:Lumifera Setup;T:nopass;P:;;", MESSAGE_CONFIGURE_WIFI);
  delay(5000);
  display.clearDisplay();
	drawQrCode("HTTP://192.168.171.16", MESSAGE_OPEN_WEBAPP);
  delay(5000);
}

void loop() {
}


void drawQrCode(const char* qrStr, const char* lines[]) {
	uint8_t qrcodeData[qrcode_getBufferSize(3)];
	qrcode_initText(&qrcode, qrcodeData, 3, ECC_LOW, qrStr);

  // Text starting point
  int cursor_start_y = 10;
  int cursor_start_x = 4;
  int font_height = 12;

	// QR Code Starting Point
  int offset_x = 62;
  int offset_y = 3;

  for (int y = 0; y < qrcode.size; y++) {
      for (int x = 0; x < qrcode.size; x++) {
          int newX = offset_x + (x * 2);
          int newY = offset_y + (y * 2);

          if (qrcode_getModule(&qrcode, x, y)) {
							display.fillRect( newX, newY, 2, 2, 0);
          }
          else {
							display.fillRect( newX, newY, 2, 2, 1);
          }
      }
  }
  display.setTextColor(1,0);
  for (int i = 0; i < 4; i++) {
    display.setCursor(cursor_start_x,cursor_start_y+font_height*i);
    display.println(lines[i]);
  }
  display.display();
}


_ztBMuBhMHo.jpg?auto=compress%2Cformat&w=48&h=48&fit=fill&bg=ffffff)


Comments
Please log in or sign up to comment.