


In one line - Franzininho is a development board based on ATTiny85 MCU. This board is very famous in Brazil. It has two onboard LEDs. All the 8 pins are connected to a connector which is brought out. In summary, it is a low-cost development board that helps in unleashing the mighty power of ATtiny85 MCU!
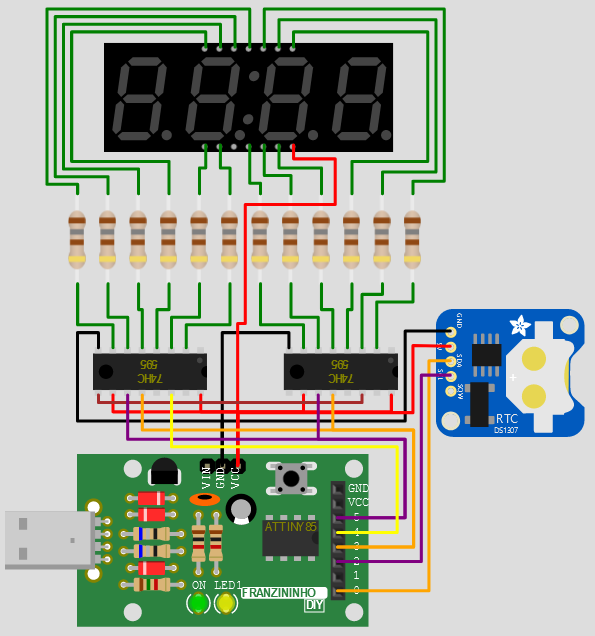
In this project - you will learn how to connect a DS1307 RTC module to the Franzininho development board. To display the time on the LCD segments, you do not have enough pins on the ATTiny85. Hence, you will use two 74HC595 to expand the GPIOs
/*
Digital Clock using Franzininho, 74HC595, 7 Segment Display (4 digits) and DS1307 RTC
Code by: Uri Shaked
Diagram: Anderson Costa
Visit https://wokwi.com to learn about the Wokwi Simulator
Visit https://franzininho.com.br to learn about the Franzininho
*/
#include <TinyWireM.h>
#define DATA_PIN    5 // Pin connected to DS of 74HC595
#define LATCH_PIN   3 // Pin connected to STCP of 74HC595
#define CLOCK_PIN   4 // Pin connected to SHCP of 74HC595
#define DS1307_ADDR 0x68
// How many of the shift registers (74HC595)
#define NUM_SHIFT_REGS 2
const uint8_t numOfRegisterPins = NUM_SHIFT_REGS * 8;
const uint16_t digitMask = 0b1100100001101100;
const uint16_t colonPin = 12;
uint16_t registers = 0;
uint8_t time[4] = {0, 0, 0, 0};
uint8_t digitPins[] = {4, 7, 10, 13}; // 1-Q4, 1-Q7, 2-Q2, 2-Q5
uint16_t digits[] = {
0b0100000000000000, // 0
0b0100000001101100, // 1
0b1000000001000000, // 2
0b0000000001001000, // 3
0b0000000000101100, // 4
0b0000100000001000, // 5
0b0000100000000000, // 6
0b0100000001001100, // 7
0b0000000000000000, // 8
0b0000000000001100, // 9
};
uint8_t seconds;
uint8_t minutes;
uint8_t hours;
bool colon = false;
void setup() {
// Setup TinyWire I2C
TinyWireM.begin();
// Set pins to output
pinMode(DATA_PIN, OUTPUT);
pinMode(CLOCK_PIN, OUTPUT);
pinMode(LATCH_PIN, OUTPUT);
}
void loop() {
scanDigit(1);
scanDigit(2);
scanDigit(3);
scanDigit(4);
updateClock();
}
void updateClock()
{
TinyWireM.beginTransmission(DS1307_ADDR); // Reset DS1307 register pointer
TinyWireM.send(0x00);
TinyWireM.endTransmission();
// Request 7 bytes from DS1307
TinyWireM.requestFrom(DS1307_ADDR, 7);
seconds = bcdToDec(TinyWireM.receive() & 0x7F);
minutes = bcdToDec(TinyWireM.receive());
hours = bcdToDec(TinyWireM.receive());
time[0] = hours / 10;
time[1] = hours % 10;
time[2] = minutes / 10;
time[3] = minutes % 10;
colon = seconds & 1 ? HIGH : LOW;
}
void scanDigit(int index)
{
registers = digits[time[index - 1]] | bit(digitPins[index - 1]);
if (colon) {
registers |= bit(colonPin);
}
writeRegisters();
}
void writeRegisters()
{
// Set and display registers
digitalWrite(LATCH_PIN, LOW);
shiftOut(DATA_PIN, CLOCK_PIN, MSBFIRST, highByte(registers));
shiftOut(DATA_PIN, CLOCK_PIN, MSBFIRST, lowByte(registers));
digitalWrite(LATCH_PIN, HIGH);
}
// Convert binary coded decimal to normal decimal numbers
uint8_t bcdToDec(uint8_t value) {
return ((value / 16 * 10) + (value % 16));
}Here you can find the live link to the project. You can edit the code and see the results instantly. You can also share the project with others easily just by sharing the link! Please do share your projects in the comments!
Franzininho Simulator examples- Franzininho Blink
- Franzininho Clock, using two 74HC595 shift registers and DS1307 RTC
- Franzininho Analog Temperature Sensor, using NTC thermistor and SSD1306
- Franzininho Digital Humidity and Temperature, using DHT22 and SSD1306
- Ultrasonic Sensor, using 74HC595 and HC-SR04
- Servo Motor control, using Motor Micro Servo and LCD1602
- External pulse counter
I will be glad to hear from you😀. Please drop your comments below👍. If you would love to hear more about the simulators, please feel free to hop into the Wokwi Discord Channel!
Share your interesting projects and browse through several curious projects from fellow developers and makers on Facebook Wokwi Group!
Stay Safe!
Don't stop learning!
#wokwiMakes


Comments
Please log in or sign up to comment.