What is this about?
In this series of projects, we will look at the Arduino simulator and how to build and simulate Arduino projects. We will use a free Arduino Simulator (Wokwi).
The website link is here: https://wokwi.com
About Wokwi Arduino Simulator
Wokwi Arduino simulator is a browser-based simulator where you will build your projects. You will find several Arduino boards such as Arduino UNO, Arduino Mega, Arduino Nano etc. You will get a lot of peripherals such as LEDs, resistors, push buttons, slide switches, OLED displays, humidity sensors, PIR motion sensors and more! You can use all these peripherals for free and build your own project. wokwi Arduino simulator is an alternative for the Tinkercad Arduino simulator.
You can access the projects you build from anywhere if you login into the Wokwi Arduino simulator website.
How to use Wokwi Arduino Simulator?
STEP 1: Go to Wokwi Arduino simulator Home page https://wokwi.com 😀
STEP 2: Go to the "Start a New Project" section 😀
STEP 3: Click on the Arduino UNO icon to start a new project 😀
STEP 4: A new webpage will open 😀
STEP 5: Here you can see the complete layout of the Wokwi Arduino simulator 😀
Here are the section description
1. Arduino sketch tab - you will write the sketch here (copy and paste as well)
2. Share button - Click on this button to easily create a shareable link
3. Save button - Click on this button to save the project (so that you can refer to the project later)
4. Here you will be able to select Arduino peripherals
5. Docs - This takes you to the support document section where you will find more details about the parts along with the example projects
6. Sign-in button - You can sign in if you want to save the projects online for future access
7. Simulation section - Here is where you place and connect the parts
8. Editor window - Here you edit your code as well as add more libraries
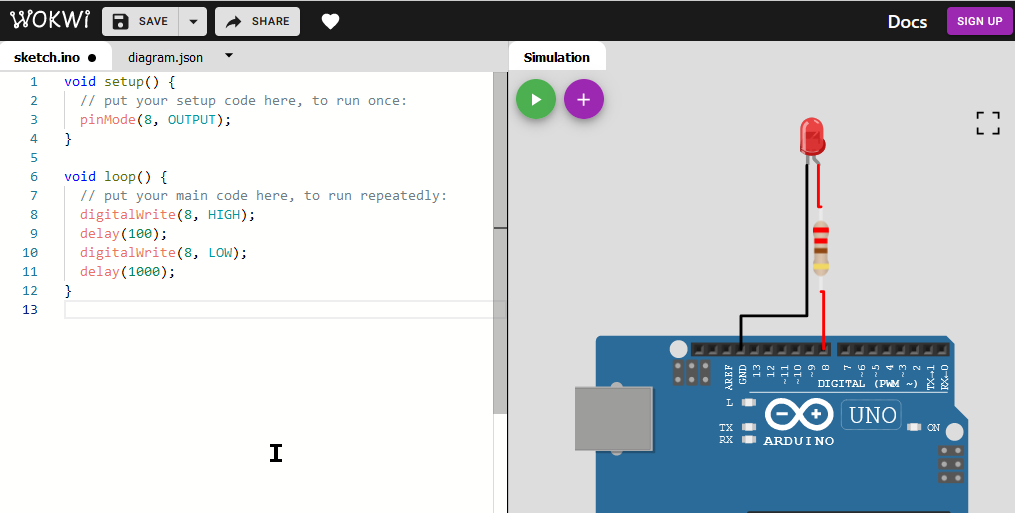
STEP 6: Let us construct the project. Click on the purple icon and select the "LED" 😀
STEP 7: Repeat the same and select the resistor as well. To rotate the resistor head to diagram.json tab and add the text "rotate": 90 (refer to image below) 😀
STEP 8: Point to the LED pin until the pin tip gets highlighted. You will be able to read the pin label. Click on it. A wire will appear. now click on the destination pin. the wire will now electrically connect the two ports. Repeat the same to complete the circuit 😀
STEP 9: To change the wire colour of the simulator, go to the tabdiagram.json. Change the colour to "red" as shown in the image below 😀
STEP 10: Add the code. We will drive UNO pin 8 high and low so that LED will blink! Hit on the save button 😀
STEP 11: Click on the Green button to start the simulation 😀
Final Simulation output:
Please hit a like button if you found this helpful 👍👍
For any support or feedback, please leave a comment. You can also hop on to Wokwi Discord Channel.
Share your interesting projects and browse through several curious projects from fellow developers and makers on Facebook Wokwi Group!
Stay Safe!
Don't stop learning!
#wokwiMakes
Until next time 👋


_ztBMuBhMHo.jpg?auto=compress%2Cformat&w=48&h=48&fit=fill&bg=ffffff)


Comments