This article gives you a step-by-step guide to becoming a pro in using Liquid Crystal Display. We will use a free Arduino Simulator to try all the examples without leaving your PC. No hardware is needed.
Important LinksWokwi Arduino Simulator - https://wokwi.com
Documentation on LCD - https://docs.wokwi.com/parts/wokwi-lcd1602
Facebook group to seek support on the Arduino Simulator - https://docs.wokwi.com/parts/wokwi-lcd1602
What is an LCD?LCD stands for Liquid Crystal Display. The very commonly used LCD type is 16x2 LCD, and it has two rows and 16 columns.
Here is the table with the LCD pin description. This will help you understand and debug the project later in an intelligent way.
You will also find LCDs with an I2C interface. Fewer Pins will lead to easier connection—less messy wires.
So, based on the LCD, you will have to tell the Arduino UNO which type of LCD you are using. You will see this in the sections later.
The LCD1602 uses the Hitachi HD44780 LCD controller chip. The chip comes with a built-in font and the ability to define up to 8 custom characters.
There are two versions of the chip's ROM with two different fonts: HD44780UA00, Japanese katakana characters, and HD44780UA02, which includes Western European characters.
Wokwi simulates the HD44780UA00 variant. It has a total of 256 characters:
You can see that the first eight characters are user-defined. It allows you to create custom shapes and store them. You will see how to create custom characters and load them in your following Arduino projects. Let us start with a basic example.
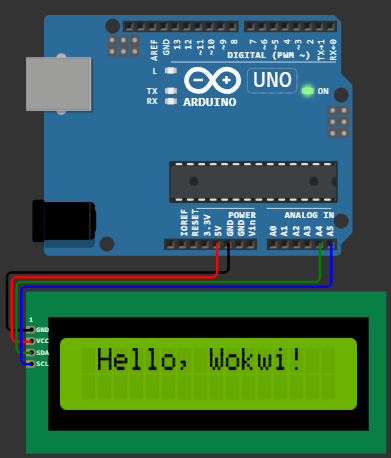
Example 1 - Basic example with LCD "Hello World" Example on I2C interfaceWe will print a simple text on the LCD using Arduino UNO in this example. In this case, you control what is displayed on the Arduino readily. You only need four cables. Power, Ground, I2C data, and I2C clock.
Here is the code
/* Hello Wokwi! */
#include <LiquidCrystal_I2C.h>
LiquidCrystal_I2C lcd(0x27, 20, 4);
void setup() {
lcd.init();
lcd.backlight();
lcd.setCursor(1, 0);
lcd.print("Hello, Wokwi!");
}
void loop() {
}
Connection diagram: LCD and Arduino UNO
Project link: https://wokwi.com/projects/325996799788581459
Use the link above to run the code. You can tinker with the code to change the text displayed or the position. The best thing about the link is that it will save the project as your version. It will be automatically saved under my projects tab on the wokwi site if you are logged in.
Let us take a minute and see the code line by line. Let me try to explain the purpose of each code one by one.
The below line code adds the LCD library to your project. This consists of all the LCD-related functions. Since we are using the I2C version, we have included the standard LCD library made for the I2C version.
#include <LiquidCrystal_I2C.h>Below, we are creating an object called LCD. We pass the I2C address, the number of columns, and the number of rows.
Can you let me know the parameters in the comments if we want to use an LCD2004 instead of LCD1602?
LiquidCrystal_I2C lcd(0x27, 16, 2);The following line of the code resets and initializes all the LCD registers and prepares them for project usage. This function will be called only once in the setup() function.
lcd.init();To turn on the backlight, you can use the below code. You will be able to see the contents of the display without a backlight, too, if it is a green LCD. Backlight, nevertheless, makes the project more beautiful and reading crisper.
lcd.backlight();You can mention where the characters should be displayed. You can always use the below function to set/reset the cursor position. This function will be beneficial when you have to display time or a counter that demands the cursor to always be in the same position.
The first parameter tells the position column-wise (0 indicated first place, 1 indicates the second place, and so on). The second parameter tells the row number. We have only two rows (0 and 1).
lcd.setCursor(1, 0);The last thing to be seen is the below line, where we actually send a message. In this case a string Hello, Wokwi is sent!
lcd.print("Hello, Wokwi!");This completes a basic introduction to the LCD as well as an example project to start the LCD exploration. In the coming sections, we will see different projects as soon as possible 🚧
Example 2 - Basic example with LCD "Hello World" Example on Parallel interfaceYou will often see the LCD1602 interface connected with Arduino UNO. Here you will use a few control lines, and 4 data lines for communication.
Here is the example connection diagram
- Arduino
PIN.7-> D7 - Arduino
PIN.8-> D6 - Arduino
PIN.9-> D5 - Arduino
PIN.10-> D4 - Arduino
PIN.11-> E - Arduino
PIN.GND-> RW - Arduino
PIN.5V-> RS
Code
// LCD1602 to Arduino Uno connection example
#include <LiquidCrystal.h>
LiquidCrystal lcd(12, 11, 10, 9, 8, 7);
void setup() {
lcd.begin(16, 2);
// you can now interact with the LCD, e.g.:
lcd.print("Hello World!");
}
void loop() {
// ...
}
I am sure you have noticed the differences. The LCD library file you include is now different since we are no more using the I2C interface.
another difference is the constructor parameters you send. This time, you have to send 6 numbers, representing control and data lines as depicted in the pin list above.
Simulation link: https://wokwi.com/projects/294342288335700490
Example 3 - Creating user-defined characters in LCD1602, easy wayCreating custom characters on the LCD is easy. In this example, you will see how to create a character in the shape of a heart.
Project link: https://wokwi.com/projects/294395602645549578
Code:
// LCD1602 custom characters example
#include <LiquidCrystal.h>
LiquidCrystal lcd(12, 11, 10, 9, 8, 7);
uint8_t heart[8] = {
0b00000,
0b01010,
0b11111,
0b11111,
0b11111,
0b01110,
0b00100,
0b00000,
};
void setup() {
lcd.createChar(3, heart);
lcd.begin(16, 2);
lcd.print("  I \x03 Arduino");
}
void loop() { }
To create a symbol, you have to define an array with 8 numbers. Basically, you will define which pixels will be lit and which pixels will not be in the array.
Let us see some examples.
Heart shape example
The first line is empty.. so it can be defined as 00000 in binary. The second line will be built using 01010. The third line will be all ones 11111 I hope you got the idea now. You can compare again the binary values above in the code.
Box shape
uint8_t heart[8] = {
0b11111,
0b10001,
0b10001,
0b10001,
0b10001,
0b10001,
0b10001,
0b11111,
};
an animation for any future projects (think some games!)
In the following sections, we will see more exciting LCD projects
Example 4 - Working with LCD2004 and Arduino UNO (with some simple animation)In this project, you will see how to use an LCD2004 module. LCD2004 has 4 rows and 20 columns. The basic function names and constructor pattern remains the same.
You might have even come across the blue color LCD2004 module. It might look something similar to this.
Here is one link: https://wokwi.com/projects/294590769009787402
You can get access to the code and the connection diagram in the link above.
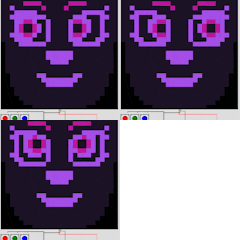
here is how the animation looks!
Simulation link: https://wokwi.com/projects/326034190442168916
Simulation output:
To be continued 😉


_ztBMuBhMHo.jpg?auto=compress%2Cformat&w=48&h=48&fit=fill&bg=ffffff)


Comments
Please log in or sign up to comment.