


Hardware components | ||||||
_ztBMuBhMHo.jpg?auto=compress%2Cformat&w=48&h=48&fit=fill&bg=ffffff) |
| × | 1 | |||
 |
| × | 1 | |||
 |
| × | 1 | |||
 |
| × | 1 | |||
| × | 1 | ||||
Push buttons are everywhere. TV, AC, Remote, Car, Plane, vending machine, trains, buses, etc.
You will also see a lot of applications where you will see push buttons and Arduino together. In this article, I will brief about push buttons and how we connect them.
Why pull-ups are needed for pushbuttons, why push buttons need pull-downs, how to read the status of pushbuttons, how to read push buttons in the polling method, and many more topics. I will use the Wokwi Arduino simulator for the examples because the Wokwi Arduino simulator is easy to use. Wokwi Arduino simulator is free and you can play with the simulation right in the browser!
Let us get started!
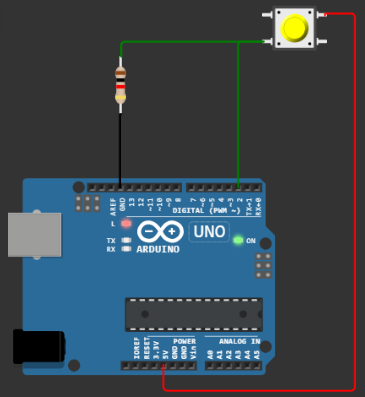
Example 1 - Pushbutton connected to an Arduino (pin read method)Arduino has an internal pull-up option.
This will help you to avoid one external resistor. Let us just dive in and see the pin connection. The connection of a button to pin 6 is shown in the image below
Here is an example code for you.
use this link to try it out for yourself!
void setup() {
// put your setup code here, to run once:
pinMode(6, INPUT_PULLUP);
pinMode(13, OUTPUT);
}
void loop() {
// put your main code here, to run repeatedly:
digitalWrite(13, digitalRead(6));
}
When the button is pressed, you connect Arduino Pin 6 to the GND. Hence Arduino reads a LOGIC ZERO. When you release the button, the Pin 6 is not connected to anything. Still, we read it as a LOGIC ONE. This is because we have enabled internal pull-up on the Pin 6.
pinMode(6, INPUT_PULLUP);If you don't use the internal pullup you have to use a pull-up externally. You will see this in example 2.
Example 2 - Pushbutton connected to an Arduino (pin read method-without internal pullup)The internal pullup is not enabled in the code this time.
pinMode(6, INPUT);connection diagram
Code
void setup() {
// put your setup code here, to run once:
pinMode(6, INPUT);
pinMode(13, OUTPUT);
}
void loop() {
// put your main code here, to run repeatedly:
digitalWrite(13, digitalRead(6));
}
Link to the simulation
https://wokwi.com/arduino/projects/323901367569613396
a note about debounce bounce debounce bounceSwitches when opened or closed make and break the connections several times before settling. this is due to the nature of the switches. this will cause many logic ones and logic zero states for the MCU Pin. Here is one example of bouncing in a switch.
If you don't handle it you might count one user press as multiple presses. This may lead to wrong counter values or poor user experience.
Here is one example from the Wokwi Arduino simulator to illustrate it
Simulation link for you: https://wokwi.com/arduino/projects/323902147442770516
The application simply counts the number of transitions (both high to low, low to high)
You can see that, for the red switch, you don't just count two for a single press but several. The blue push button doesn't;t mimic the real-world scenario of bounce. Hence it looks ideal.
Since we live in the practical world, we have to counter this bounce problem. There are many ways of doing it. We will see what software options are available.
https://wokwi.com/arduino/projects/323902706198512212
Working simulation output
Code
- Both buttons are connected to Arduino Pin 4
// Button Debouncer
//
// Red button has bouncing simulation enabled,
// Blue button has bouncing simulation disabled.
//#include "debouncer.h"
#include "debouncer_integrator.h"
#define BUTTON_PIN 4
void setup()
{
Serial.begin(115200);
pinMode(BUTTON_PIN, INPUT_PULLUP);
}
void loop()
{
/**
static Debouncer button(BUTTON_PIN);
button.Update();
if (button.Fall())
{
Serial.println("Pressed.");
}
else if (button.Rise())
{
Serial.println("Released.");
}
/**/
static DebouncerIntegrator button_int(BUTTON_PIN, 300); // Large debounce time to see integration sum on serial plotter.
button_int.Update();
if (button_int.Fall())
{
Serial.println("Pressed.");
}
else if (button_int.Rise())
{
Serial.println("Released.");
}
#if DEBOUNCER_REPEAT_COUNT
static unsigned long previous_repeat_count = 0;
unsigned long repeat_count = button_int.RepeatCount();
if (repeat_count != previous_repeat_count)
{
Serial.print("Repeat count = ");
Serial.println(repeat_count);
previous_repeat_count = repeat_count;
}
#endif
}
Click on the simulation link above to access the complete code, library files, as well as the hardware connection with the working demo.
Example 2: Basic Debouncer using Arduino libraryArduino Library link: https://www.arduino.cc/en/Tutorial/BuiltInExamples/Debounce
Connection diagram
Code
/*
Debounce
Each time the input pin goes from LOW to HIGH (e.g. because of a push-button
press), the output pin is toggled from LOW to HIGH or HIGH to LOW. There's a
minimum delay between toggles to debounce the circuit (i.e. to ignore noise).
The circuit:
- LED attached from pin 13 to ground through 220 ohm resistor
- pushbutton attached from pin 2 to +5V
- 10 kilohm resistor attached from pin 2 to ground
- Note: On most Arduino boards, there is already an LED on the board connected
to pin 13, so you don't need any extra components for this example.
created 21 Nov 2006
by David A. Mellis
modified 30 Aug 2011
by Limor Fried
modified 28 Dec 2012
by Mike Walters
modified 30 Aug 2016
by Arturo Guadalupi
This example code is in the public domain.
https://www.arduino.cc/en/Tutorial/BuiltInExamples/Debounce
*/
// constants won't change. They're used here to set pin numbers:
const int buttonPin = 2; // the number of the pushbutton pin
const int ledPin = 13; // the number of the LED pin
// Variables will change:
int ledState = HIGH; // the current state of the output pin
int buttonState; // the current reading from the input pin
int lastButtonState = LOW; // the previous reading from the input pin
// the following variables are unsigned longs because the time, measured in
// milliseconds, will quickly become a bigger number than can be stored in an int.
unsigned long lastDebounceTime = 0; // the last time the output pin was toggled
unsigned long debounceDelay = 50; // the debounce time; increase if the output flickers
void setup() {
pinMode(buttonPin, INPUT);
pinMode(ledPin, OUTPUT);
// set initial LED state
digitalWrite(ledPin, ledState);
}
void loop() {
// read the state of the switch into a local variable:
int reading = digitalRead(buttonPin);
// check to see if you just pressed the button
// (i.e. the input went from LOW to HIGH), and you've waited long enough
// since the last press to ignore any noise:
// If the switch changed, due to noise or pressing:
if (reading != lastButtonState) {
// reset the debouncing timer
lastDebounceTime = millis();
}
if ((millis() - lastDebounceTime) > debounceDelay) {
// whatever the reading is at, it's been there for longer than the debounce
// delay, so take it as the actual current state:
// if the button state has changed:
if (reading != buttonState) {
buttonState = reading;
// only toggle the LED if the new button state is HIGH
if (buttonState == HIGH) {
ledState = !ledState;
}
}
}
// set the LED:
digitalWrite(ledPin, ledState);
// save the reading. Next time through the loop, it'll be the lastButtonState:
lastButtonState = reading;
}you have many ways to ask for help, suggest a feature, or share your feedback
- Open an issue on GitHub
- Visit Facebook group
- Hop on to Discord Server!
- leave a comment here 👇


Comments
Please log in or sign up to comment.