


Hardware components | ||||||
_ztBMuBhMHo.jpg?auto=compress%2Cformat&w=48&h=48&fit=fill&bg=ffffff) |
| × | 1 | |||
 |
| × | 1 | |||
 |
| × | 1 | |||
 |
| × | 1 | |||
 |
| × | 1 | |||
 |
| × | 1 | |||
Learn Arduino faster with the help of a free Arduino simulator. Let us get started. In this project, we will blink an LED and also plan for some assignments :)
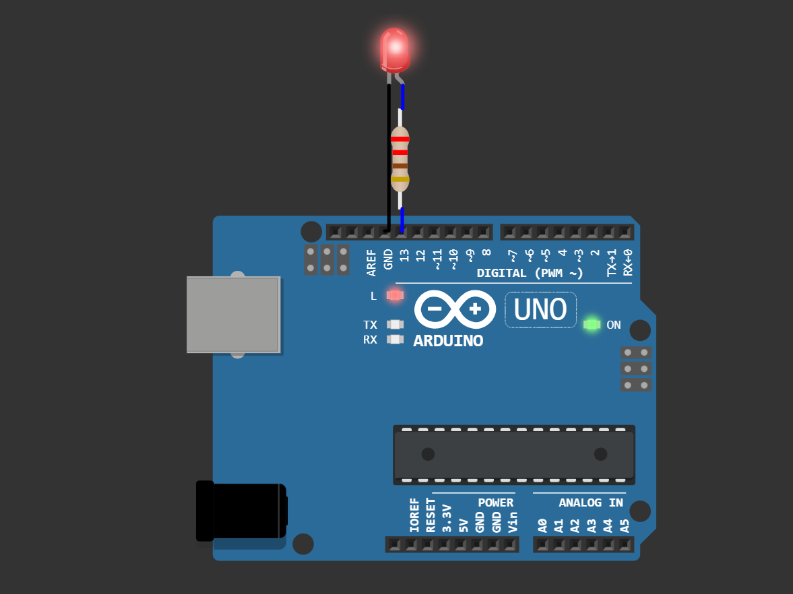
Hardware setup1 - LED
2 - Current limiting resistor
3 - Arduino UNO
4 - connecting wires
LED blink basicsLED will turn on when you connect positive voltage to the Anode pin (lengthier pin) and negative voltage (ground) to the Cathode pin. You need to have a resistor of suitable value (330 ohms is a safe bet) to limit the current through the LED. if not, it will overheat and die sooner or later 🥵
Connect the Anode pin to one of the Arduino GPIO pins through the resistor. In this example, it is connected to GPIO13. Connect the cathode to the ground.
This example blinks the LED every 1 sec. You can play with the code to make it blink at different intervals. Let's see the code!
Code// the setup function runs once when you press reset or power the board
void setup() {
// initialize digital pin LED_BUILTIN as an output.
pinMode(LED_BUILTIN, OUTPUT);
}
// the loop function runs over and over again forever
void loop() {
digitalWrite(LED_BUILTIN, HIGH); // turn the LED on (HIGH is the voltage level)
delay(1000); // wait for a second
digitalWrite(LED_BUILTIN, LOW); // turn the LED off by making the voltage LOW
delay(1000); // wait for a second
}I would ask you to go here and play with the code. You can try following things
- Change the LED colour to blue💙
- Change the blinking pattern to 100 ms ON, 1000 ms OFF
- Find out at what value of Delay, your eyes will fail to distinguish between ON and OFF
- Add two LEDs. Connect One LED to GPIO13 and the other LED to the GPIO of your wish. Blink both LEDs alternatively
I will be glad to support all issues you find while trying out the above code or the tasks. you can ask me here directly or hop on to the Discord server where a cool community welcomes you!
Share your interesting projects and browse through several curious projects from fellow developers and makers on Facebook Wokwi Group!
Stay Safe!
Don't stop learning!
#wokwiMakes


Comments
Please log in or sign up to comment.