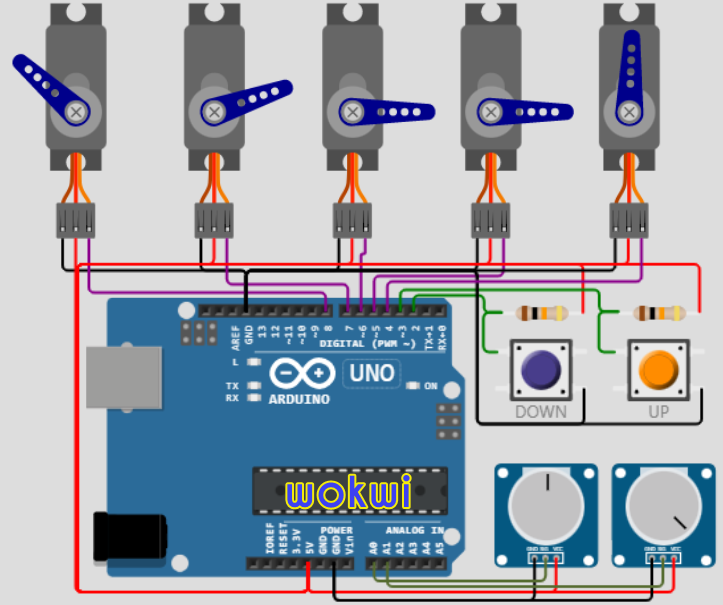
The 5 Servo motors in this project are connected to one Arduino UNO board. Each Servo motor has a unique function. This article will shed light on the example in detail, along with the code, Arduino Simulation, and connection diagram.
This is a very good example to understand how multitasking is achieved in an easier way. This will help you to gain knowledge on both multitasking as well as tips and tricks to manage future tasks. Let us begin.
Connection DiagramHere is the connection diagram for the project. You can use the simulation link to observe the connections closely.
https://wokwi.com/arduino/projects/305087394119418434
Servo Motor 1 -> PIN 8
Servo Motor 1 -> PIN 7
Servo Motor 1 -> PIN 6
Servo Motor 1 -> PIN 5
Servo Motor 1 -> PIN 4
Servo Motor 1The First Servo motor rotates to a random angle every time. The angle is set every 700ms once. Below is the code extract for Servo Motor 1.
count700ms++;
if( count700ms >= (700 / interval))
{
count700ms = 0;
int angle1 = random( 0, 181); // 0...180
servo1.write( angle1);
}
angle1 is the variable that loads a random angle between 0 and 180. servo1.write function is called with the random value loaded.
The Second Servo motor sweeps in a sinusoidal way. The rate is controlled by the potentiometer connected to Arduino PIN A0.
The code extract is here (related to Servo Motor 2)
float s = sin( r); // The sine from the angle in radian
float t = (90.0 * s) + 90.0; // convert -1...1 to 0...180
int angle2 = int( t); // convert it to integer for the servo angle
servo2.write( angle2);
int potentiometer1 = analogRead( A0);
float r_increment = 0.001 + (0.00005 * float(potentiometer1));
r += r_increment;
if( r >= 2.0 * M_PI)
{
r -= 2.0 * M_PI;
}
The analog value read from the potentiometer decides the rate at which we increment the angle. The higher the analog value, the faster will be the rate at which we reach the maximum angle and reset. hence, the potentiometer position decides the rate of movement of the Servo motor.
In the Arduino simulation link, you can experiment as well by playing with the potentiometer. Wokwi Arduino simulator supports several other peripherals as well which you can use in your next simulation projects.
The Third Servo motor is driven in a simple way. There is another potentiometer connected to Arduino PIN A1. the angle of the servo motor is directly proportional to the position of the potentiometer.
This will be very helpful in robotic arm or car steering projects in the future. Here is the servo motor 3 in action.
Code extract
int potentiometer2 = analogRead( A1);
int angle3 = map( potentiometer2, 0, 1023, 0, 180);
servo3.write( angle3);The fourth Servo motor is controlled by two pushbuttons. The two pushbuttons are connected to Arduino PINs 2 and 3.
Code
bool up = false;
if( digitalRead( 3) == LOW)
up = true;
bool down = false;
if( digitalRead( 2) == LOW)
down = true;
if( step == 0 and up)
step = 1;
else if( step == 0 and down)
step = -1;
else if( step > 0 and down)
step = -1;
else if( step < 0 and up)
step = +1;
pos += step;
if( pos <= 0)
{
pos = 0;
step = 0;
}
else if( pos >= 180)
{
pos = 180;
step = 0;
}
servo4.write( pos);
For every interval (10 ms or 20 ms) the position of the servo motor is changed by one step. Depending on the button pressed, the servo 4 will either move to one edge or the other. Since this is an example, some cases are not taken care.
Can you write in comments what would happen if both the buttons are pressed at the same time?
Servo Motor 5The fifth servo motor has smooth landings at the end of the motion. You can see it in action here
Code
float step;
step = (90.0 - fabs(90.0 - position)) / 90.0;
step = 0.1 + (pow( step, 1.5) * 5); // make a steep curve, with 0.1 as minimum
if( direction > 0)
{
position += step;
if( position >= 180.0)
{
position = 180.0;
direction = -1;
}
}
else
{
position -= step;
if( position <= 0.0)
{
position = 0.0;
direction = 1;
}
}
int angle5 = int( position);
servo5.write( angle5);
}
}The article gave you an example project where 5 servo motors were controlled in parallel. This was possible due to following reasons
- No
delay()functions are used. Adding a delay() function causes the control to block the processor by doing other tasks - Using
millis()functions is a very good tool to create multitask parallel actions
Please leave a comment if you have any questions or suggestions. Thank you 🙏👍


_ztBMuBhMHo.jpg?auto=compress%2Cformat&w=48&h=48&fit=fill&bg=ffffff)


_3u05Tpwasz.png?auto=compress%2Cformat&w=40&h=40&fit=fillmax&bg=fff&dpr=2)
Comments
Please log in or sign up to comment.