Build a joystick controller to pilot a digital shark as it surveys a virtual marine environment in Microsoft Excel. Use this project as-is or modify the joystick code to control your keyboard and/or mouse!
Download the Joystick Workbook here: https://onedrive.live.com/?authkey=%21AI5IcSCS8O%5FUMd0&id=D1EAAFC0BDFA320E%219640&cid=D1EAAFC0BDFA320E
Note: This tutorial is a shortened version of our original instructions, which you can find here: https://aka.ms/shark-lesson
Prepare Joystick PartsCut the following pieces of cardboard: 9cm x 25cm, 9cm x 9cm, two pieces of 5cm x 5cm, and 2 pieces of 1cm x 3cm
Label the cardboard pieces: Plate Support (9x 25cm), Base (9x9cm), Handle 1 (5x5cm), Handle 2 (5x5cm), Yaw 1 (1x3cm), and Yaw 2 (1x3cm).
Find the center of the Base, Handle 1 and Handle 2.
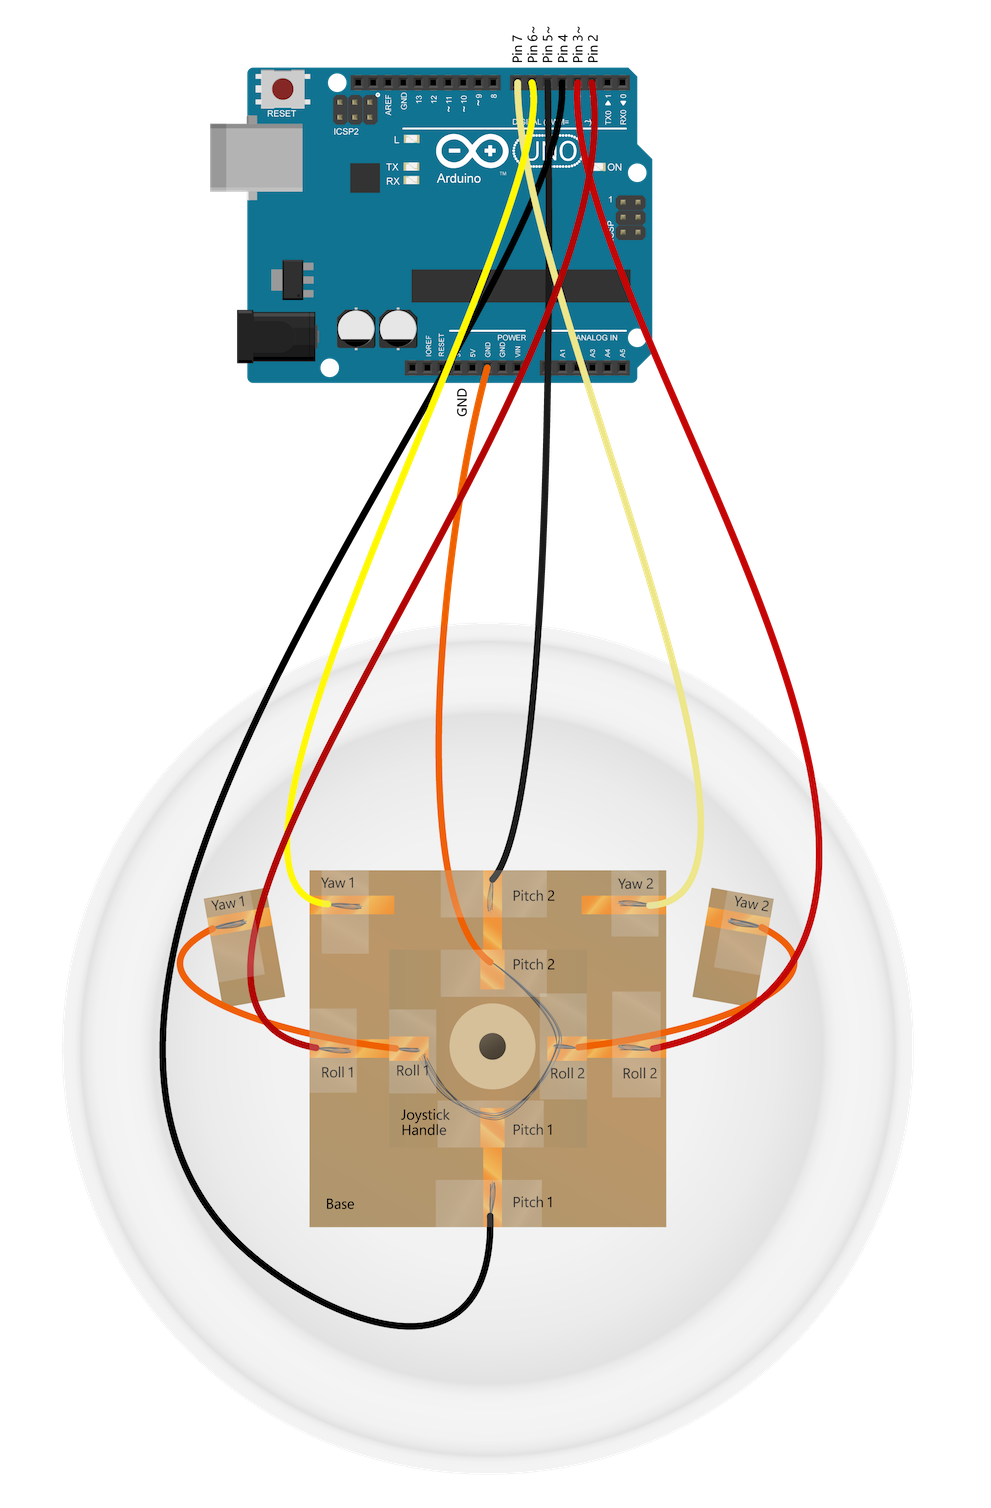
On the Base, measure and mark the halfway point for each side. Label the bottom and top Pitch 1 and Pitch 2, respectively. Label the left and right Roll 1 and Roll 2, respectively.
On the left side of the Base, measure 1cm from top. Mark the Yaw 1.
On the right side of the Base, measure 1cm from the top and mark Yaw 2.
Measure and mark center point on Joystick Handle 1 as shown in the photo above.
Use your scissors to drill a hole in the center of the Base, Handle 1, and Handle 2 pieces.
The pieces of your joystick should now look like the photo above. Onward to assemble and connect!
Hot glue Joystick Handle 1 to Joystick Handle 2 so that they line up with each other and the labels on Joystick Handle 1 are facing out.
Glue the spool to the top of Handle 1 so that the hole in the spool aligns with the hole in Handle 1 and 2.
Wrap copper tape over your Pitch and Roll marks so that the tape reaches around both Handle 1 and Handle 2 pieces
On the joystick Base, add strips of copper tape for Pitch, Roll, and Yaw markings as shown in the photo. Wrap copper tape around to the bottom of the cardboard.
On the Handle, attach the foam tape square to the bottom center.
Adhere the joystick Handle to the center of the joystick Base piece.
Use scissors to clear the foam tape from the joystick center hole.
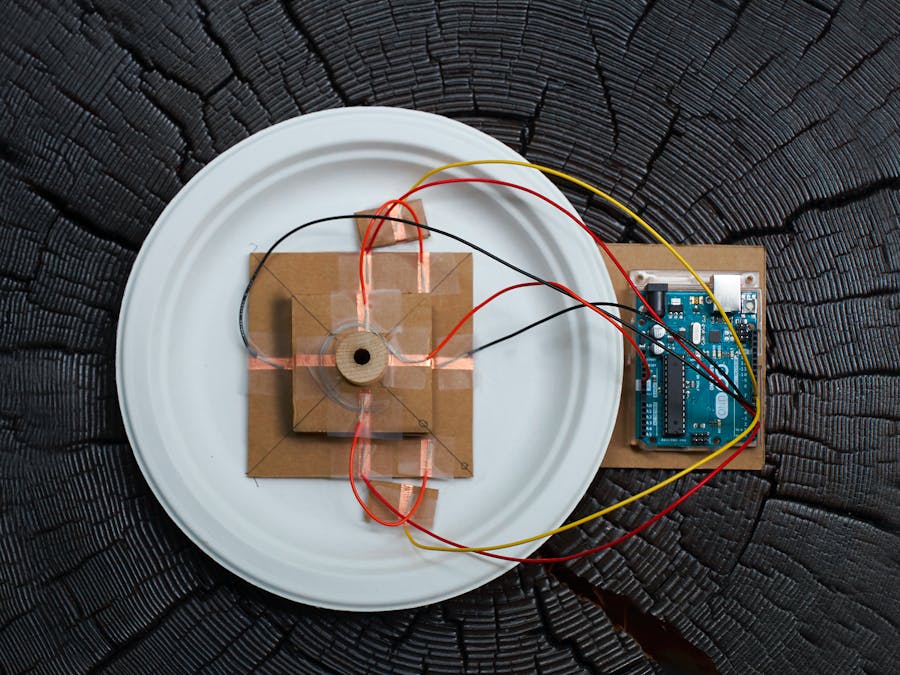
On the remaining cardboard piece, glue down your Arduino board and the paper plate.
Place the joystick Base in the center of the plate and mark its location.
Find the center of the rectangle. Then mark the location of Yaw 1 and Yaw 2 (1 cm from top of Joystick Base).
Use your scissors to drill out a center hole.
Add hot glue in the hole, then insert your small dowel piece. Let dry fully.
Place the joystick base on top of the dowel. Be sure it can freely rotate.
Wrap copper tape around the center of both of the Yaw pieces.
Rotate the joystick Base until it lines up with the mark you made earlier. Use this to align the Yaw 1 piece, then glue it down.
Repeat for Yaw 2: rotate the Base until it lines up with the other Yaw mark, then glue down the Yaw 2 pieces.
Strip off 1.5 cm from both ends of the 11 cm stranded wires. This will give the wires a good connection when taped down. Set aside.
Grab your M-to-M jumper wires. Cut off one end and remove about 1.5cm of insulation for each wire.
Grab one of the M-to-M jumper wires and remove about 10cm of insulation. This is the ground wire.
Grab your F-to-M jumper cables. For each M-to-M wire, insert the remaining male pin into the female plug.
Connect the ground wire so that it wraps around the copper tape on the joystick Handle. Cover the wire with copper tape for a good electrical connection.
Connect wires between the joystick Handle and the side Yaw 1 and Yaw 2 pieces. Cover with copper tape.
Connect jumper wires between Arduino Digital Pins 2 and 3 and joystick Base Roll 2 and 1, respectively
Connect jumper cables from Arduino Digital Pins 4 and 5 to joystick Base Pitch 2 and 1, respectively.
Finally, connect the last 2 jumper wires from Arduino digital pins 6 and 7 to Joystick Base Yaw 2 and Yaw 1, respectively.
Your joystick will control the shark in this customized Excel workbook.
We love it when folks hack our projects! Use your joystick in the Excel workbook or modify the Arduino code to control a Human Interface Device ("HID") like your computer keyboard or mouse.
Let us know what you and/or your students create via social media, Linked In, or Flip Grid. Find us by searching for Microsoft HackingSTEM.
Other questions, comments, or ideas? Please feel free to reach out to us on our website: aka.ms/hackingSTEM
Happy making!


_ztBMuBhMHo.jpg?auto=compress%2Cformat&w=48&h=48&fit=fill&bg=ffffff)


Comments
Please log in or sign up to comment.