


Hardware components | ||||||
 |
| × | 1 | |||
 |
| × | 1 | |||
Software apps and online services | ||||||
 |
| |||||
 |
| |||||
ZhangGaoxing's LCD1602 Demo
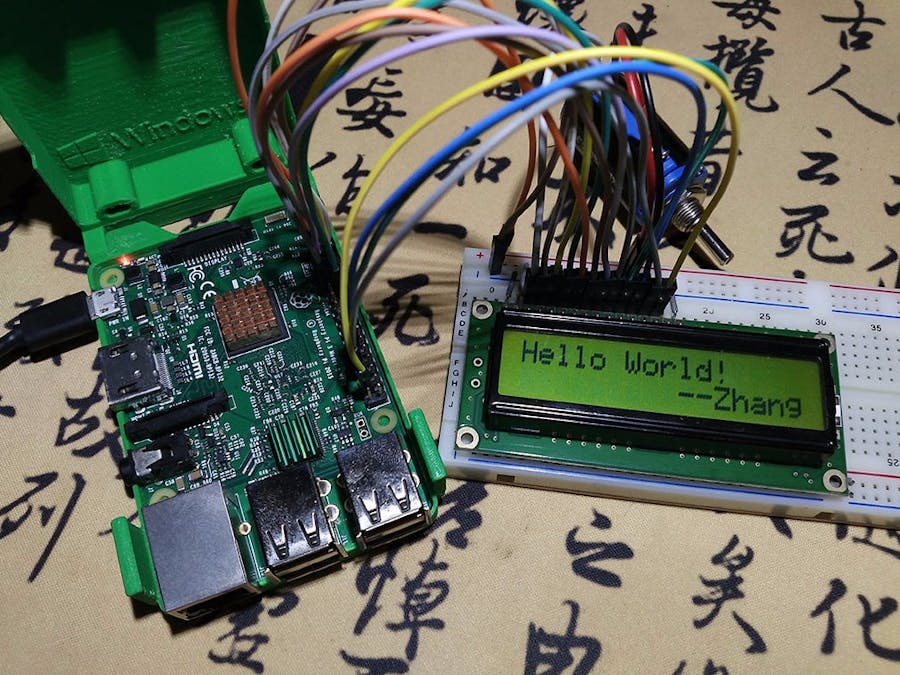
Read moreThis is a Windows 10 IoT Core project on the Raspberry Pi 2/3, coded by C#.
ConnectIn 4 data line
- VSS - GND
- VDD - 5V
- V0 - 10KΩ Rotary Potentiometer / GND
- RS - GPIO 18
- RW - GPIO 23
- E - GPIO 24
- D4 - GPIO 5
- D5 - GPIO 6
- D6 - GPIO 13
- D7 - GPIO 26
In 8 data line
- VSS - GND
- VDD - 5V
- V0 - 10KΩ Rotary Potentiometer / GND
- RS - GPIO 18
- RW - GPIO 23
- E - GPIO 24
- D0 - GPIO 4
- D1 - GPIO 17
- D2 - GPIO 27
- D3 - GPIO 22
- D4 - GPIO 5
- D5 - GPIO 6
- D6 - GPIO 13
- D7 - GPIO 26
https://wenku.baidu.com/view/036d5449ff4733687e21af45b307e87101f6f828.html
What ContainsIn LCD1602.cs file
/// <summary>
/// Initialize LCD1602
/// </summary>
public async Task InitializeAsync();
/// <summary>
/// Write command
/// In 4 data line, first write the high 4 bits, then write the low 4 bits.
/// </summary>
/// <param name="command">Command byte</param>
public async Task WriteCommand(byte command);
/// <summary>
/// Write data
/// In 4 data line, first write the high 4 bits, then write the low 4 bits.
/// </summary>
/// <param name="data">Data byte</param>
public async Task WriteData(byte data);
/// <summary>
/// Print string in LCD
/// </summary>
/// <param name="value">string</param>
public async Task Print(string value);
/// <summary>
/// Set Print Cursor
/// </summary>
/// <param name="x">From 0 to 15</param>
/// <param name="y">From 0 to 1</param>
public async Task SetCursor(int x, int y);
/// <summary>
/// Clear LCD
/// </summary>
public async Task Clear();
/// <summary>
/// Cleanup
/// </summary>
public void Dispose();
- First, you need to create a LCD1602 object. After that you should call InitializeAsync() to initialize.
LCD1602 lcd = new LCD1602(18, 23, 24, /*4, 17, 27, 22,*/ 5, 6, 13, 26);
await lcd.InitializeAsync();
- Secondly
await lcd.Print("Hello World!");
await lcd.SetCursor(9, 1);
await lcd.Print("--Zhang");
- If you want to close the sensor, call Dispose().
lcd.Dispose();


Comments
Please log in or sign up to comment.