Hackster is hosting Hackster Holidays, Ep. 7: Livestream & Giveaway Drawing. Watch previous episodes or stream live on Friday!Stream Hackster Holidays, Ep. 7 on Friday!
HeathenHacks
Published © GPL3+

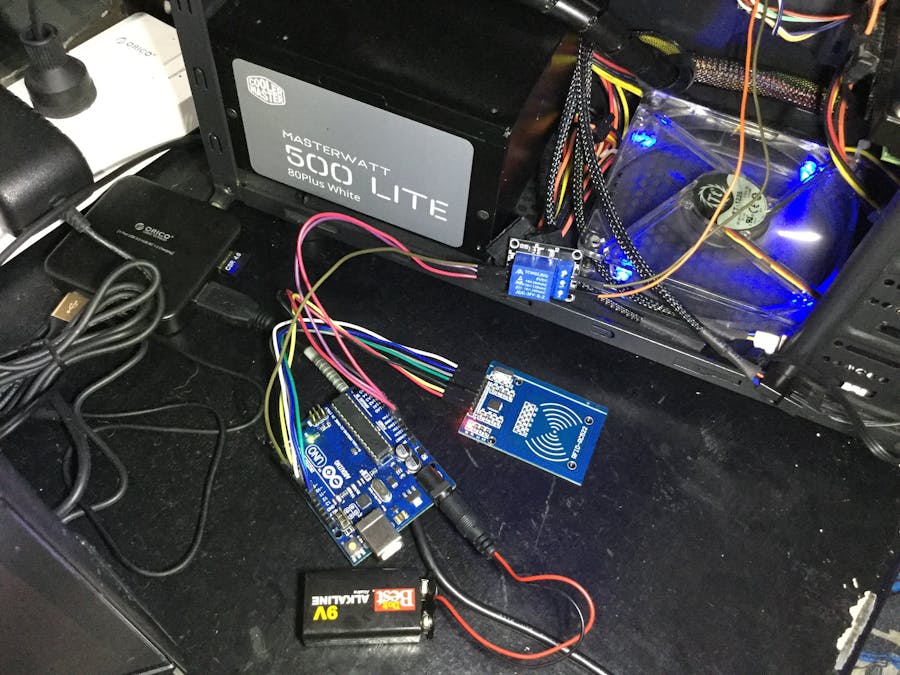
RFID+Relay+RFID Door Lock Code = RFID PC Switch!

A simple RFID controlled relay module to turn your PC on/off.

BeginnerFull instructions provided40,626
RFID+Relay+RFID Door Lock Code = RFID PC Switch!

Things used in this project

Hardware components

Arduino UNO
Arduino UNO
×1
RFID Module (Generic)
I used MFRC522.
×1
Relay Module (Generic)
I used a 5v Single Channel Relay Module
×1
Male/Female Jumper Wires
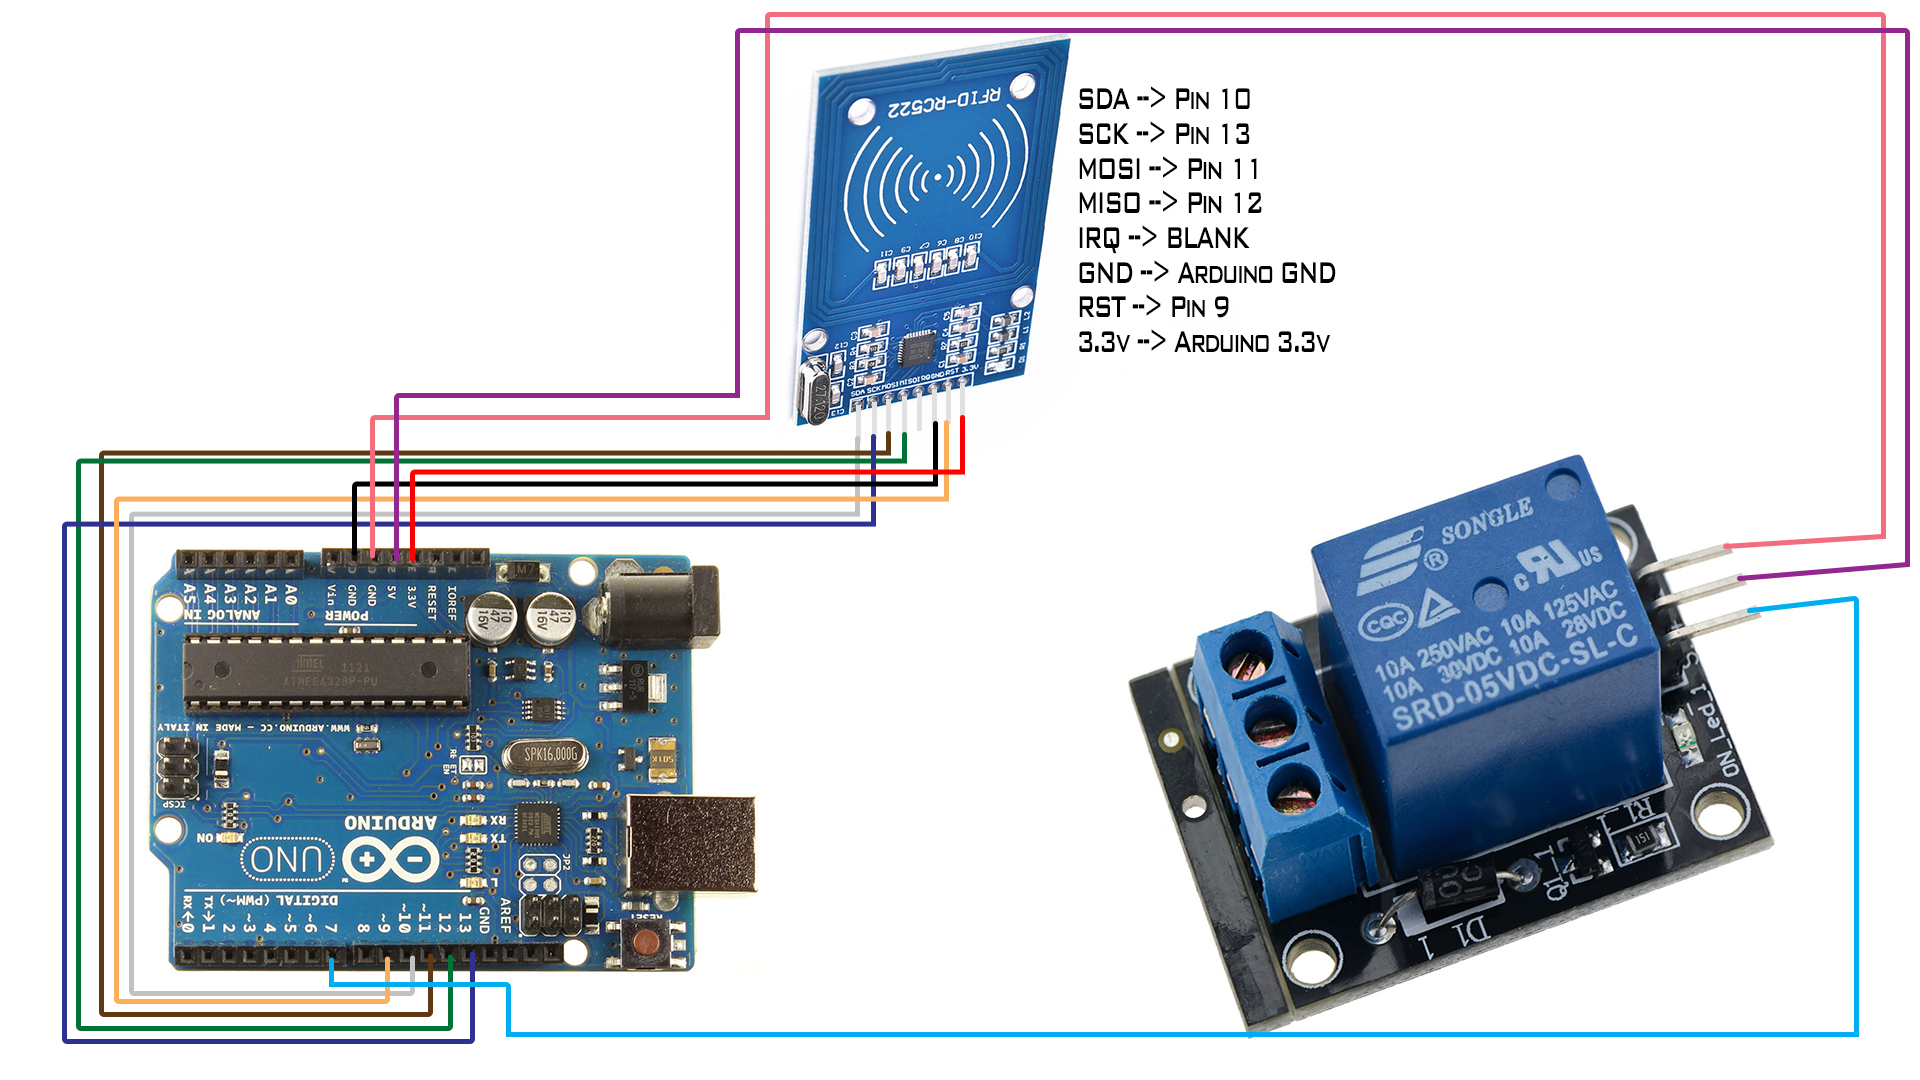
7 for the RFID module -> Arduino , 3 For the Relay -> Arduino and 2 For the Relay -> Motherboard.
×12

Story

Read more

Schematics

Visual Wiring Diagram

I made this using Photoshop. The wires have various colors to avoid confusion.

Code

RFID-Relay

Arduino
This is really an RFID Door Lock code. I just used it to power my PC on.
/*
 * ----------------------------------------------------------------------------
 * This sketch uses the MFRC522 library ; see https://github.com/miguelbalboa/rfid
 * for further details and other examples.
 * 
 * NOTE: The library file MFRC522.h has a lot of useful info. Please read it.
 * 
 * This sketch show a simple locking mechanism using the RC522 RFID module.
 * ----------------------------------------------------------------------------
 * Typical pin layout used:
 * -----------------------------------------------------------------------------------------
 *             MFRC522      Arduino       Arduino   Arduino    Arduino          Arduino
 *             Reader/PCD   Uno           Mega      Nano v3    Leonardo/Micro   Pro Micro
 * Signal      Pin          Pin           Pin       Pin        Pin              Pin
 * -----------------------------------------------------------------------------------------
 * RST/Reset   RST          9             5         D9         RESET/ICSP-5     RST
 * SPI SS      SDA(SS)      10            53        D10        10               10
 * SPI MOSI    MOSI         11 / ICSP-4   51        D11        ICSP-4           16
 * SPI MISO    MISO         12 / ICSP-1   50        D12        ICSP-1           14
 * SPI SCK     SCK          13 / ICSP-3   52        D13        ICSP-3           15
 *
 */
#include <SPI.h>
#include <MFRC522.h>

#define RST_PIN         9           // Configurable, see typical pin layout above
#define SS_PIN          10          // Configurable, see typical pin layout above

MFRC522 mfrc522(SS_PIN, RST_PIN);   // Create MFRC522 instance.

String read_rfid;                   // Add how many you need and don't forget to include the UID.
String ok_rfid_1="e199312d";        // This is for my main RFID Card. aka. The one I will be using to turn on my PC. Can also be used to shut it down if you want to.
String ok_rfid_2="fbecb673";        // This is for the RFID Keyfob. aka. Shutdown Keyfob. Not advisable tho. Just shutdown your PC normally.
int lock = 7;                       // For the Card.
int lock2 = 7;                      // For the Keyfob.
/*
 * Initialize.
 */
void setup() {
    Serial.begin(9600);         // Initialize serial communications with the PC
    while (!Serial);            // Do nothing if no serial port is opened (added for Arduinos based on ATMEGA32U4)
    SPI.begin();                // Init SPI bus
    mfrc522.PCD_Init();         // Init MFRC522 card

    //Choose which lock below:
    pinMode(lock, OUTPUT);
    pinMode(lock2, OUTPUT);
}
/*
 * Helper routine to dump a byte array as hex values to Serial.
 */
void dump_byte_array(byte *buffer, byte bufferSize) {
    read_rfid="";
    for (byte i = 0; i < bufferSize; i++) {
        read_rfid=read_rfid + String(buffer[i], HEX);
    }
}

void open_lock() {
  //Use this routine when working with Relays and Solenoids etc.
  digitalWrite(lock,HIGH);
  delay(500);
  digitalWrite(lock,LOW);
}


void close_lock2() {          // You can also just use the card to shutdown your PC. This is just for those moments that you really need to shut it down quickly. 
  //Use this routine when working with Relays and Solenoids etc.
  digitalWrite(lock2, HIGH);
  delay(5000);                
  digitalWrite(lock2,LOW);
}


void loop() {

      // Look for new cards
    if ( ! mfrc522.PICC_IsNewCardPresent())
        return;

    // Select one of the cards
    if ( ! mfrc522.PICC_ReadCardSerial())
        return;

    dump_byte_array(mfrc522.uid.uidByte, mfrc522.uid.size);
    Serial.println(read_rfid);
    if (read_rfid==ok_rfid_1) {
      //ok, open the door.
      open_lock();
    }

    Serial.println(read_rfid);
    if (read_rfid==ok_rfid_2) {
      //ok, open the door.
      close_lock2();
    }
    //Add below as many "keys" as you want
    //if (read_rfid==ok_rfid_2) {
      //also ok, open the door
    //  open_lock();
    //}
    // else not needed. Anything else is not ok, and will not open the door...
}

MFRC522 Library

Credits

HeathenHacks
24 projects • 57 followers
I don't know what I'm doing here.

Comments