

Hardware components | ||||||
_ztBMuBhMHo.jpg?auto=compress%2Cformat&w=48&h=48&fit=fill&bg=ffffff) |
| × | 1 | |||
| × | 1 | ||||
 |
| × | 1 | |||
 |
| × | 1 | |||
Software apps and online services | ||||||
| ||||||
I want to show you a simple life hack: porting your favorite JavaScript game to your Arduino board by using PHPoC shield. Just a few steps, and you can enjoy any games on your board.
There are lots of JavaScript games available on the Internet, open and free for you to download. And you know what? Since PHPoC shield for Arduino can let your IoT board become embedded Web server, you can host any JavaScript Web game on your IoT board. Note that if the file size is too large, you may need to store your files on an online CDN instead of uploading it to your board.
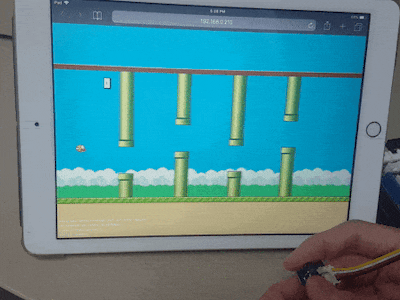
Let's have "fun" with the Floppy bird this time (Yep, struggling yourself with that annoying bird is really funny 😁).
Basically, I found an open-source JavaScript code for Floppy bird. The remaining job is quite easy. Since the size of the code is not too large (< 250 KB), I can upload them to PHPoC shield. A little bit modification needed here, I add an event listener on JS code so that the game can be processed upon receiving WebSocket data from the server.
On Arduino side, I just make it send data to WebSocket client if a button is pressed. That's how I made a game console for this game. If you continue reading this post, you can see more detail in the latter part 😁
And actually you can choose any hardware component. For example, a touch sensor may be valid for this game. And for another game? It's totally up to you. Overall, the hardware part for game console won't be hard for you.
DemoWiring- Stack PHPoC shield on Arduino.
- Connect pin GND, VCC, and SIG of button to GND, 5V and D2 of Arduino, respectively. Or even easier, I just used Grove board for Arduino.
Arduino ---> PHPoC Shield ---> Web browser
User interacts with a button. The input state of the button is used to control the bird.
Arduino with PHPoC shield act as a WebSocket server, and the browser is a client.
I just use a simple button as a game console. Just a basic digital IO stuff, if the button is pressed, Arduino will send the signal to PHPoC shield.
When receiving the value, PHPoC Shield sends it to Web browser via WebSocket. I modified JS source code to make the game updated upon having incoming WS data from the server (means button pressed).
Things To Do- Set up WiFi connection for PHPoC shield (SSID and password)
- Upload new UI to PHPoC shield
- Upload Arduino code
Set up WiFi connection for PHPoC Shield
Upload new Web User Interface to PHPoC Shield
- Download PHPoC source code
floppy_bird.php. - Upload it to PHPoC shield using PHPoC Debugger according to this instruction.
Upload Arduino Code
- Install PHPoC Library for Arduino ( see instruction)
- Upload Arduino code to Arduino
- Click serial button on Arduino IDE to get the IP address.
- Open web browser, type
http://relace_ip_address_here/floppy_bird.php - Use the button to start and enjoy the game. You can also use touch or keyboard, mouse in this game, since they are originally supported.
You can download the full source code (POC file) for PHPoC shield here.
Cheers 😎


Comments